10 Kitchen Organization Hacks That Make Cooking Faster and Easier (no Fuss, All Wins)
If your kitchen feels like a scavenger hunt every time you cook, it’s not you—it’s the setup. The good news? A few smart tweaks can make your space work harder for you. These 10 kitchen organization hacks are simple, stylish, and actually doable—no contractor needed. Ready to shave minutes off dinner and make weekday meals feel like a breeze?
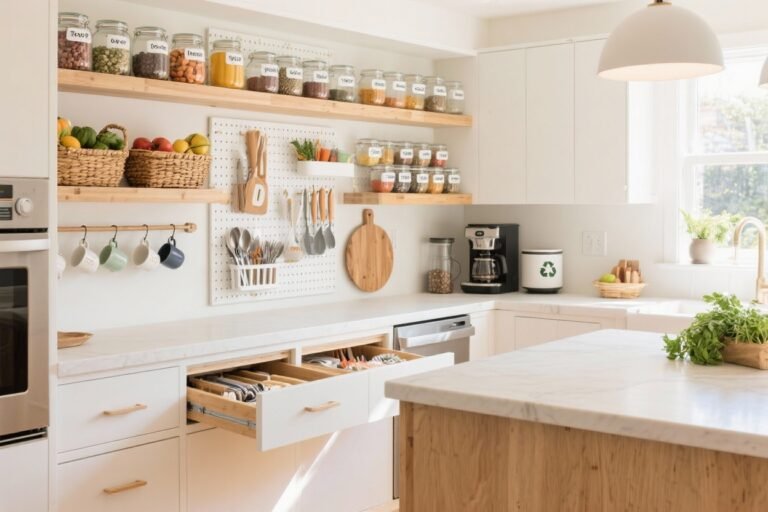
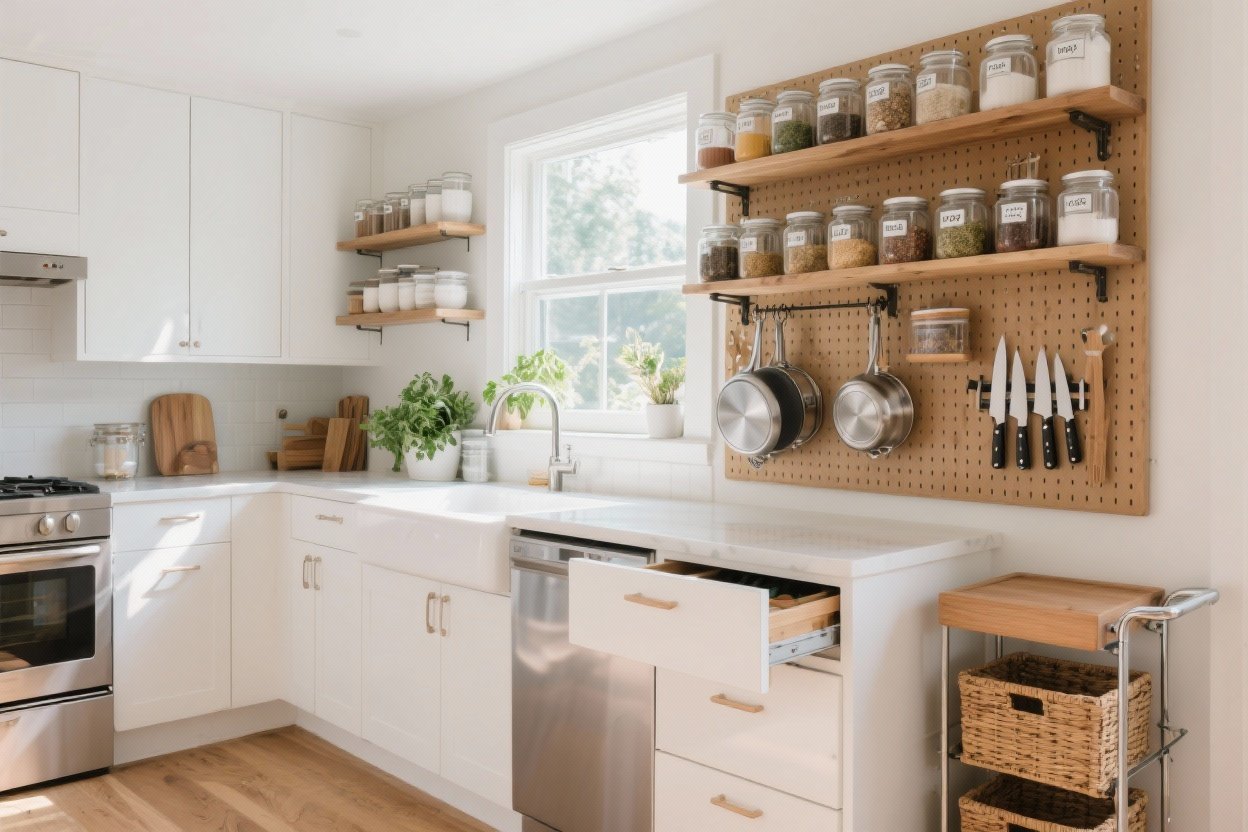
1. Create a “Golden Zone” You Can Cook From Blindfolded
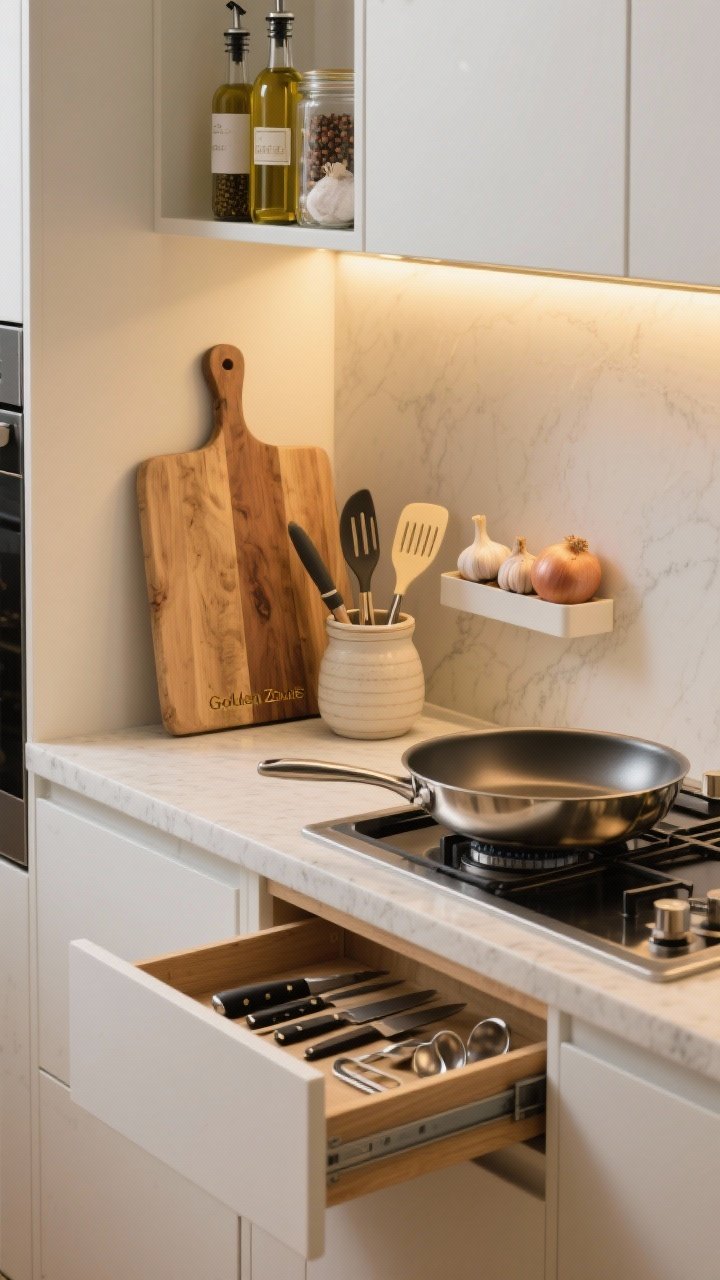
Let’s start with the heart of your kitchen: the spot you prep 90% of your meals. Set up a Golden Zone—one drawer, one cabinet, and one counter section that hold your most-used tools together.
Tired of snacking when you’re not even hungry? This reset helps you stop the loop and feel back in control.
A simple reset for moments when cravings take over. Easy to use, easy to repeat, and designed to help you feel satisfied instead of stuck.
- Drawer: Knives, measuring spoons, peeler, tongs, spatula.
- Cabinet: Everyday oils, vinegar, salt, pepper, garlic, onions.
- Counter: Cutting board, utensil crock, your go-to pan on the stovetop.
Think of it like a cooking cockpit. Everything within one step, no digging around. FYI, this one change alone can speed you up more than any fancy gadget.
2. Zone Your Kitchen Like a Grocery Store (But Cuter)
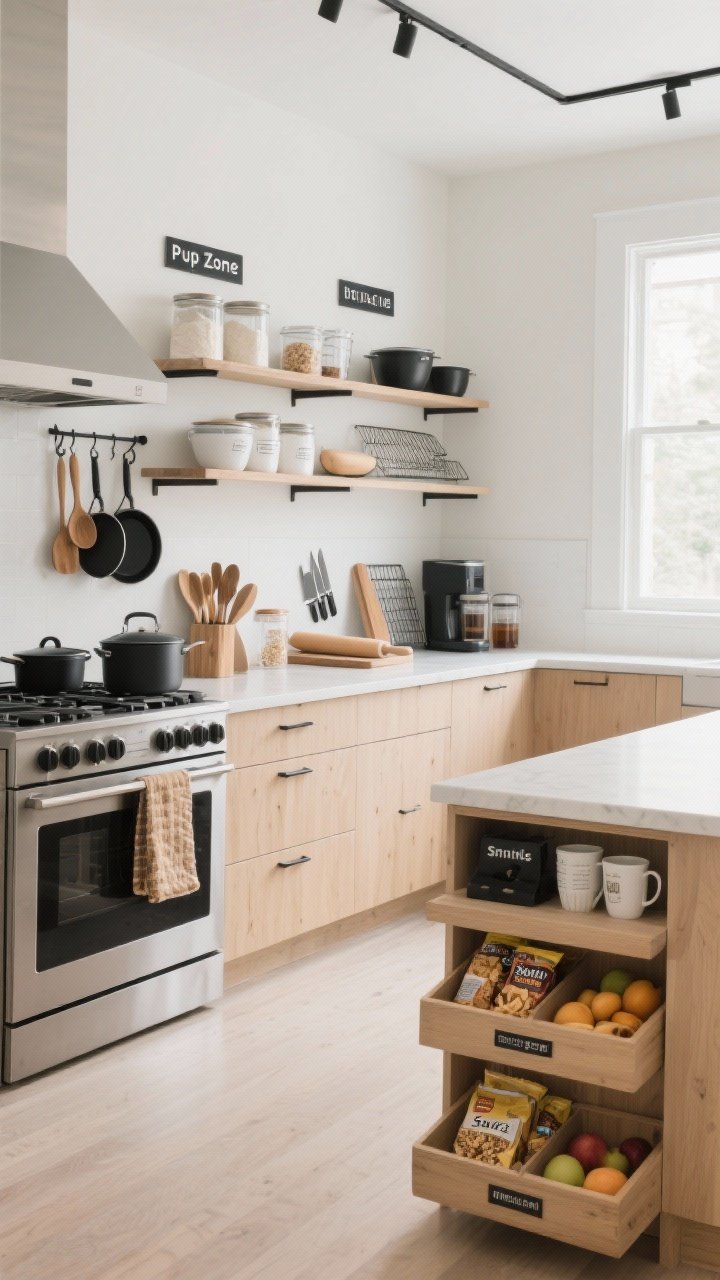
Grocery stores aren’t random—they’re zoned for flow. Do the same at home so your brain knows where to go without thinking. Set up clear zones and keep items loyal to their turf.
Try these zones:
- Prep Zone: Cutting boards, knives, mixing bowls, measuring cups.
- Cooking Zone: Pots, pans, wooden spoons, spatulas, oven mitts.
- Baking Zone: Flour, sugar, rolling pin, sheet pans, cooling rack.
- Drink Station: Mugs, tea, coffee, filters, sweeteners.
- Snack Zone: Granola bars, chips, fruit—kid-friendly and grab-ready.
Label shelves or bins so the whole household sticks to the system. It’s not bossy—it’s efficient.
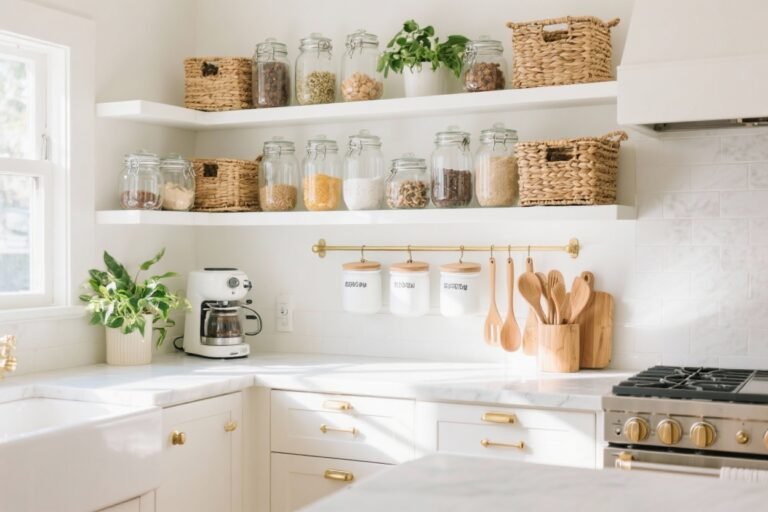
3. Decant Like You Mean It (But Only the Workhorses)
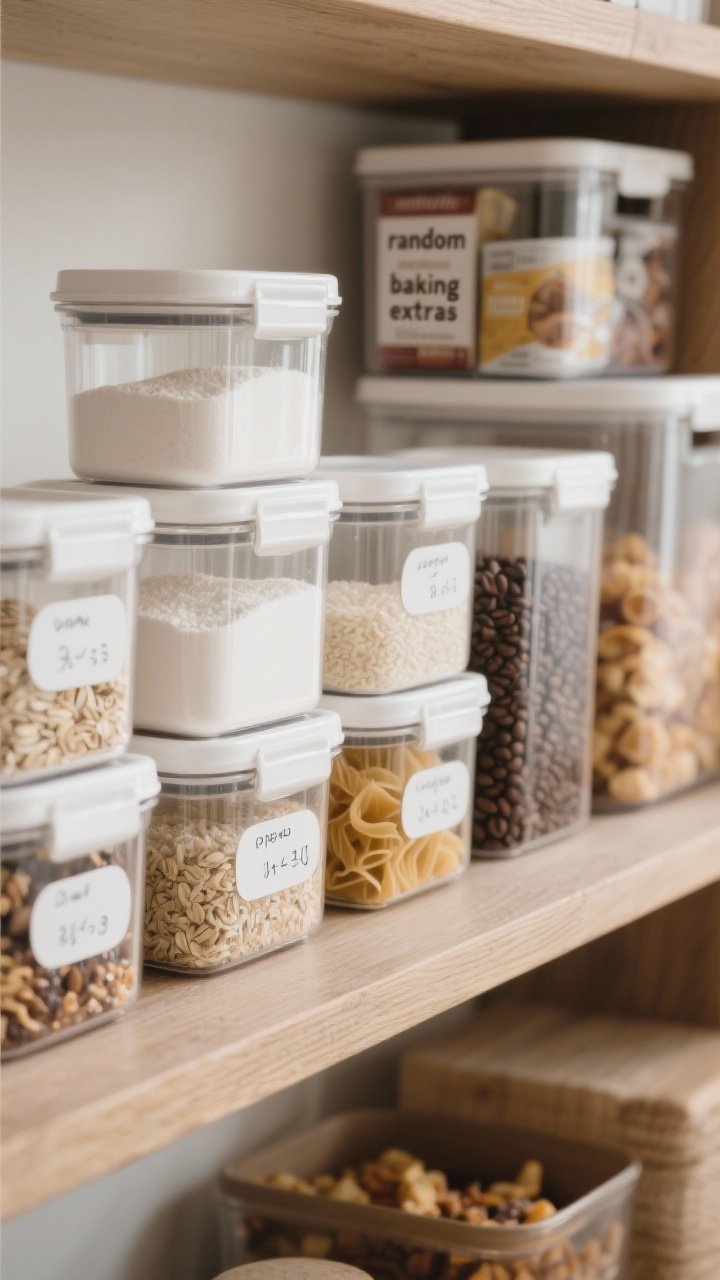
Decanting isn’t just for Instagram. It keeps ingredients fresh, visible, and easy to scoop—especially the ones you use daily. But don’t decant everything. That’s chaos.
Transform Your Home With 7,250+ Stunning Landscaping Designs—No Expensive Designers Needed!
- 🌿 Access 7,250+ stunning landscaping designs.
- 💰 Save thousands—no pro designer needed.
- 🏡 Plans for gardens, patios, walkways, and more.
- ✨ Simple, beginner-friendly DIY layouts.
- 🛠️ Customize any design to fit your yard.
- Must-decant: Flour, sugar, rice, oats, pasta, coffee, snacks.
- Skip: Random baking extras you use twice a year. Keep those in their original bags in a labeled bin.
Pick clear, stackable containers with airtight lids and label them with the item and the date you opened it. Bonus: pour instructions or ratios on the back of the label (IMO, future you will applaud).
4. Install a Spice Situation You’ll Actually Use
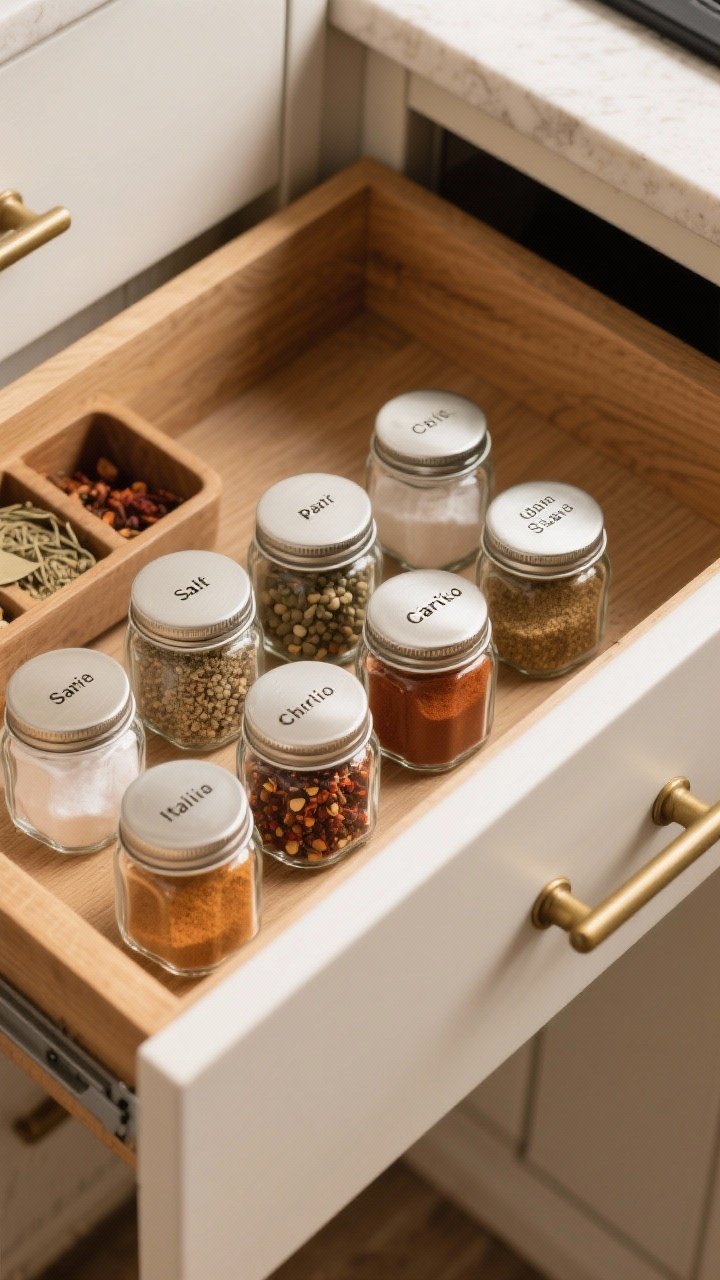
Spices are tiny but mighty—also usually a hot mess. Streamline them so you can find the cumin in 0.5 seconds. Two paths that always work:
- Drawer insert + uniform jars: Label the tops for a clean, glanceable lineup.
- Risers in a cabinet: Tiered shelves so nothing hides in the back.
Keep only the greatest hits near the stove—salt, pepper, chili flakes, garlic powder, paprika, Italian blend. Move unloved extras to a secondary spot. And check dates; old spices taste like dust, because they basically are.
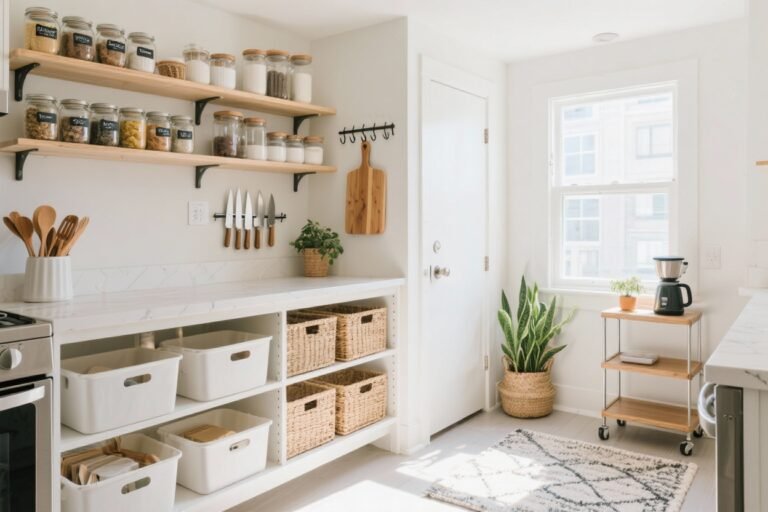
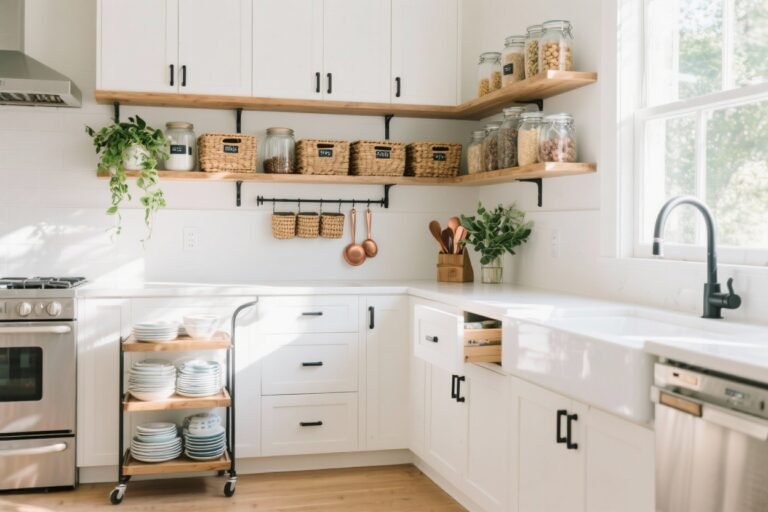
5. Use Vertical Space Like a Storage Ninja
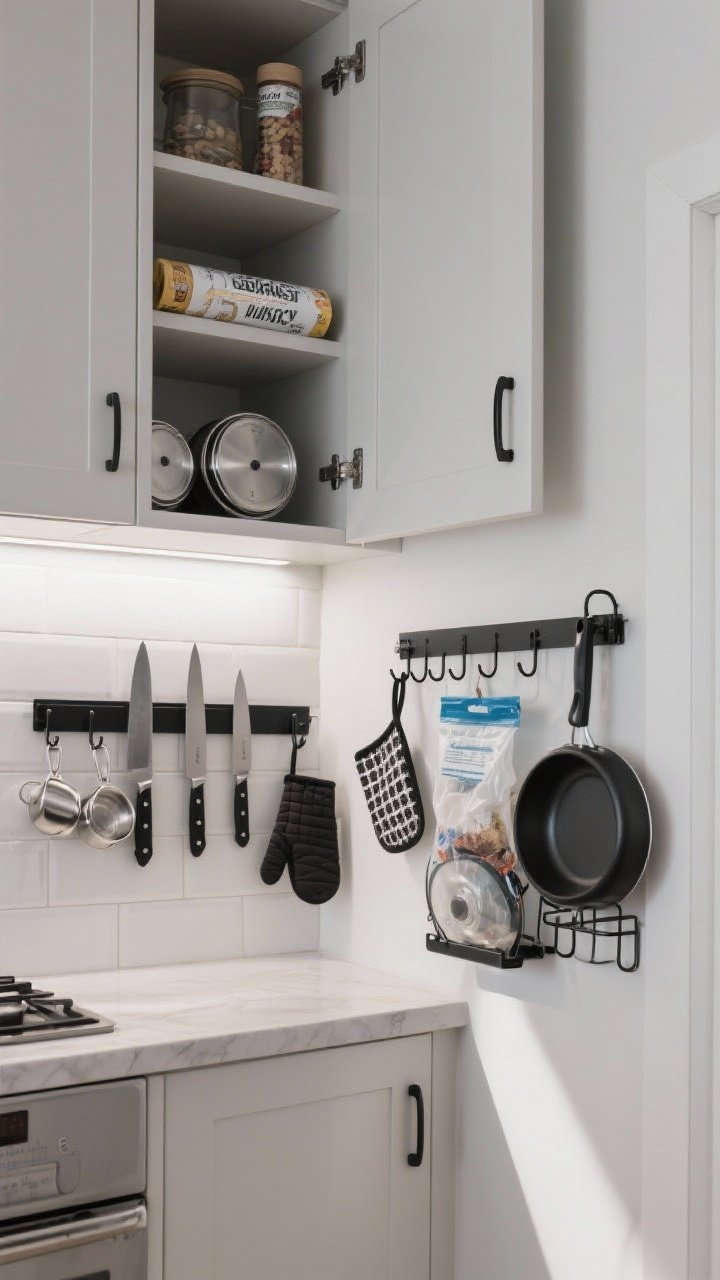
Your walls and cabinet doors are prime real estate. Use them. Go vertical to free up drawers and make essentials feel “reach and go.”
- Adhesive hooks: Hang measuring cups, oven mitts, potholders inside cabinet doors.
- Magnetic strip: Store knives or metal lids on the wall—looks chef-y and saves counter space.
- Over-the-door racks: Great for wraps, foils, and zip bags in the pantry.
- Pan lid racks: Mount a rack on a door to tame lid chaos.
Keep it cohesive with matching hardware finishes. Function first, but make it pretty—you’ll use it more.

6. File, Don’t Stack: Rethink Drawers and Cabinets

Stacks are annoying. You need the bottom pan, and suddenly you’re playing kitchen Jenga. Fix it with a simple switch: file things vertically.
- Sheet pans and cutting boards: Use a divider rack to file them like books.
- Food storage lids: Corral in a small bin; stack containers by size.
- Plastic wrap and foil: Use a drawer organizer or a wall-mounted dispenser.
Vertical storage means you can grab the exact piece without a mini avalanche. Your sanity will thank you.
Smart Inserts Worth It
- Expandable drawer dividers: Turn chaos into tidy lanes.
- Lazy Susans: Perfect for oils, sauces, and corner cabinets.
- Pull-out shelves: Especially for deep, dark lower cabinets. No more crouching.
7. Build a “Meal Prepped” Fridge That Tells You What to Eat
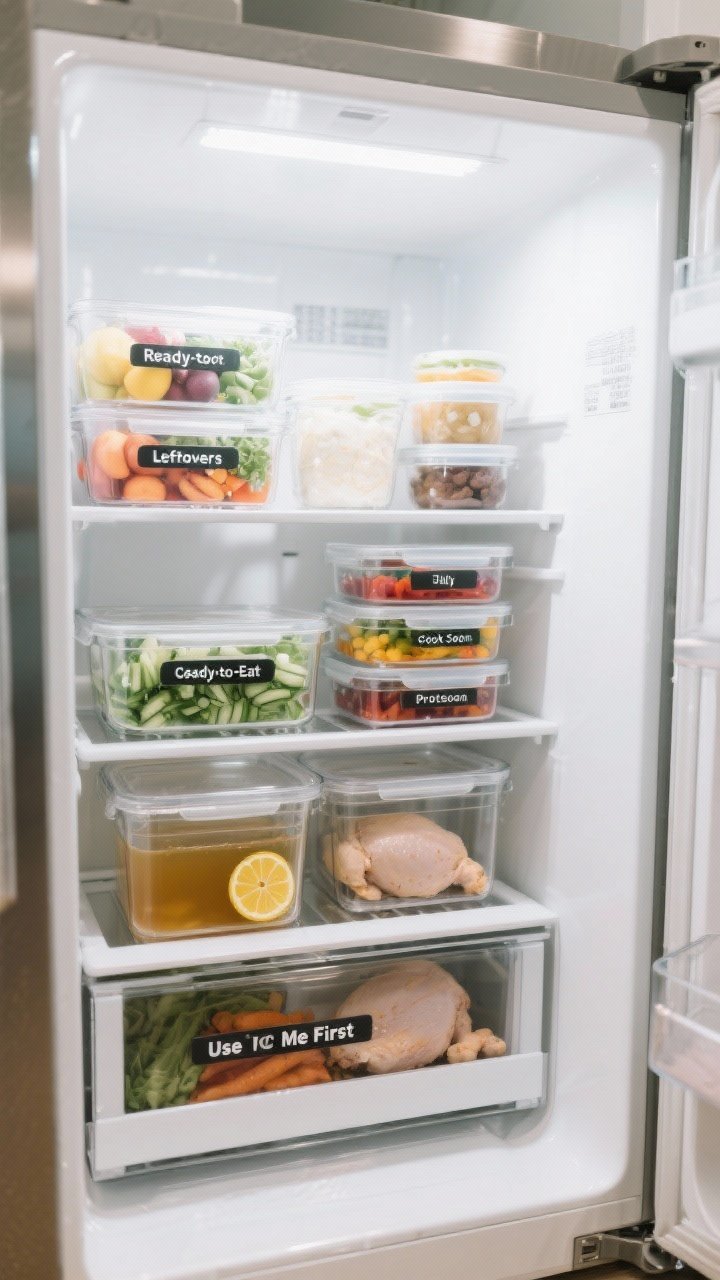
When your fridge is organized, cooking decisions get simple. Set it up so what’s ready and what’s expiring is front and center.
- Use clear bins: One for ready-to-eat (washed fruit, chopped veggies), one for “cook soon.”
- Label shelves: Leftovers, dairy, sauces, proteins—everyone in the house is now on the same page.
- Stackable glass containers: You’re more likely to use what you can see.
- First In, First Out (FIFO): New groceries go behind older ones. Restaurants do this for a reason.
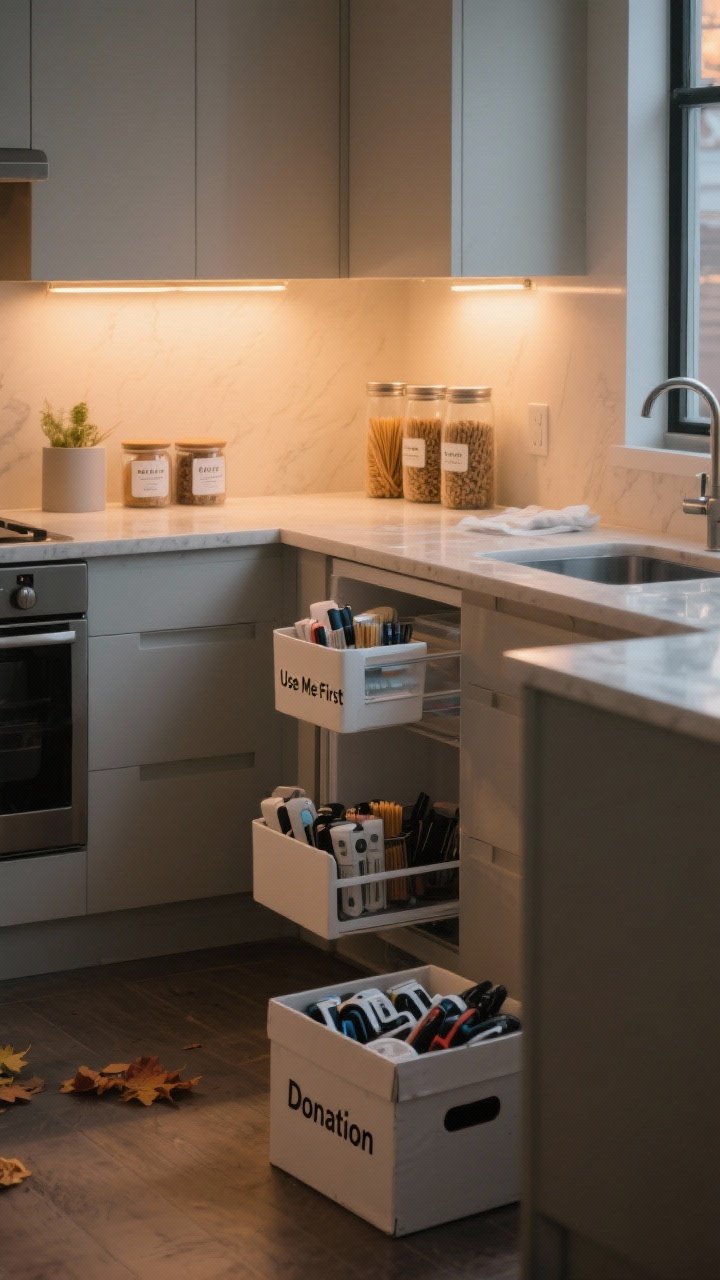
Keep a small “Use Me First” bin for half lemons, open broth, or last night’s chicken. It’s basically a weekly dinner plan in disguise.
8. Make a Mini “Heat-and-Eat” Station
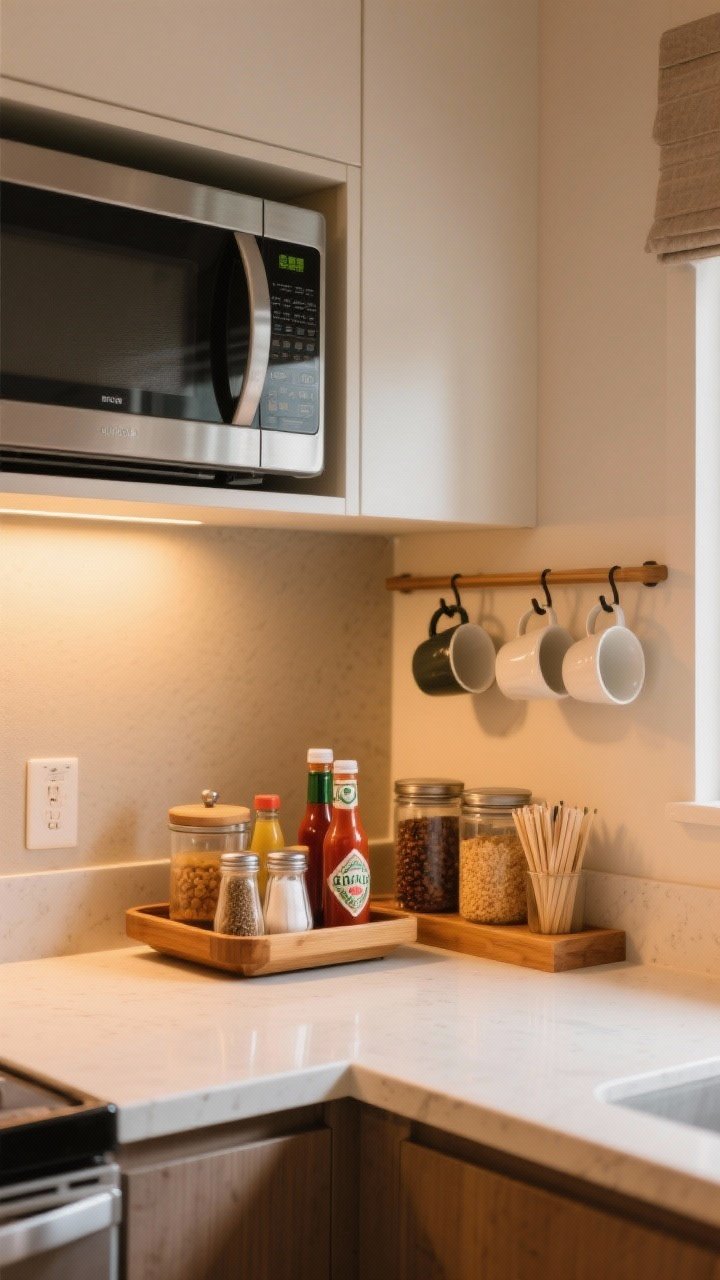
Microwave meals, quick lunches, and tea breaks shouldn’t hijack your whole counter. Create a compact station for all the bits that clutter up the rest of your space.
- Tray or turntable: Holds salt, pepper, hot sauce, and daily condiments.
- Mug shelf + hooks: Mugs, tea, coffee, sweeteners, stirrers all in one cozy corner.
- Microwave drawer or shelf: If you can, free counter space by giving it a dedicated home.
Contain it visually with a pretty tray or riser. Suddenly your kitchen looks styled, not crowded.
9. Prep Bins for Weeknight Wins
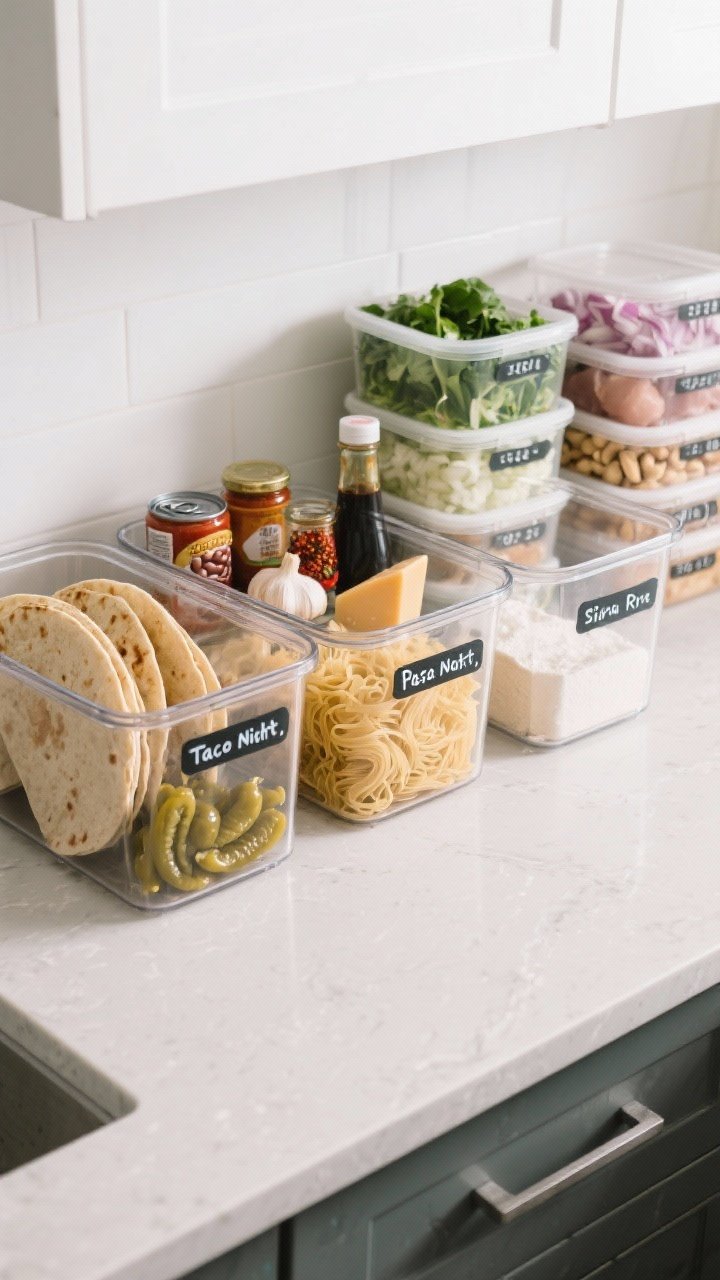
Do future you a solid and prep the boring stuff once. Keep prep bins ready in the fridge or pantry so cooking becomes assembly instead of a full production.
Bin Ideas That Actually Save Time
- Taco Night Bin: Tortillas, seasoning, salsa, canned beans, pickled jalapeños.
- Pasta Night Bin: Dried pasta, garlic, jarred sauce, chili flakes, parm wedge.
- Stir-Fry Bin: Rice noodles, soy sauce, sesame oil, cornstarch, cashews.
On Sundays, wash greens, chop onions, and portion proteins. Store prepped ingredients in stackable containers labeled by meal. You’ll shave off 15–20 minutes on busy nights—easily.
10. Style Meets Function: Curate What Lives on Your Counter

Clutter kills speed. Keep counters intentionally minimal—only what earns its spot gets to stay. The rest? Drawer or cabinet life.
- Daily-use appliances only: Coffee maker, toaster, maybe a blender if it’s daily. Everything else is a guest star, not a regular.
- Elevate the essentials: Uniform oil and vinegar bottles, a salt cellar, and a handsome utensil crock.
- Pretty + practical trays: Corrals loose items so surfaces look styled, not scattered.
Less visual noise = faster decisions. Plus, your kitchen now looks like a magazine in the best way possible.
Quick Maintenance Rituals (So It Stays Organized)
- Two-minute reset: Every night, clear counters, wipe surfaces, reload the “Use Me First” bin.
- Five-minute Friday: Toss expired items, refill decanted staples, tighten labels.
- Seasonal edit: Donate duplicate gadgets and retire what you never use. Be ruthless—kindly.
Conclusion
You don’t need a bigger kitchen—you need a smarter one. With zones, vertical storage, a solid spice setup, and a few well-placed bins, cooking gets faster, cleanup gets easier, and your counters stay cute. Start with one hack, feel the win, then stack the rest. Your future weeknights (and your sanity) will be very, very grateful. FYI: you’ve got this.