10 Kitchen Island Ideas for Awkward or Narrow Layouts That Actually Work
You don’t need a ballroom-sized kitchen to rock an island. You just need smart design, a sprinkle of creativity, and zero fear of breaking a few “rules.” If your space is awkward, narrow, or both (love that for us), here are ten kitchen island ideas that punch way above their footprint—and look amazing doing it.
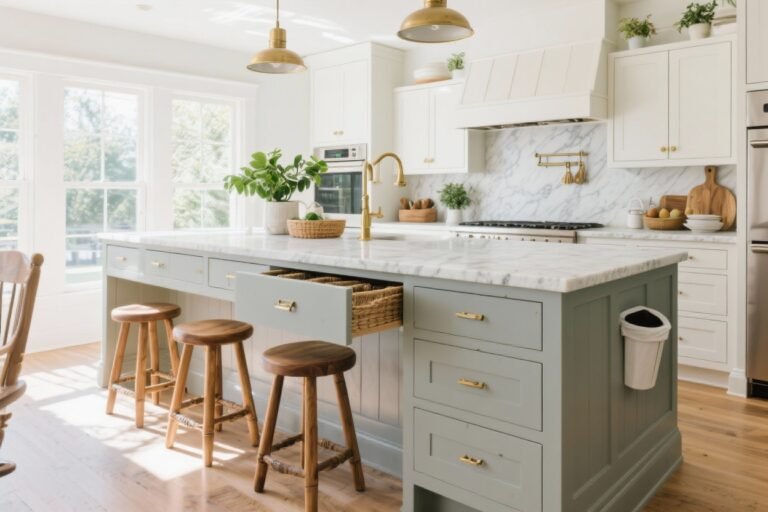
1. The Skinny-but-Strong Slab
Think of this as the runway model of islands: long, lean, and surprisingly functional. A narrow slab—around 18–24 inches deep—runs parallel to your counters without hogging the walkway. It’s perfect for prep, plating, or a quick coffee perch.
Tired of snacking when you’re not even hungry? This reset helps you stop the loop and feel back in control.
A simple reset for moments when cravings take over. Easy to use, easy to repeat, and designed to help you feel satisfied instead of stuck.
Why It Works
- Minimal depth keeps circulation clear in tight kitchens.
- Continuous length gives you generous prep space without the bulk.
- Visually, a slim silhouette makes the room feel longer and lighter.
Pro Tips
- Target 36 inches of clearance on both sides if possible; 32 inches is the absolute minimum for tight layouts.
- Use waterfall ends for a sleek finish that doubles as wall protection in high-traffic zones.
- Choose a light countertop (quartz or maple) to bounce light in narrow spaces.
2. The Movable Marvel (Rolling Island)
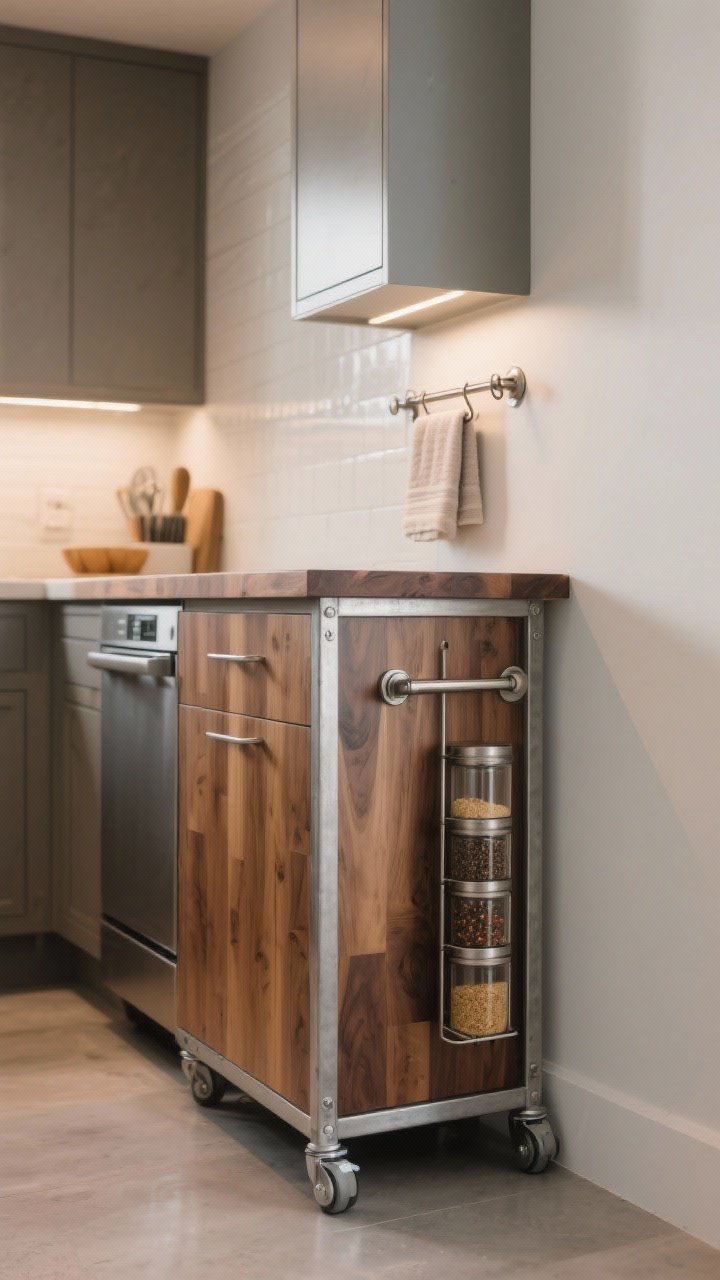
Need an island that moonlights as a bar cart, buffet, and mobile prep station? Put it on wheels. A rolling island gives you flexibility for weeknight cooking and weekend hosting—just glide it where you need it.
Why It Works
- Portable means it adapts to your traffic flow and tasks.
- You can tuck it against a wall when not in use. Zero commitment, maximum function.
- Works beautifully in rentals—FYI, no major renos required.
Pro Tips
- Look for locking casters and a sturdy frame (metal base, butcher-block top).
- Keep it no deeper than 20–24 inches in narrow rooms.
- Add hooks, a towel bar, or a narrow spice rack to optimize the sides.
3. The Foldaway Flirt (Drop-Leaf Island)

Commitment issues? Same. A drop-leaf island gives you flexible square footage that flips up for brunch and folds down for normal life. It’s the Swiss Army knife of tiny kitchens.
Why It Works
- Expandable surface only when you want it.
- Ideal for galley kitchens where a fixed overhang would block flow.
- Visually light—no heavy footprint overwhelming your layout.
Pro Tips
- Choose a sturdy leaf support (rule of thumb: leg or swing-out bracket).
- Keep the main island top 24 inches deep, with a 10–12 inch leaf to host two stools.
- Match countertop color to cabinets for a cleaner, less busy look.
4. The Slimline Storage Hero
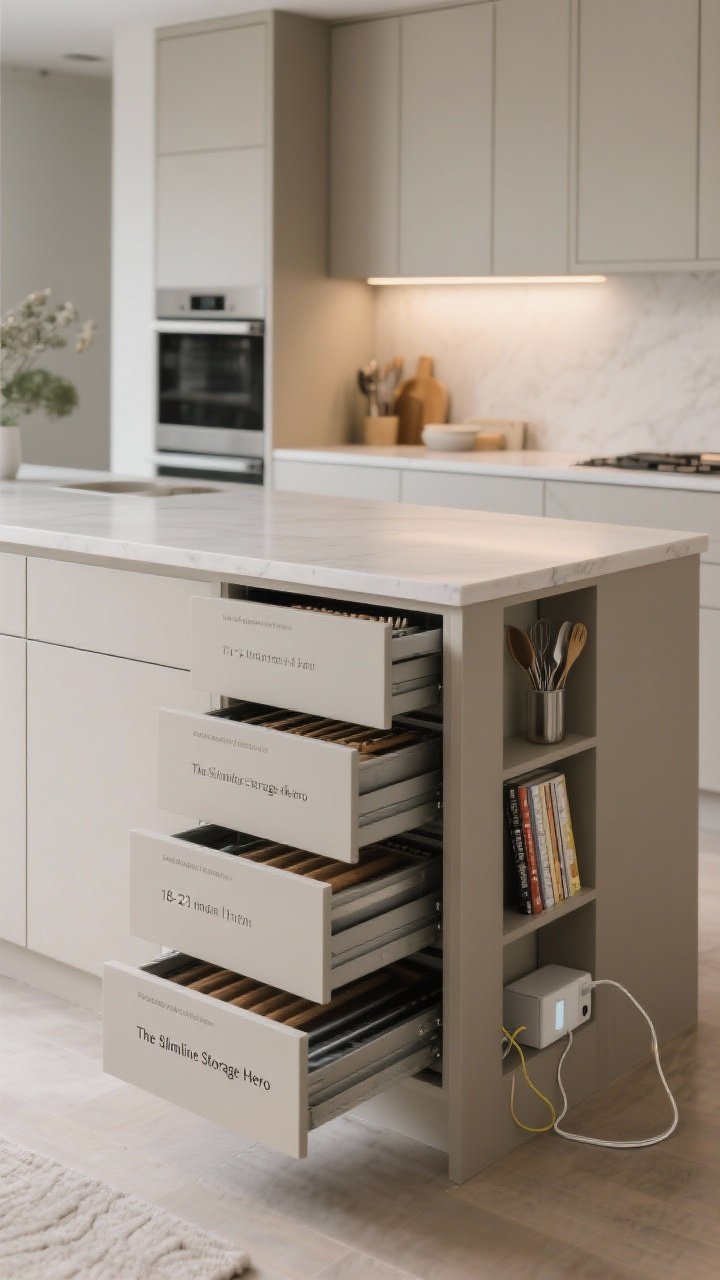
When you can’t go big, go smart. A slim island with built-in storage keeps countertops clear and your kitchen functioning like a pro. Think drawers, narrow shelves, and sneaky cubbies.
Why It Works
- Vertical efficiency: shallow drawers for utensils, a pull-out for baking sheets, and slim shelves for cookbooks.
- Max storage without beefy dimensions—perfect for awkward nooks.
- Closed fronts keep it tidy in a compact space.
Pro Tips
- Pick a base that’s 18–21 inches deep with a matching top.
- Add toe-kick drawers for bonus space (seriously underrated).
- Install a charging drawer to hide cords and devices from your precious counter real estate.
5. The Wall-Hugger Peninsula
If your room hates freestanding furniture, hug the wall. A small peninsula island attached at one end gives you a legit work zone without interrupting traffic. It’s especially great for L-shaped or small U-shaped kitchens.
Transform Your Home With 7,250+ Stunning Landscaping Designs—No Expensive Designers Needed!
- 🌿 Access 7,250+ stunning landscaping designs.
- 💰 Save thousands—no pro designer needed.
- 🏡 Plans for gardens, patios, walkways, and more.
- ✨ Simple, beginner-friendly DIY layouts.
- 🛠️ Customize any design to fit your yard.
Why It Works
- No dead space around all four sides—just one path to manage.
- Gives you workspace and seating while keeping the layout compact.
- You can integrate electrical without floor trenching (contractors everywhere rejoice).
Pro Tips
- Keep the overhang 10–12 inches for knee space (counter-height seating).
- Use a rounded or chamfered corner to soften tight walkways.
- Consider open shelving end-caps to visually lighten the piece and stash pretty bowls.

6. The Two-Tier Power Move
When space is limited, separate tasks vertically. A two-tier island gives you a higher bar for eating and a standard-height zone for meal prep—aka function without sprawl.
Why It Works
- Dual levels hide prep mess from the dining side. Bless.
- Bar height (around 42 inches) creates a visual barrier in open layouts.
- Ideal for narrow kitchens where deep counters aren’t realistic.
Pro Tips
- Keep the prep level at 36 inches high and 24 inches deep.
- Limit the bar top to 10 inches of overhang for stools without tipping risks.
- Use thin profiles (slim stone or composite) to avoid chunky edges that feel heavy.
7. The Curvy Commuter (Rounded or Capsule Island)
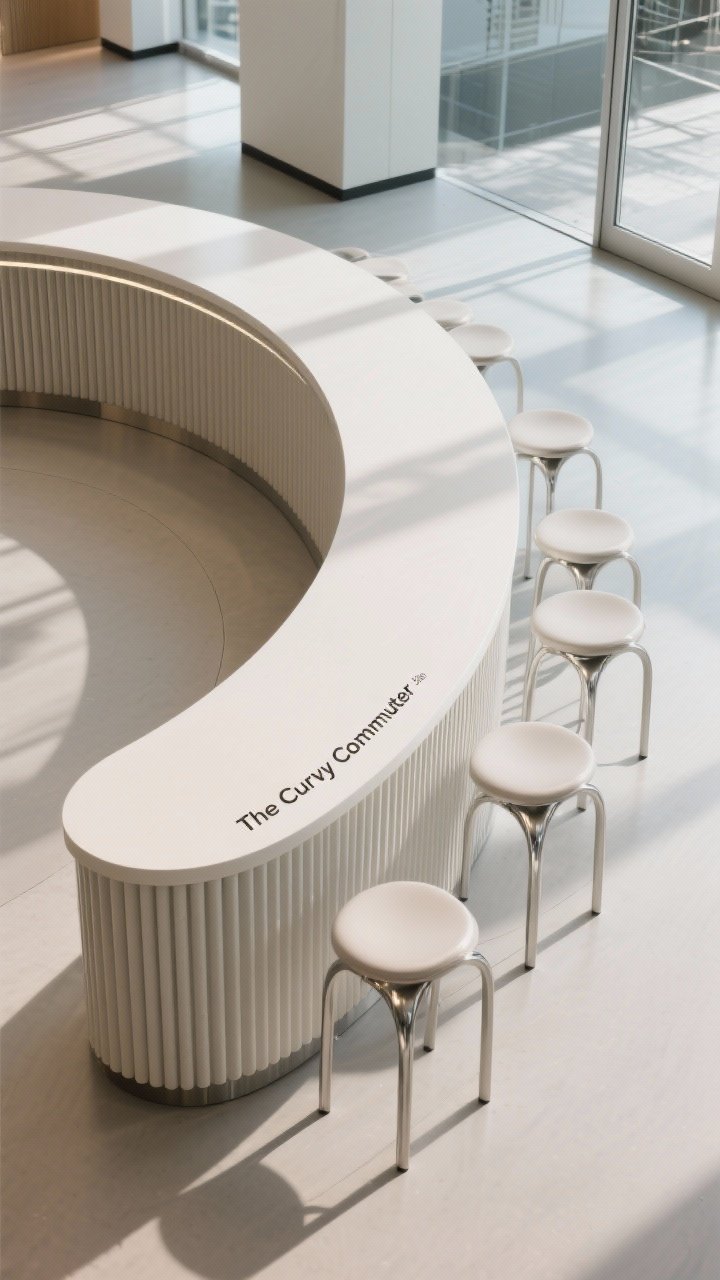
Edges are where collisions happen—so lose them. Rounded ends or a capsule shape keep traffic moving, especially in galley or pass-through kitchens.
Why It Works
- Soft corners are friendlier to hips and kids.
- Curves reduce the visual bulk, which is clutch in narrow rooms.
- Makes small islands feel custom and intentional (not “we tried”).
Pro Tips
- Try a 36–42 inch diameter if you’re going round, or a capsule 20–24 inches deep for tight spaces.
- Pair with arched stools or rounded backs for a cohesive vibe.
- Choose a ribbed or fluted base to add texture without visual clutter.
8. The See-Through Statement (Open-Frame Island)
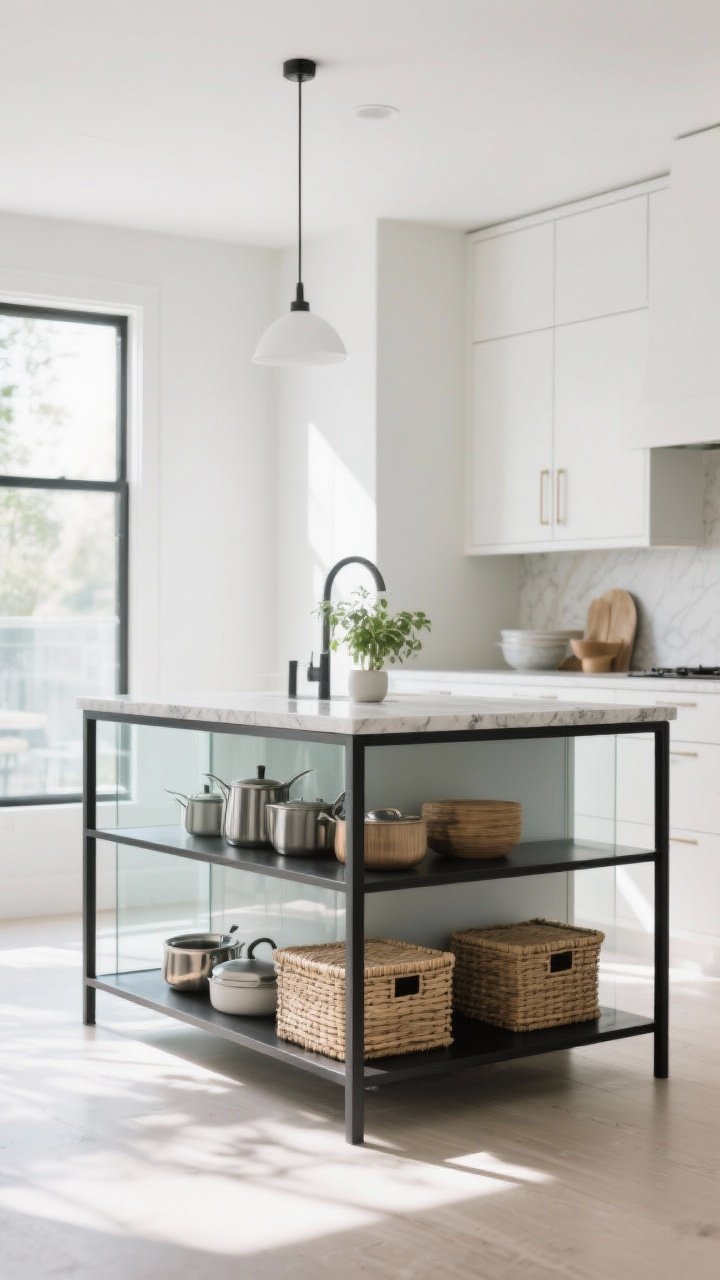
Heavy cabinetry can make small kitchens feel like a closet. An open-frame island with a slender metal or wood base and a thin top keeps sightlines open while still boosting function.
Why It Works
- Visual lightness = the room feels bigger.
- Open lower shelves are perfect for baskets or pretty cookware.
- It doubles as a styling moment—plants, cookbooks, a tray with oils—done.
Pro Tips
- Choose a powder-coated frame in matte black, cream, or brass for durability.
- Use tempered glass or thin stone on top for an airy look; butcher block adds warmth.
- Stick to 20–22 inches depth to maintain flow in narrow layouts.
9. The Appliance Ally (Micro-Workstation)
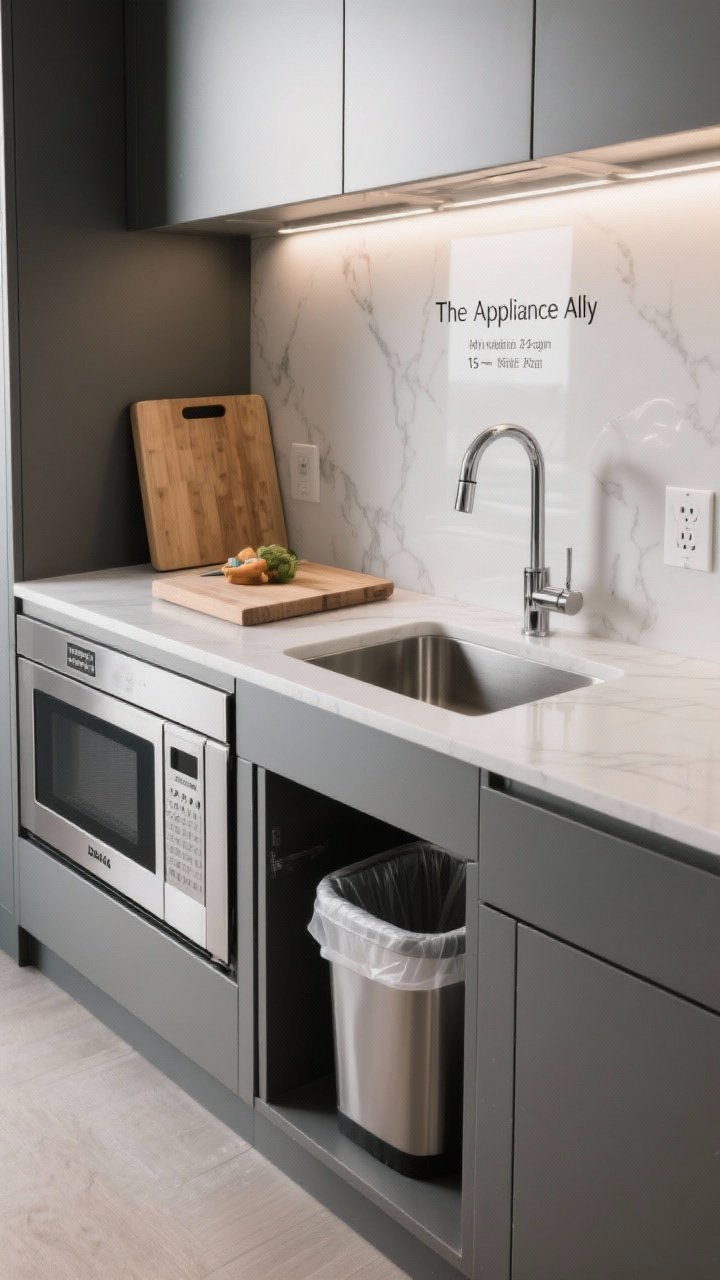
Who says an island has to be a giant slab? A micro-workstation with a prep sink, pullout trash, or a built-in microwave gives you major function in a mini footprint.
Why It Works
- Shifts key tasks off your main run so two people can work without elbow wars.
- Integrated trash + cutting board is a chef-move in tiny kitchens.
- Packs utility into a 24–30 inch wide piece—small but mighty, IMO.
Pro Tips
- Opt for a 15-inch bar/prep sink to keep the base shallow.
- Plan for GFCI outlets on the side for small appliances.
- Use a solid-surface top (quartz, Dekton) for durability and easy cleanup.
10. The Convertible Dining Buddy
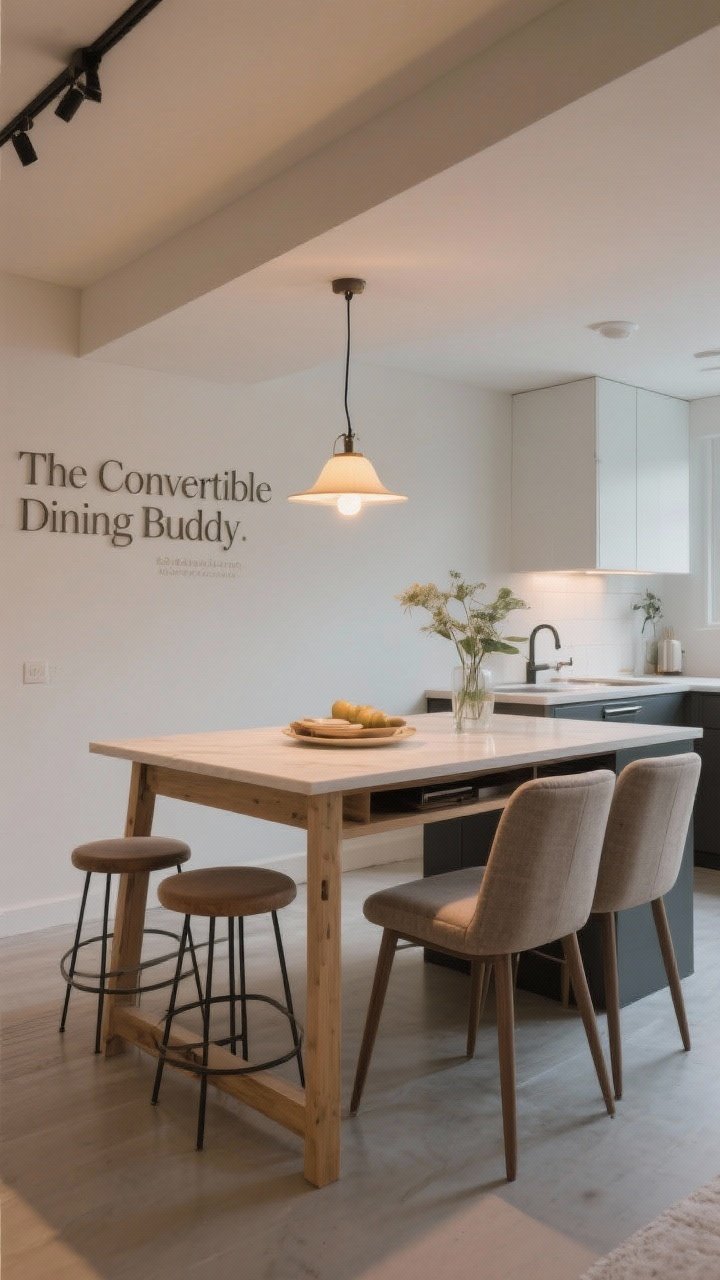
In a narrow kitchen, seating can be the deal-breaker. Solve it with an island that doubles as a dining table—slide-in stools by day, comfy chairs by night.
Why It Works
- Multi-use surface means you don’t need a separate table.
- A leggy base or trestle design keeps the piece feeling airy.
- Perfect for studio apartments and kitchen-living combos.
Pro Tips
- Keep knee clearance at 26 inches high and 18 inches deep under the overhang.
- Choose counter-height seating to match standard 36-inch counter height for easy transitions.
- Use pendant lighting on a dimmer so it vibes for dinner but still works for chopping.
How to Size Your Island (So It Doesn’t Boss You Around)
- Clearances: 36 inches is comfy; 32 inches is tight but doable; 40 inches is chef’s kiss.
- Depth: For narrow kitchens, aim for 18–24 inches. More than that, and you’ll feel squeezed.
- Length: 36–60 inches is the sweet spot for most small spaces.
- Seating: Allow 24 inches of width per stool so knees aren’t making awkward friends.
Finishes That Trick the Eye
- Monochrome magic: Match island color to cabinets for a seamless, bigger-feel look.
- Light, reflective tops: White or pale stone bounces light; matte black reads sleek but can feel heavier—balance with open bases.
- Leggy silhouettes: Furniture-style legs keep things open; closed plinths look chunkier.
- Vertical lines: Fluting or reeded panels draw the eye up—instant height.
Lighting and Power (AKA Don’t Skip These)
- Pendants: Two small or one medium pendant centered—hang at 30–36 inches above the countertop.
- Recessed or track: Add overhead general light so the island isn’t doing all the heavy lifting.
- Outlets: At least one tamper-resistant outlet on the side—perfect for mixers, laptops, or an emergency phone charge.
Materials That Love Small Spaces
- Butcher block: Warm, forgiving, budget-friendly; oil regularly.
- Quartz/composite: Durable and low maintenance—great for daily use.
- Compact laminate or porcelain slab: Thin profiles look sleek and keep things light.
- Metal frames: Powder-coated steel or aluminum for open-frame styles—slim but sturdy.
Styling That Doesn’t Clutter
- Keep the top 70% clear. One tray with essentials (salt, pepper, oil) is plenty.
- Use lidded baskets on open shelves to hide chaos and keep dust at bay.
- Add a micro runner or mat under stools for texture and comfort—just make sure it’s flat-weave to avoid trips.
Awkward or narrow kitchen layouts are basically an invitation to get creative. Pick one of these island ideas, tailor the dimensions to your space, and don’t be afraid to go slim, mobile, or curved. You’ll get more function, more style, and more moments where you say, “Wow, that actually works.” Go make your tiny kitchen feel like a big deal.