10 White Kitchen Ideas That Pair Perfectly With Wood Accents You’ll Love
You want a white kitchen that doesn’t feel like a hospital, right? Good. Because the secret to warmth, personality, and “wow” is simple: pair all that crisp white with the right wood accents. The contrast is fresh, the vibe is timeless, and the styling options are endless.
Whether you’re renovating or just swapping hardware, these ideas will help you nail that bright-and-cozy sweet spot. Let’s dig in.
Tired of snacking when you’re not even hungry? This reset helps you stop the loop and feel back in control.
A simple reset for moments when cravings take over. Easy to use, easy to repeat, and designed to help you feel satisfied instead of stuck.
1. Mix Your Wood Tones (On Purpose)
White is your blank canvas, which means you can layer multiple wood tones without chaos. Light oak adds airiness, walnut brings drama, and a honey-toned maple softens everything. When you mix a couple of tones, your kitchen instantly feels designed—not matchy-matchy.
How to Pull It Together
- Anchor piece: Choose one “hero” wood (like a walnut island) and keep other wood tones lighter.
- Repeat for cohesion: Echo that hero wood in smaller areas—stools, a cutting board, or a picture frame.
- Mind the undertones: If your whites are cool, lean toward cooler woods (ash, taupe oak). Warm whites love golden oak and cherry.
FYI: Two tones look intentional. Three can work if one is barely-there (think driftwood shelves).
2. Warm Up All-White Cabinets With Wood Hardware
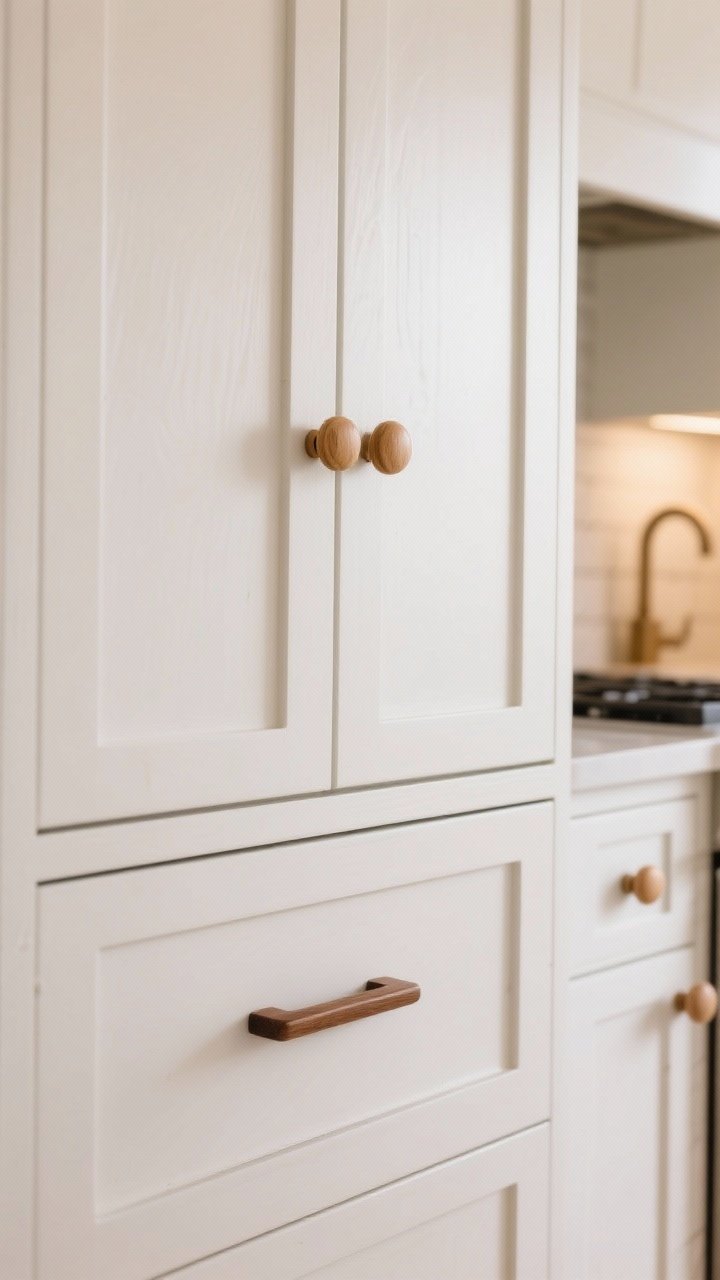
Wood knobs and pulls are the sneaky upgrade your white cabinets are begging for. They add warmth and tactile charm without a full reno. It’s like swapping sneakers for loafers—same outfit, elevated vibe.
Why It Works
- Soft contrast: Wood hardware breaks up big white surfaces in a subtle, friendly way.
- Budget win: Quick, affordable, and instantly noticeable.
- Style chameleon: Round oak knobs skew Scandinavian; slim walnut pulls feel modern.
Pro tip: Seal raw wood pulls, especially near the range or sink. Grease and water are not their friends.
Transform Your Home With 7,250+ Stunning Landscaping Designs—No Expensive Designers Needed!
- 🌿 Access 7,250+ stunning landscaping designs.
- 💰 Save thousands—no pro designer needed.
- 🏡 Plans for gardens, patios, walkways, and more.
- ✨ Simple, beginner-friendly DIY layouts.
- 🛠️ Customize any design to fit your yard.
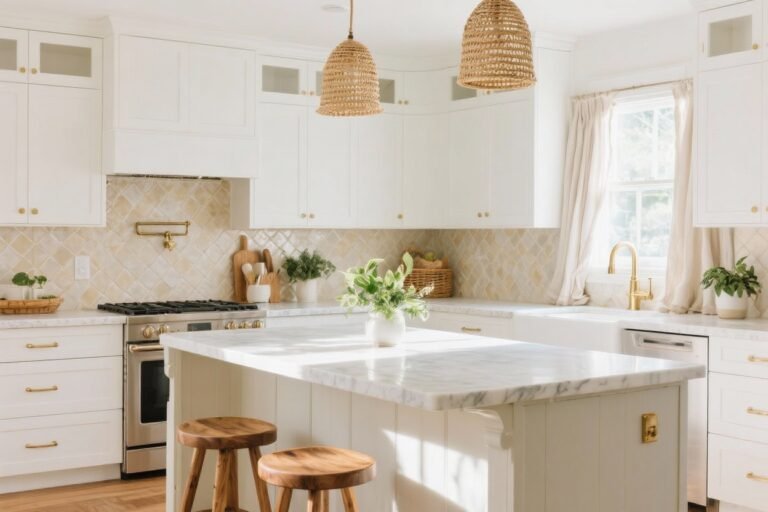
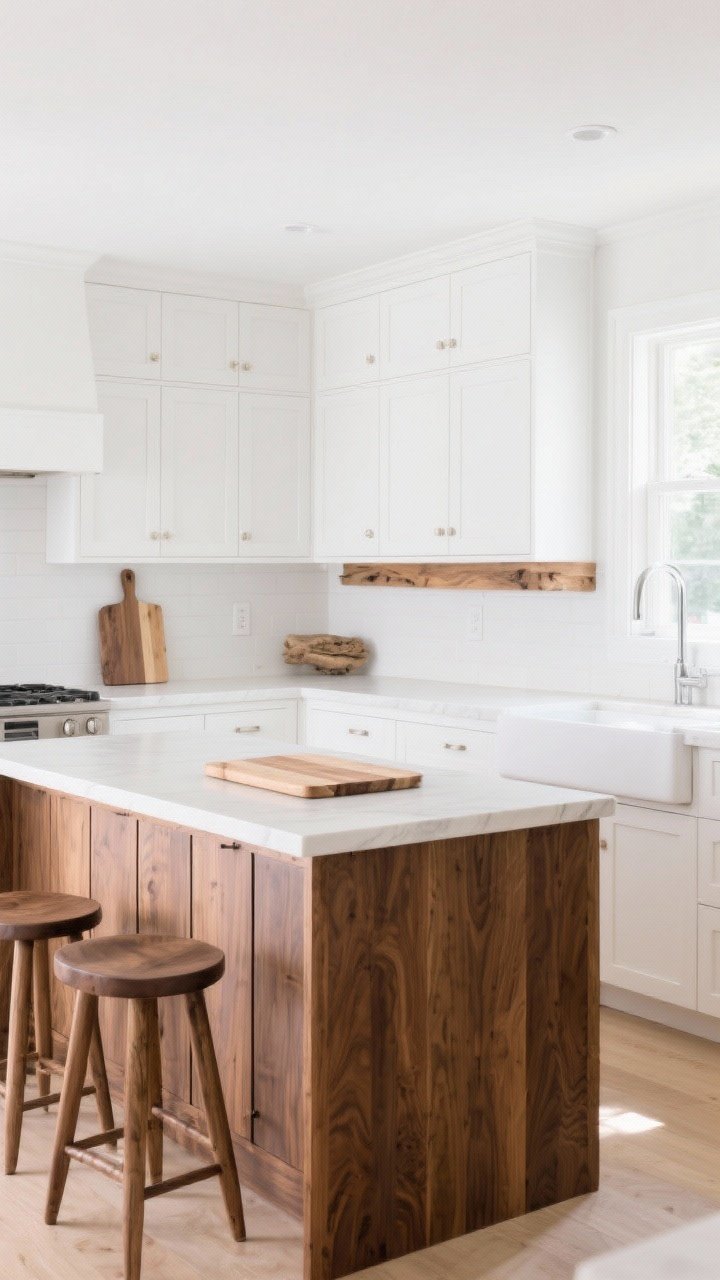
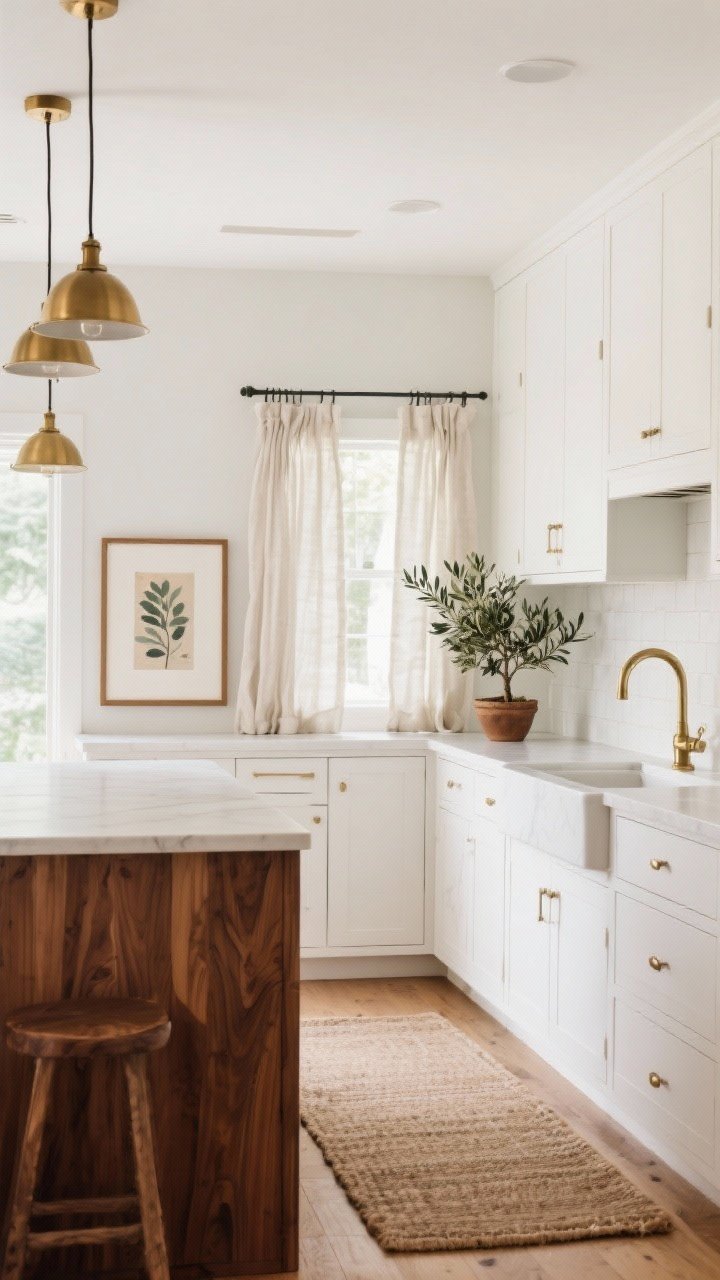
3. Go Bold With a Wood Island (Your Statement Piece)
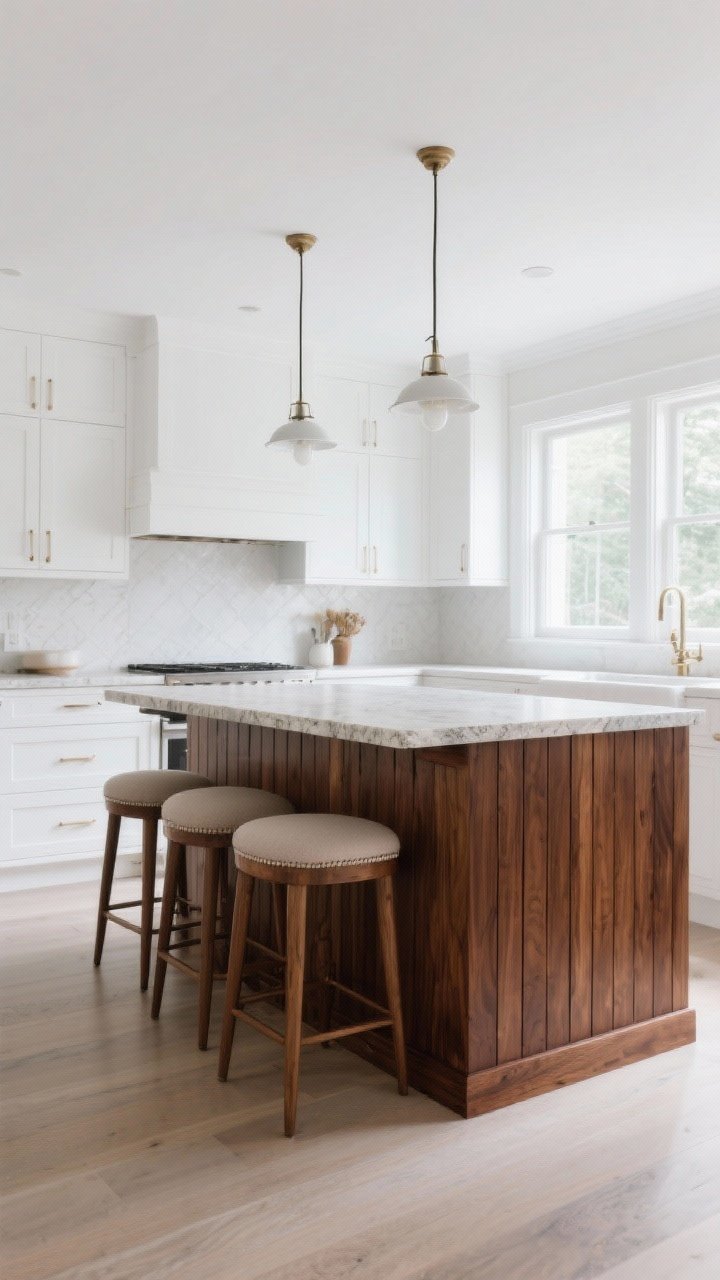
Let the island be your show-off moment. Keep wall cabinets white for brightness, then ground the space with a wood island in oak, walnut, or even rustic reclaimed planks. It gives that custom, magazine-worthy look without touching every cabinet.
Details That Make It Designer
- Contrast countertop: Pair a wood island base with a light stone top for balance.
- Paneling: Add vertical slats, beadboard, or furniture-style legs to elevate the island.
- Stool strategy: Upholstered seats soften the wood-on-wood; metal stools keep it sleek.
Bonus: A deeper island stain hides scuffs from foot traffic and eager sous-chefs.
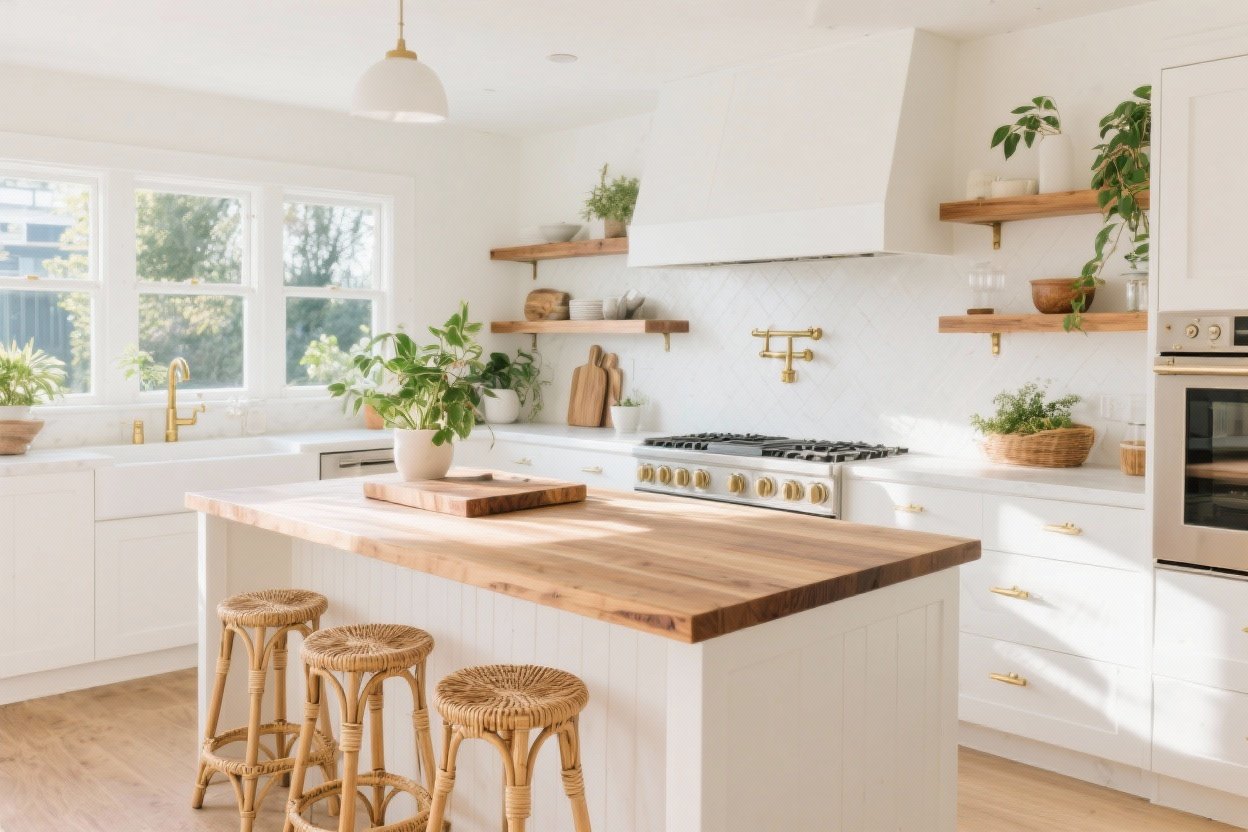
4. Swap Upper Cabinets for Wood Open Shelves
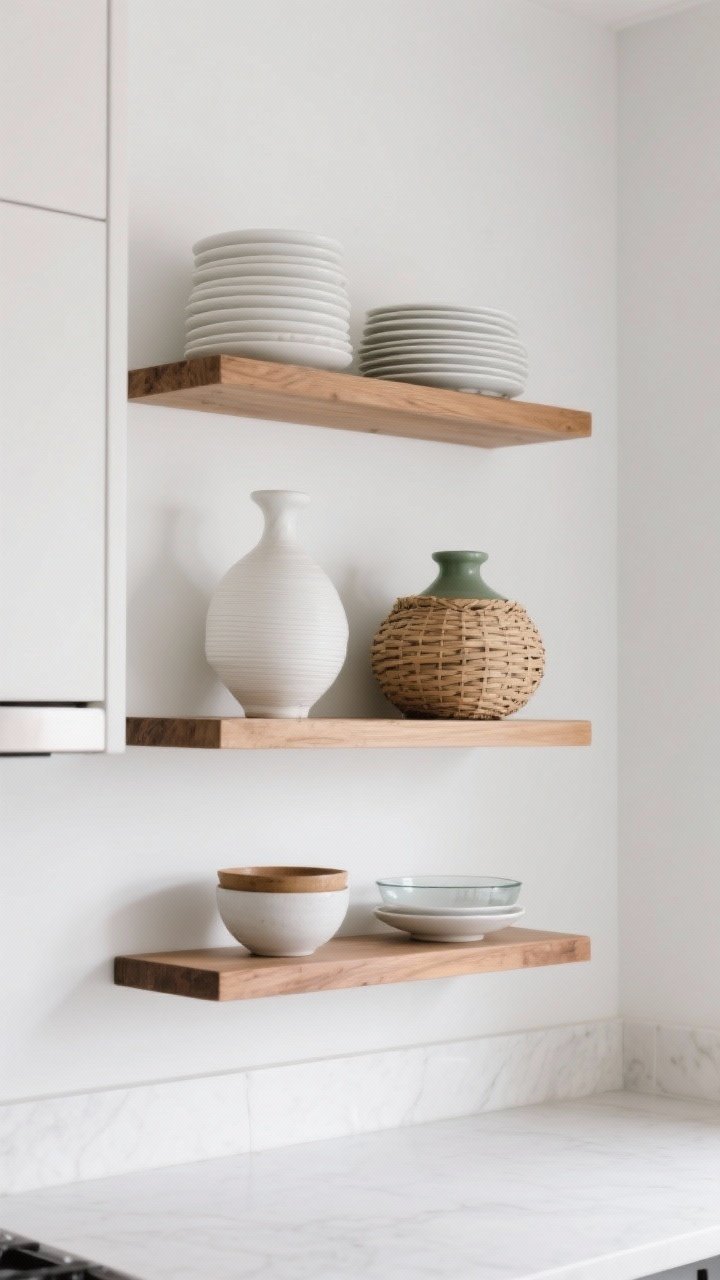
Open shelves in natural wood give a white kitchen breathing room. They show off your prettiest pieces, add texture, and make the space feel lighter and taller. Plus, they’re renter-friendly if you’re replacing a couple of uppers.
Styling That Doesn’t Look Cluttered
- Group in threes: Mix one functional stack (plates), one sculptural (vase), one textural (woven basket).
- Stick to a palette: Whites, glass, wood, and one accent color (sage, black, or blue).
- Keep daily-use items low: Fancy things up high; cereal bowls within reach.
Not into dusting? Choose floating shelves with a small lip and wipe down weekly. Or display closed canisters and call it a day.
5. Add a Wood Range Hood Mantel
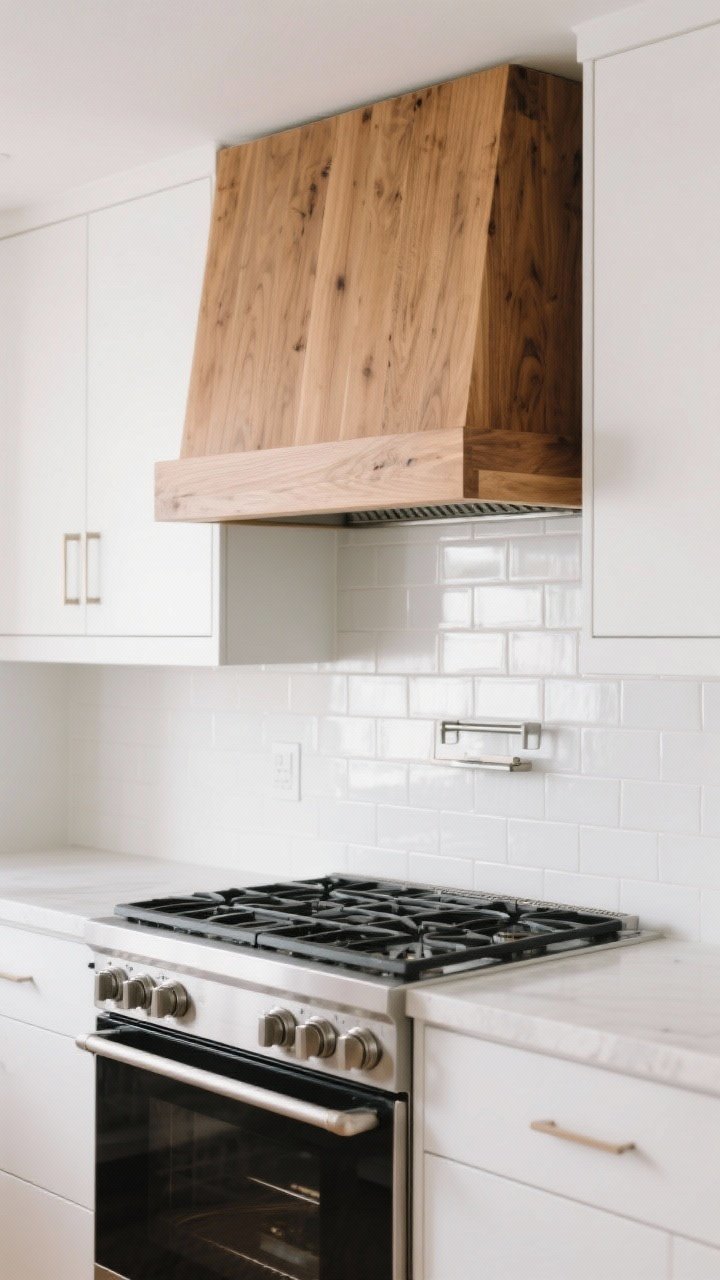
A wood-trimmed range hood or mantel bridges your white backsplash and cabinetry beautifully. It adds architecture, a focal point, and a little “chef’s kitchen” energy without the price of a pro range.
Style Options
- Boxed modern: Straight lines in oak or ash for a clean, Scandinavian look.
- Arched cottage: Soft curve + beadboard for a cozy farmhouse vibe.
- Mixed materials: White plaster hood with a wood shelf—chef’s kiss.
Just keep code in mind: ensure clearance for your stove and use heat-resistant finishes where necessary.

6. Bring in Wood Furniture (And Let It Age)
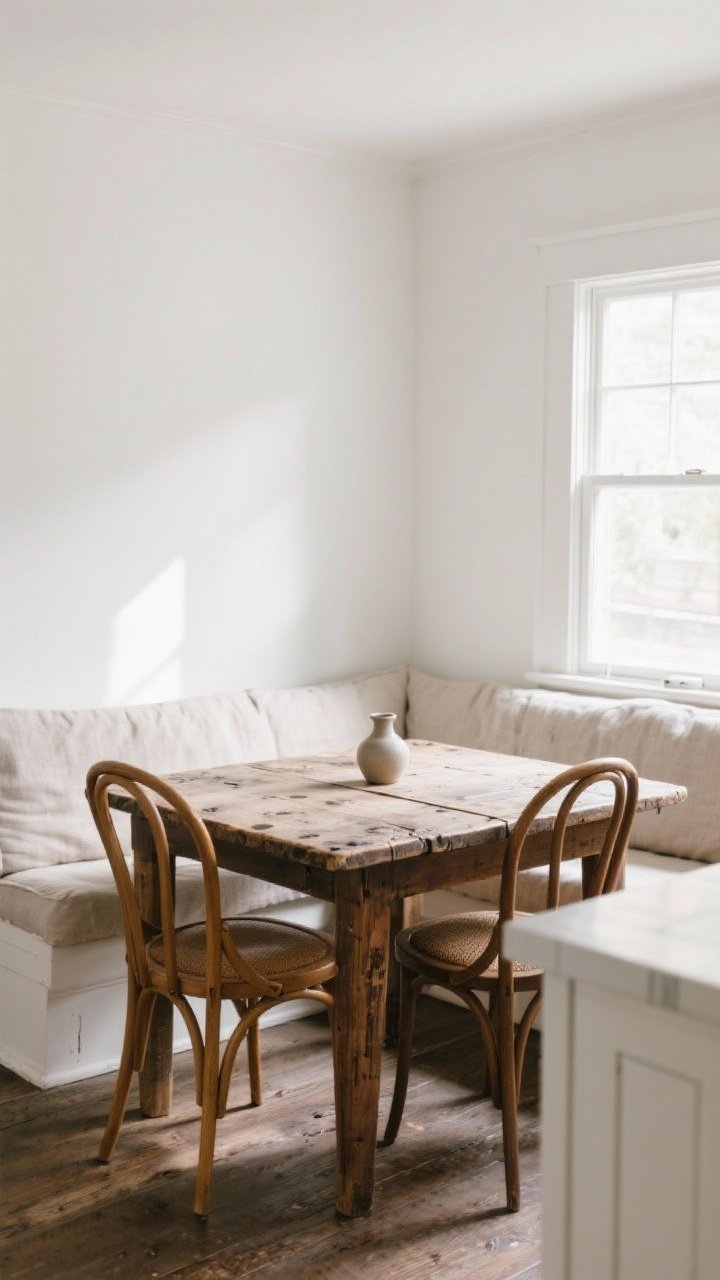
Nothing beats the soul of a wood table in a white kitchen. A farmhouse harvest table, a tulip base with a walnut top, or vintage bentwood chairs—they all warm up crisp cabinets instantly. And yes, the nicks and water rings? They tell your kitchen’s story.
Where to Start
- Breakfast nook: Round table + cushy banquette = cozy mornings.
- Slim console: A narrow wood sideboard for coffee setups or extra storage.
- Vintage chairs: Mix and match for personality (keep seat heights consistent).
Protect high-use pieces with a matte polyurethane or hardwax oil. You’ll thank yourself later.
7. Choose the Right Wood Flooring (It’s Your Foundation)
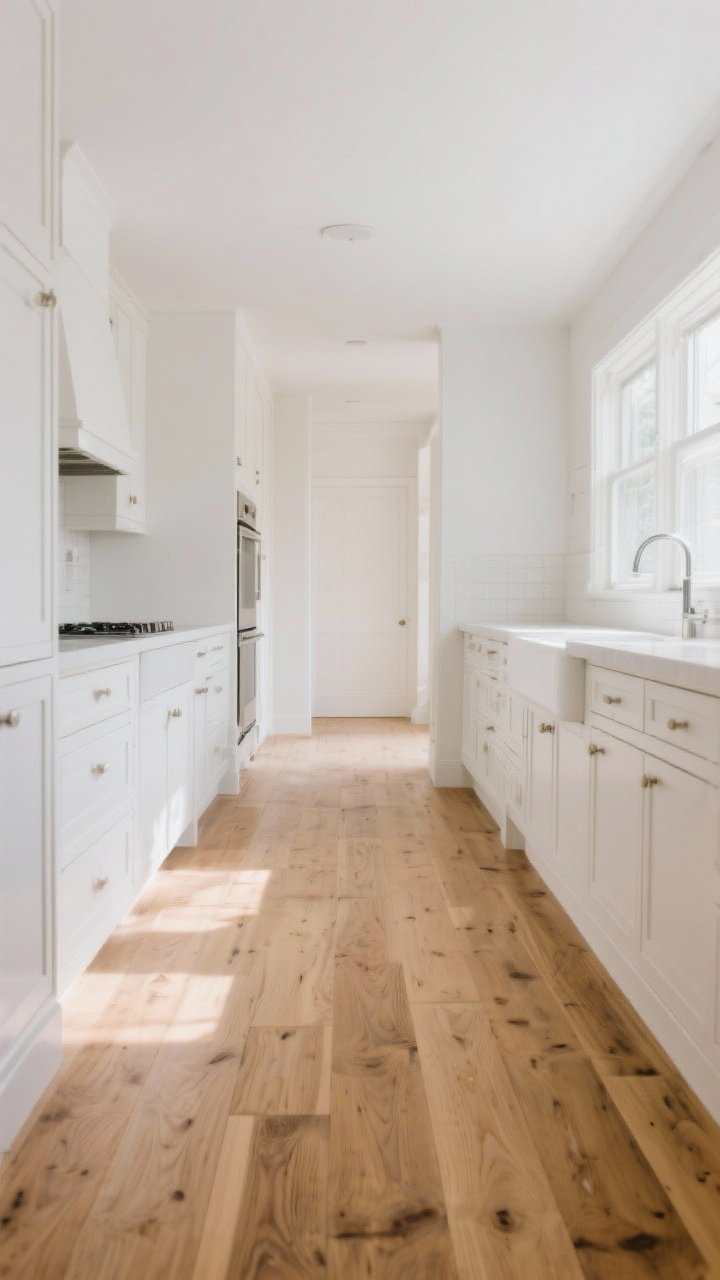
Flooring sets the mood. With white kitchens, you can lean light, mid, or dark depending on your vibe. Lighter floors feel airy and coastal; mid-toned oak is classic; deeper stains bring formality and drama.
What Works Best With White
- Light oak or whitewashed: Scandinavian brightness, minimal visual weight.
- Natural oak: The most forgiving for crumbs and daily life.
- Walnut or espresso: Major contrast—just vacuum often to keep dust from showing.
IMO, matte or satin finishes beat glossy in kitchens. They hide scratches and feel understated.
8. Layer Wood Cutting Boards and Trays as Decor
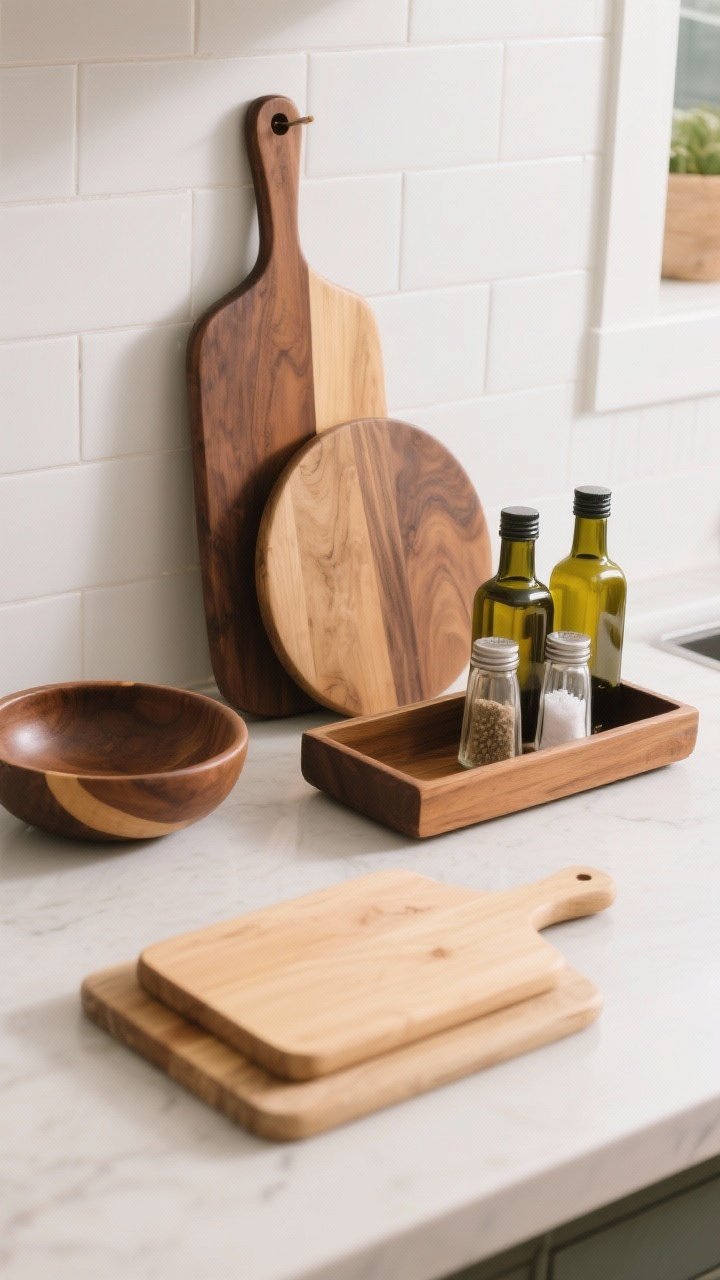
Yes, your cutting boards can be decor. Lean oversized boards against the backsplash, stack charcuterie boards in a crock, and use a wood tray to corral oil bottles and salt. It’s functional styling that feels lived-in and warm.
Quick Styling Formula
- Three heights: One tall paddle board, one medium round, one short rectangle.
- Mixed woods: Walnut + acacia + maple adds depth.
- Add a curve: A round board or bowl breaks up all those straight cabinet lines.
Reminder: Season boards with food-safe mineral oil to keep them from drying out near the stove.
9. Balance Wood With Black or Brass Accents
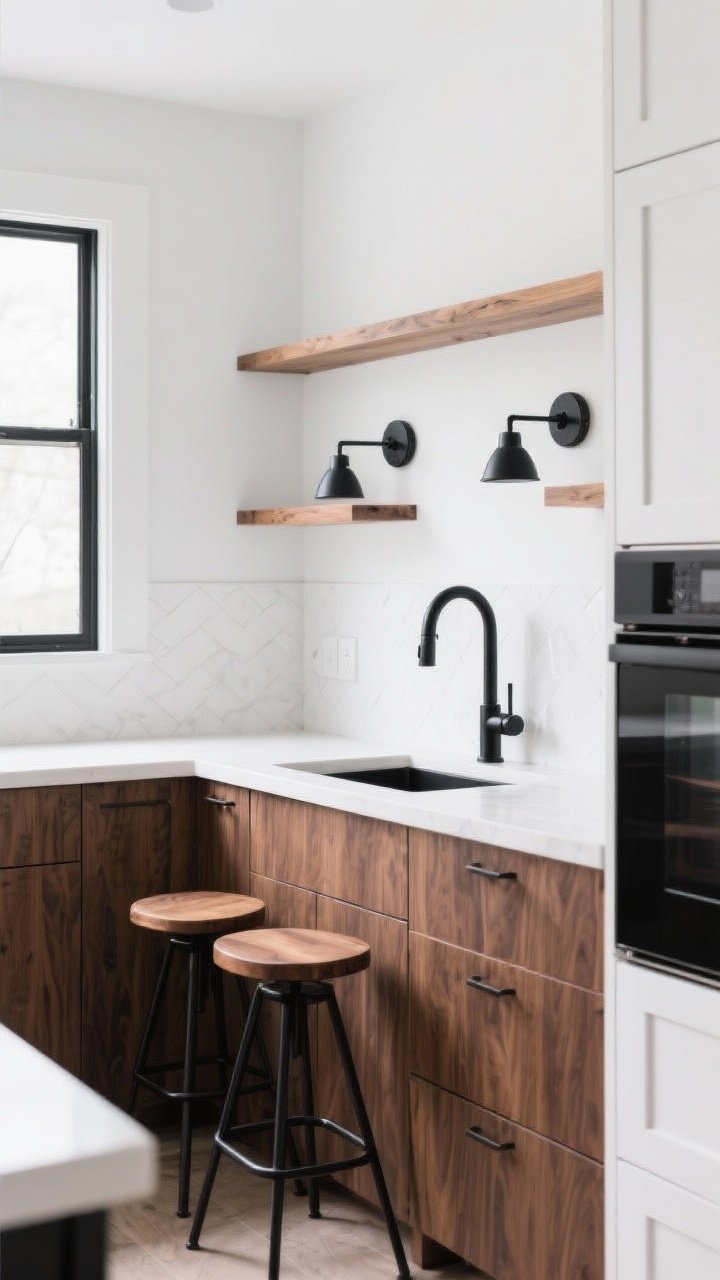
Here’s the trick to making white-and-wood look intentional: add one more strong accent—black or brass. Black grounds the palette and looks crisp; brass warms it up and reads a little luxe.
Where to Add It
- Lighting: Black sconces over wood shelves or brass pendants over the island.
- Faucet + hardware: Brass with honey oak is chef’s kiss; black with walnut is ultra-modern.
- Barstools: Wood seats with black metal bases = instant contrast.
Choose one metal and repeat it 2–3 times so it feels cohesive, not chaotic.
10. Texture Your Whites to Complement the Wood
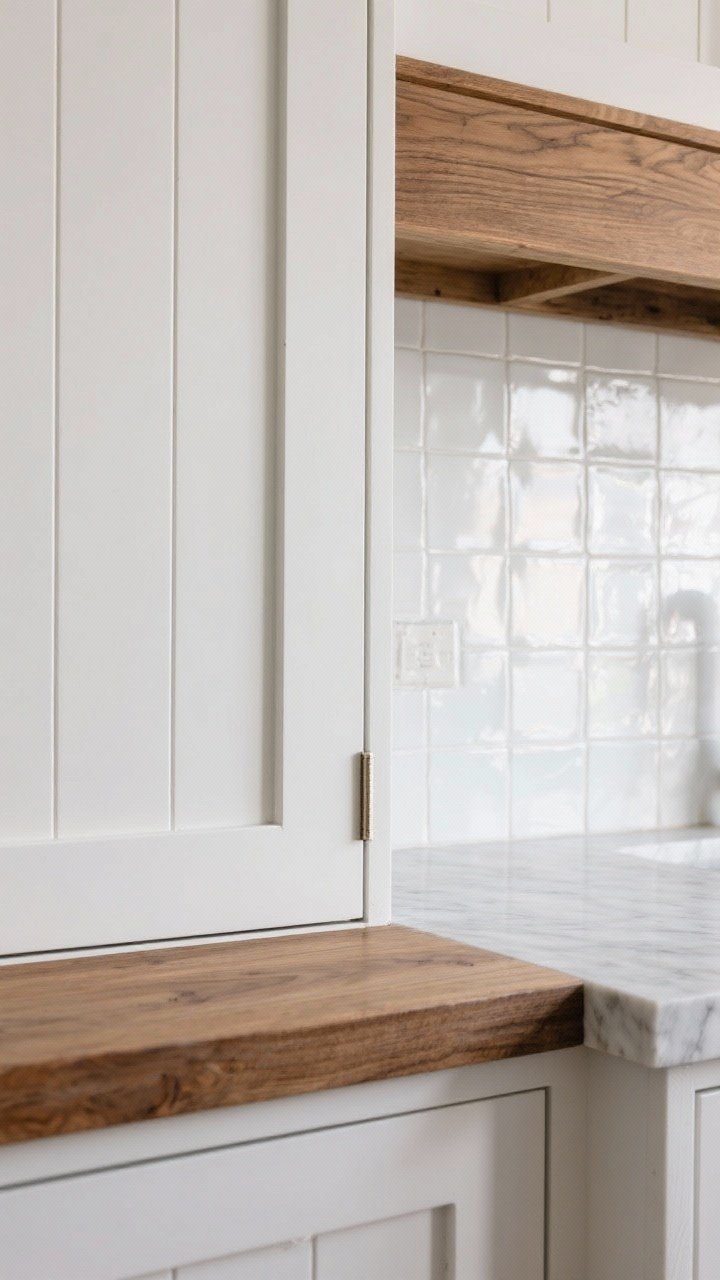
If your whites are too flat, wood can feel stuck-on. The fix? Add texture to the white surfaces so everything talks to each other—think beaded cabinets, zellige tiles, or honed stone.
Textural Combos That Win
- Beadboard + oak: Coastal-cottage charm with real depth.
- Zellige backsplash + maple shelves: Soft sheen and organic edges meet clean lines.
- Honed marble + walnut: Matte stone + rich wood = elegant and timeless.
Also, pay attention to paint sheen. Satin or semi-gloss on cabinets, matte or eggshell on walls. It’s a subtle dimension shift that makes whites feel layered, not sterile.
Bonus Styling Tips to Seal the Look
- Soft textiles: Linen cafe curtains, a cushy rug runner, or cotton seat cushions bring softness.
- Greenery: A potted olive tree or trailing pothos adds life (and breaks up all the neutrals).
- Art matters: Frame a small print in wood, lean it against the backsplash, and pretend you “just had it lying around.”
FYI: Keep your white palette consistent. If your cabinets are a warm white, choose a backsplash and walls with similar undertones so your wood feels cohesive, not random.
Conclusion
White kitchens feel fresh, but white with wood? That’s fresh with heart. Whether you go big with a walnut island or go subtle with wood hardware and cutting boards, these ideas layer warmth, texture, and personality into every corner.
Pick two or three ideas to start, repeat your wood tones on purpose, and let the space evolve as you live in it. Your future self—sipping coffee at that beautiful wood island—will be very proud.