10 Genius Kitchen Organization Ideas That Instantly Create More Space You’ll Love
Your kitchen isn’t too small—you’re just one clever trick away from feeling like you gained an extra five feet. Let’s skip the endless junk drawer shuffle and get straight to the good stuff. These ideas are practical, stylish, and renter-friendly (mostly). Ready to make your kitchen feel bigger, brighter, and way more functional?
1. Zone Your Kitchen Like a Designer
If your spices live with your baking sheets and your mugs hang out near the cleaning supplies, it’s time for a vibe check. Creating clear zones instantly makes your kitchen feel organized—and way faster to use.
Tired of snacking when you’re not even hungry? This reset helps you stop the loop and feel back in control.
A simple reset for moments when cravings take over. Easy to use, easy to repeat, and designed to help you feel satisfied instead of stuck.
How to Set Zones
- Prep Zone: Cutting boards, knives, mixing bowls, oils, and salt/pepper near your main counter.
- Cooking Zone: Pans, utensils, spices, and oven mitts near the stove.
- Coffee/Tea Station: Mugs, kettle, filters, beans, and sweeteners in one spot.
- Cleaning Zone: Towels, soaps, trash bags, and dishwasher tabs under the sink.
Bonus: Use a tray or lazy Susan in each zone to corral small items so nothing migrates. Your future self will thank you.
2. Double Your Cabinet Space With Shelf Risers

You know that dead air in your cabinets? Time to monetize it with shelf risers. They give you two levels where you once had one, so you’re not stacking plates like Jenga.
Where They Shine
- Plates and bowls: Separate stacks so you can grab what you need without a collapse.
- Mugs and glasses: Create a safe second tier for shorter pieces.
- Pantry staples: Canned goods, small jars, and snacks sit pretty and visible.
FYI: Look for adjustable or expandable risers to fit oddly sized cabinets. Clear acrylic looks sleek; bamboo adds warmth.
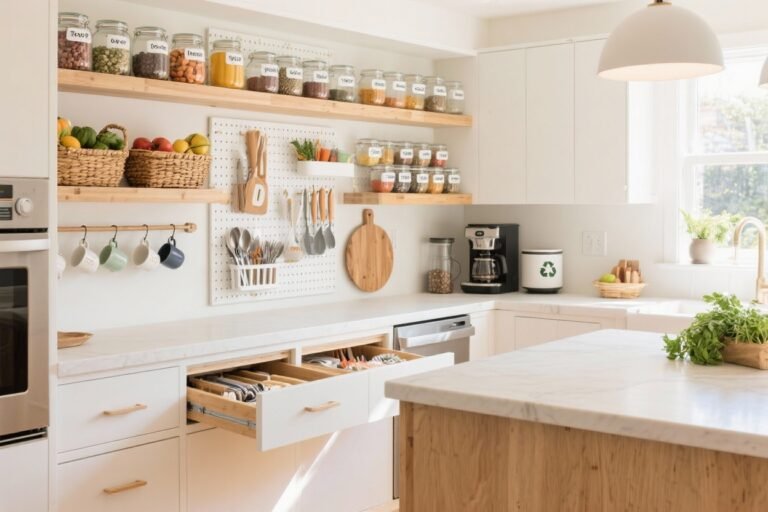
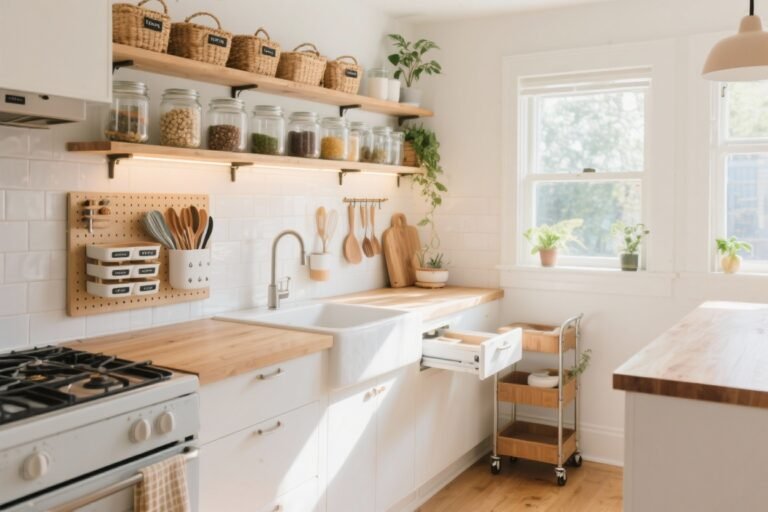
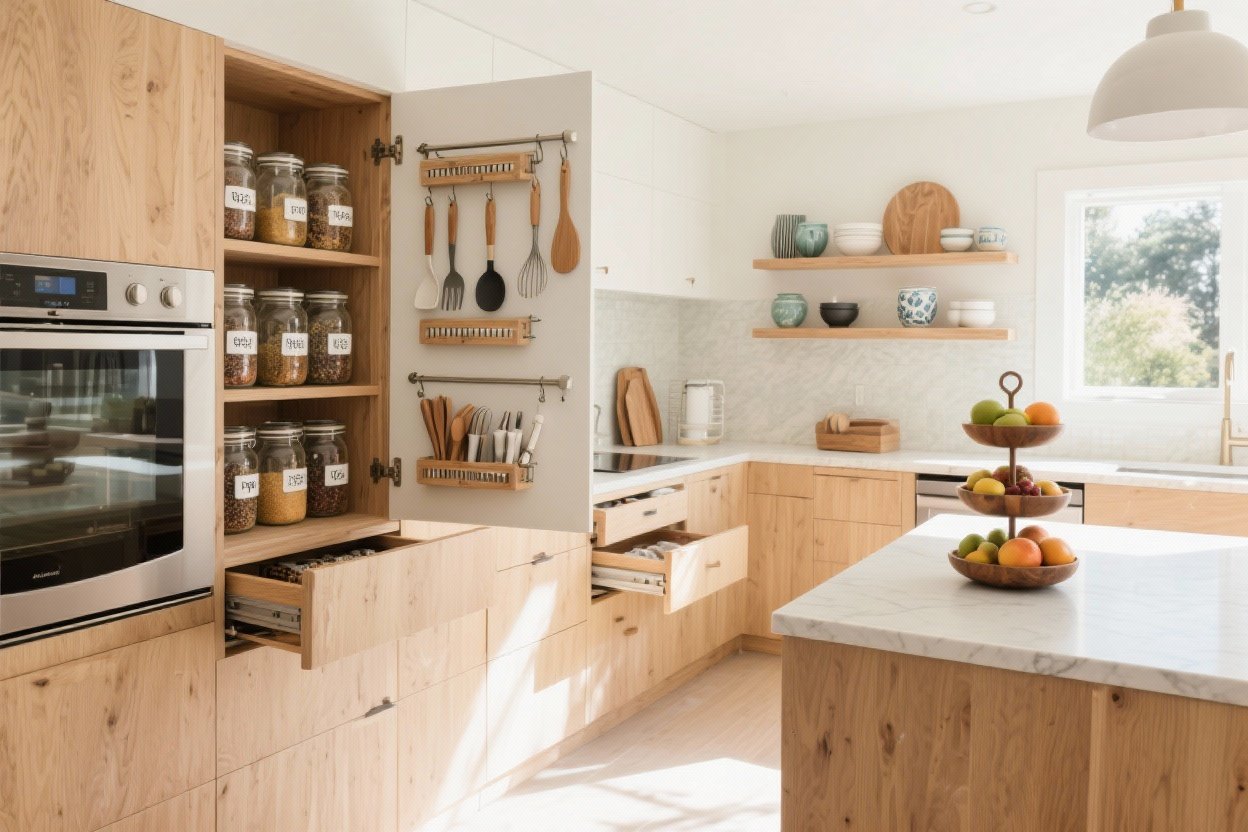
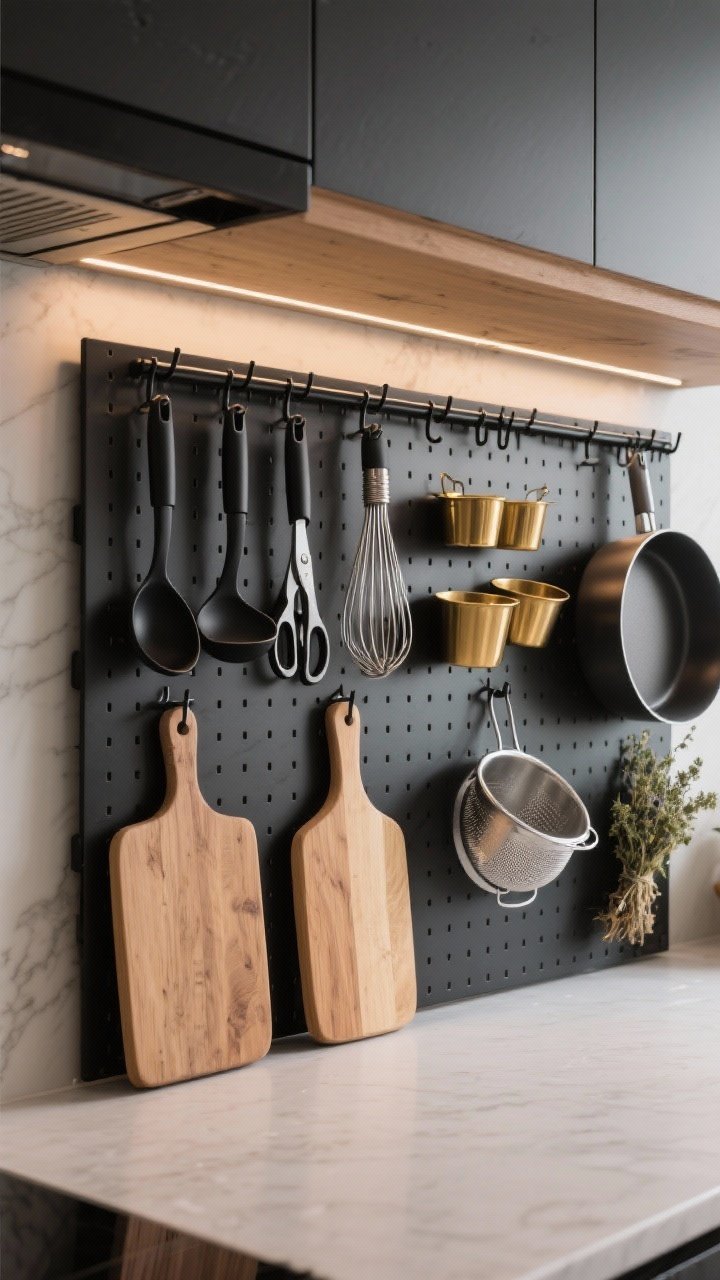
3. Go Vertical With Pegboards and Rails
Walls are prime real estate. A pegboard or rail system turns empty space into a custom storage display that’s surprisingly chic.
Transform Your Home With 7,250+ Stunning Landscaping Designs—No Expensive Designers Needed!
- 🌿 Access 7,250+ stunning landscaping designs.
- 💰 Save thousands—no pro designer needed.
- 🏡 Plans for gardens, patios, walkways, and more.
- ✨ Simple, beginner-friendly DIY layouts.
- 🛠️ Customize any design to fit your yard.
What to Hang
- Everyday tools: Tongs, ladles, whisks, scissors—grab ’n go.
- Boards and pans: Lightweight cutting boards or shallow pans look great and save space.
- Pretty essentials: Measuring cups, tiny colanders, herb bundles—functional decor, yes please.
Keep it cohesive with matching hooks and small baskets. And no, it won’t look cluttered if you keep the color palette tight.
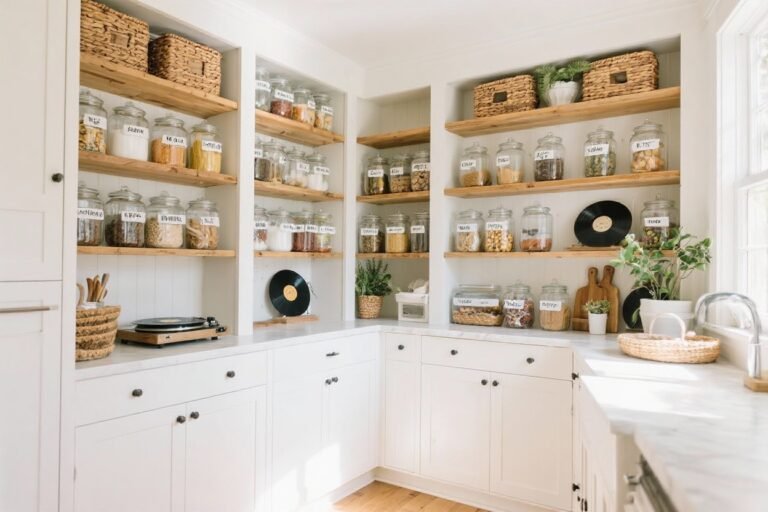
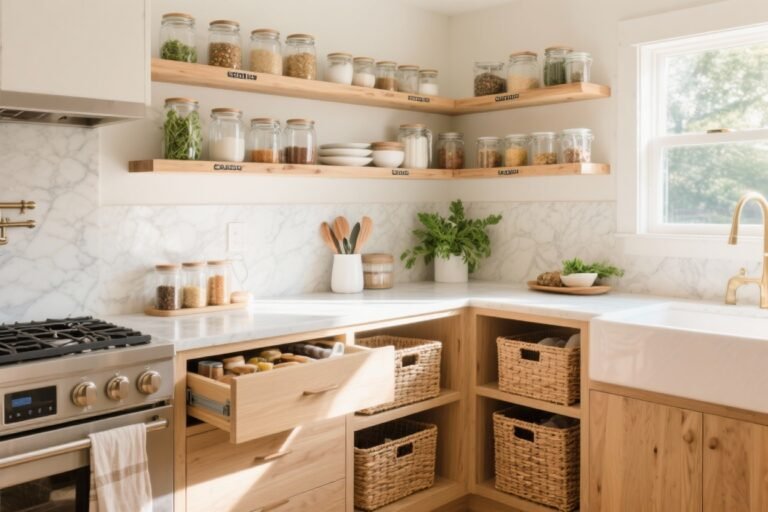
4. Use Clear Containers (And Label Like You Mean It)
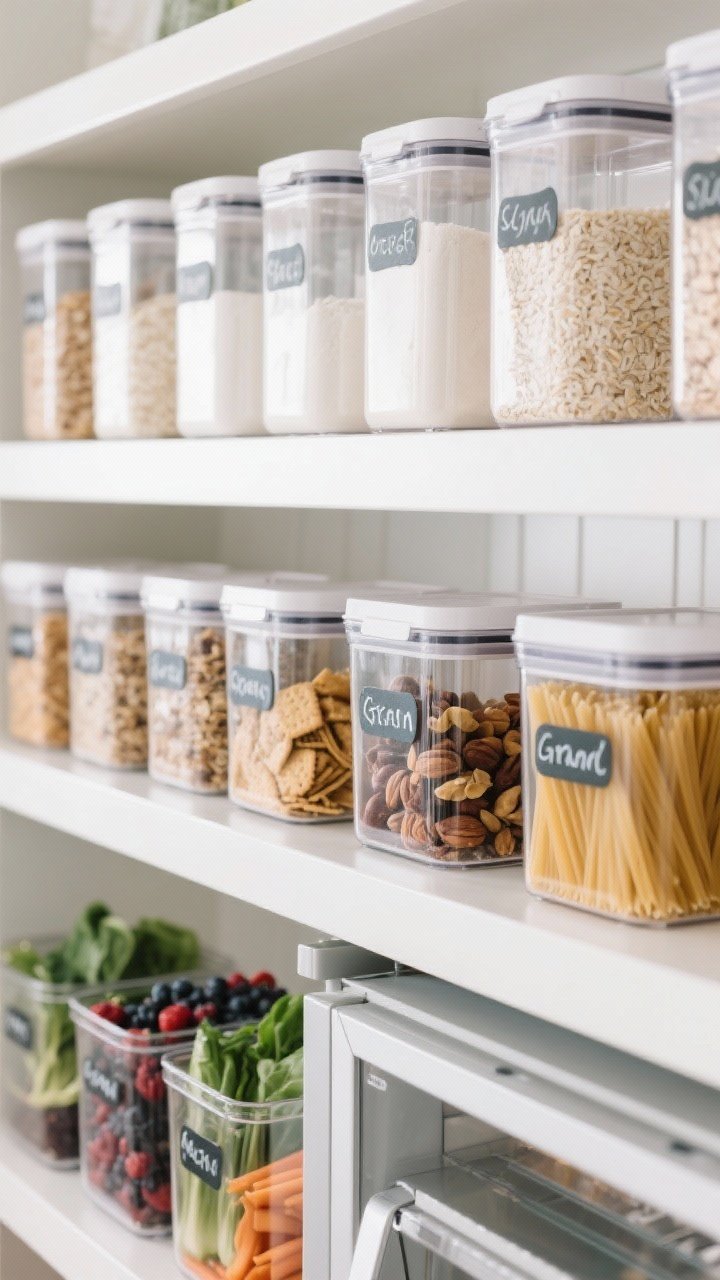
Decanting into clear containers isn’t just for Instagram. It creates uniform shapes that stack neatly and lets you see how much you have left at a glance.
What to Decant
- Dry goods: Flour, sugar, rice, oats, pasta.
- Snacks: Crackers, nuts, granola, dried fruit—especially if you’re a grazer.
- Fridge items: Berries, greens, and cut veggies in airtight bins—no mystery bags.
Labels are non-negotiable. Use chalk markers or printed labels so you don’t mix up powdered sugar and flour again. IMO, your mornings will run smoother immediately.
5. Make Your Drawers Work Harder With Inserts
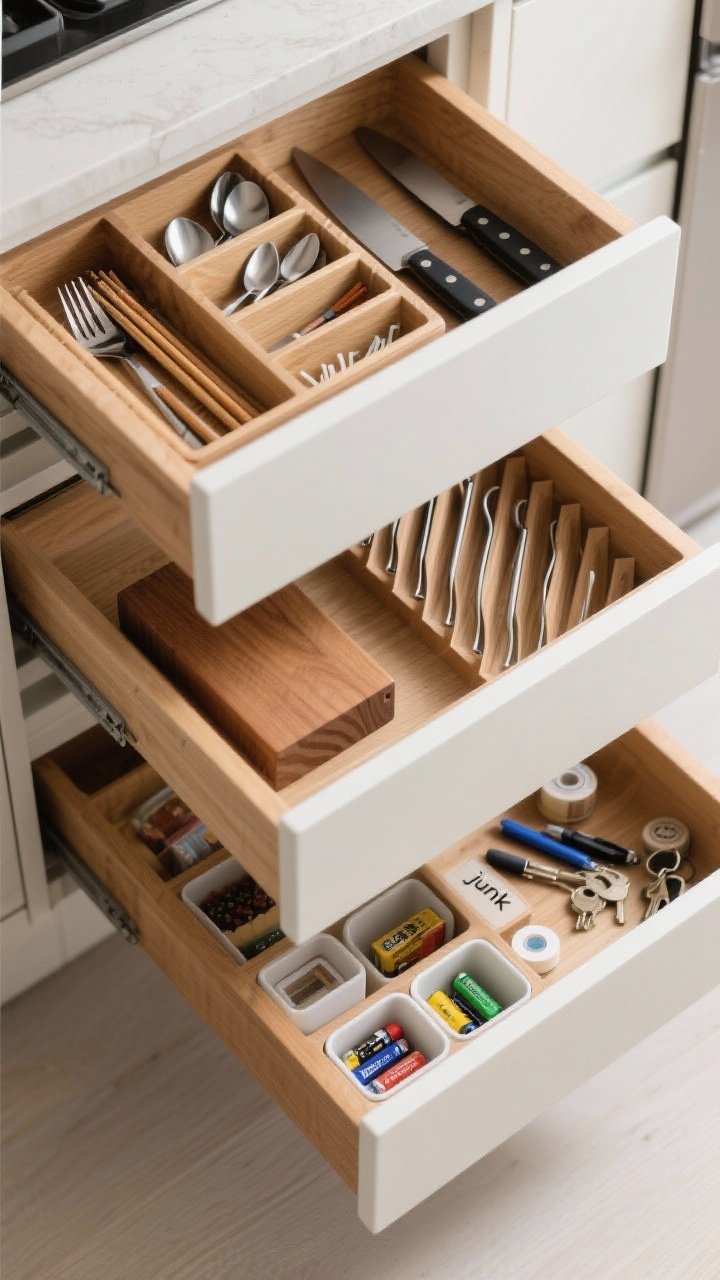
Drawers are either zen or chaos—there’s no in-between. Enter drawer dividers and insert trays to carve out designated spots for literally everything.
Smart Drawer Setups
- Utensil drawer: Tiered trays for forks/knives/spoons, plus narrow slots for chopsticks and reusable straws.
- Knife drawer: In-drawer knife blocks keep counters clear and blades safe.
- Spice drawer: Angled racks so you can read labels at a glance—chef-level efficiency.
- Junk drawer: Small bins for batteries, tape, pens, and spare keys—contain the chaos.
Pro tip: Measure the interior of your drawers before ordering inserts. Sounds obvious, but… we’ve all been there.

6. Put the Backs of Doors to Work

Cabinet and pantry doors are basically blank checks. Use over-the-door racks, adhesive caddies, or Command hooks to stash the small stuff.
High-Impact Door Ideas
- Under-sink door: Mount a caddy for sponges, dish soap, and dishwasher tabs.
- Pantry door: Add tiered racks for spices, wraps, foils, and snack packs.
- Upper cabinet door: Slim hook for oven mitts or measuring spoons.
Just keep the bulky items light so doors still close smoothly. Also: always check clearance before drilling or sticking anything permanent.
7. Tame the Tupperware (Finally)
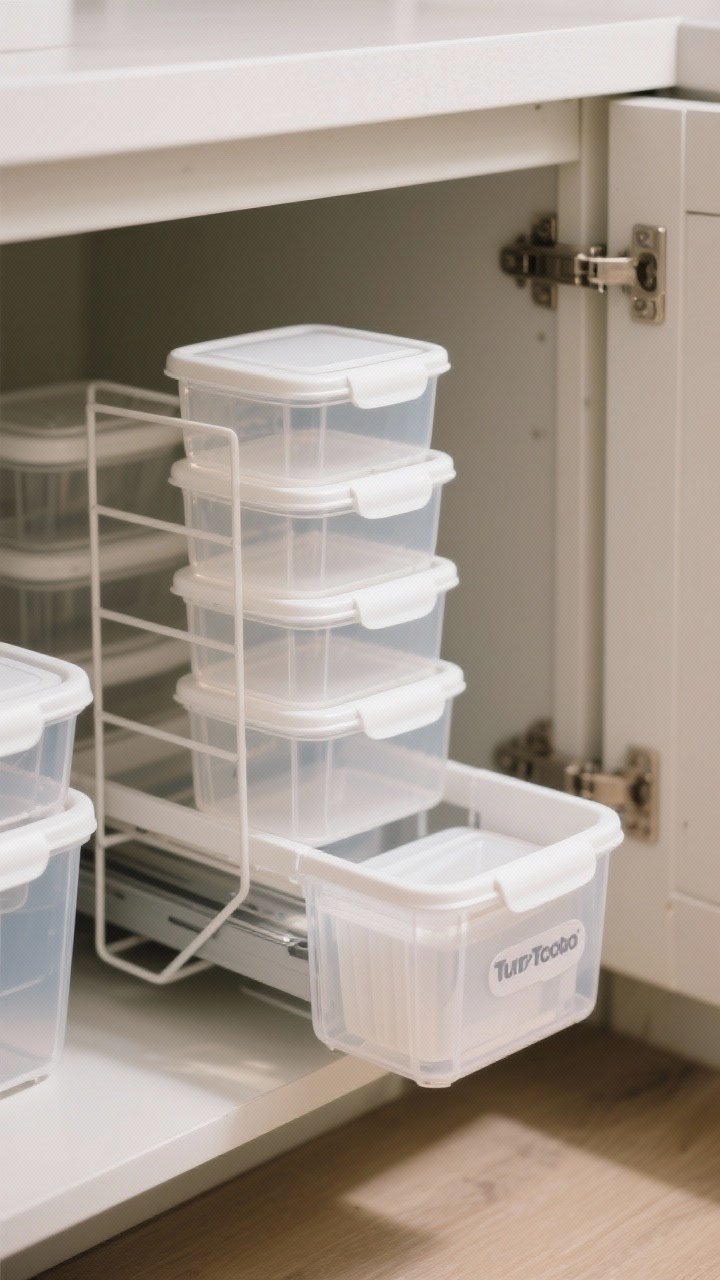
Nothing ruins a night faster than a lid avalanche. Create a container system where every lid has a place and mismatched pieces don’t make the cut.
Simple System to Copy
- Pick one brand/shape: Square stacks better than round and saves space.
- Store like with like: Nest bases by size; file lids vertically in a bin or rack.
- Go modular: Choose containers that share lids—future you will cry happy tears.
If you’re short on drawers, a low shelf with a pull-out bin works beautifully. And yes, you can donate the graveyard of mystery lids.
8. Add Pull-Outs, Turntables, and “Hidden” Storage
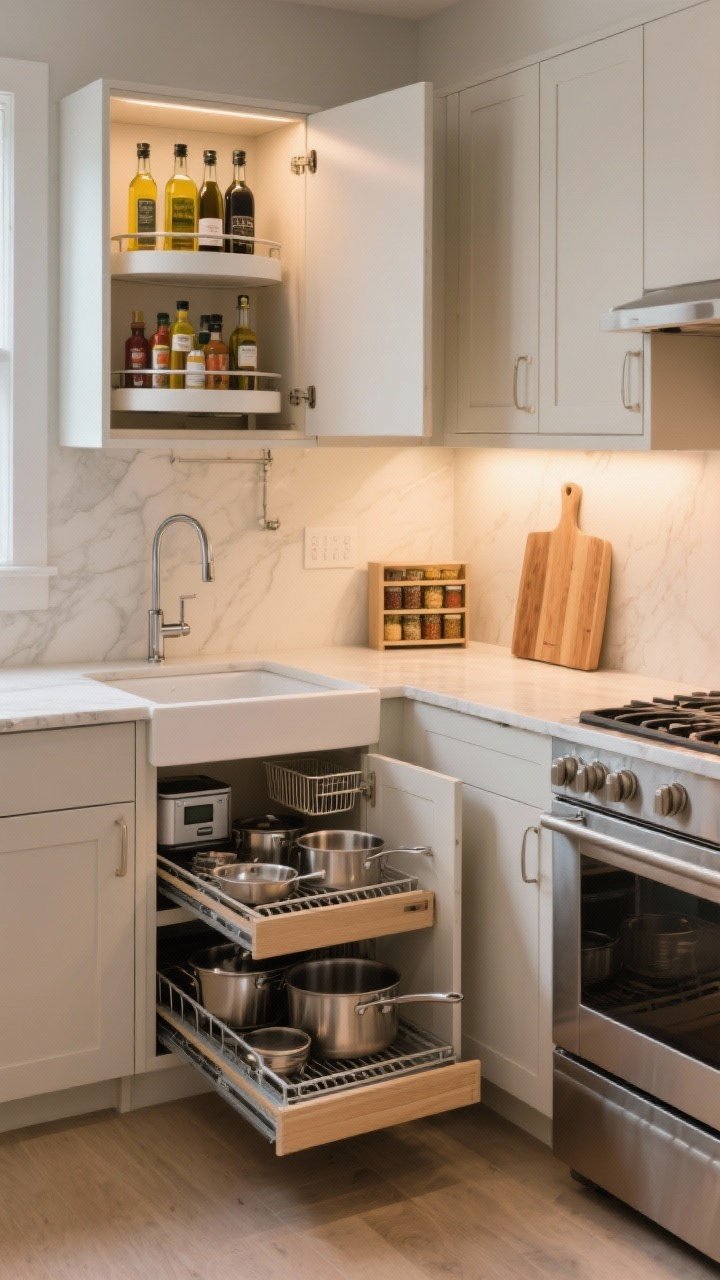
Deep cabinets are where good intentions go to die. Fix it with pull-out shelves and lazy Susans so everything is visible and accessible.
Where to Use Them
- Corner cabinets: Two-tier turntables for oils, vinegars, and condiments.
- Base cabinets: Pull-out trays for pots, pans, and small appliances.
- Under sink: Sliding baskets that dodge the plumbing and keep supplies reachable.
Consider a hidden cutting board drawer or a slim pull-out spice rack next to the stove if you’re doing light renos. Small upgrades, big payoff.
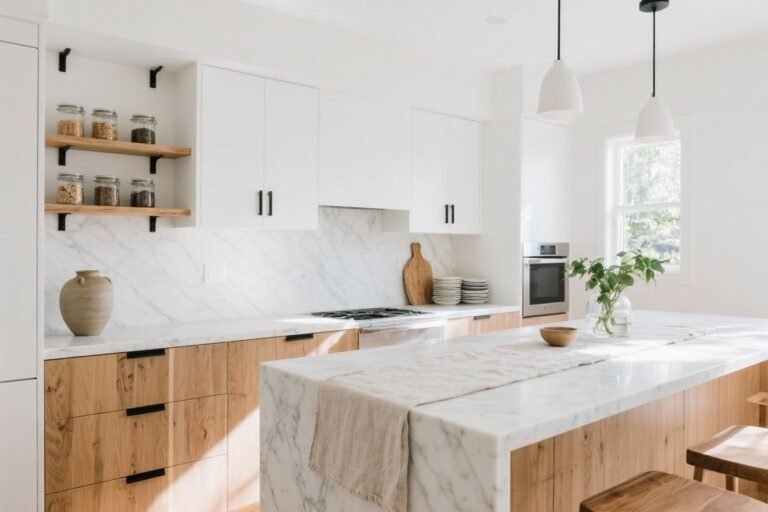
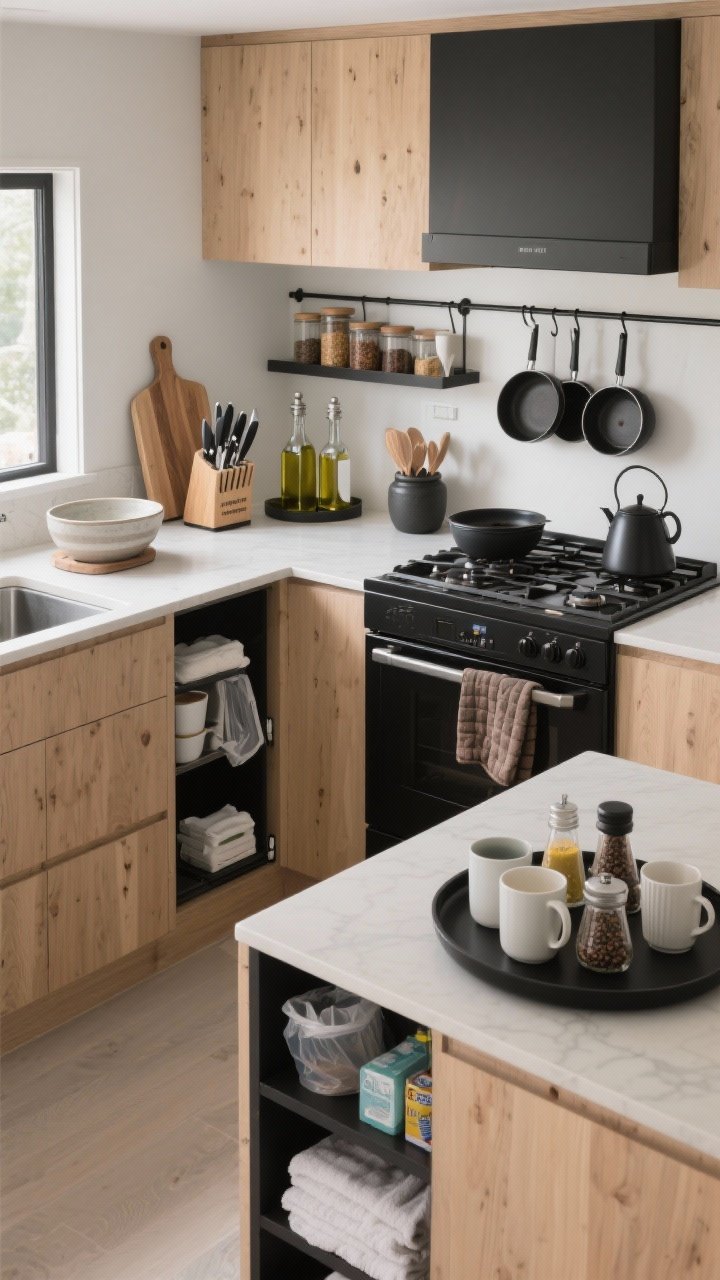
9. Float It: Shelves, Magnetic Strips, and Under-Cabinet Hacks
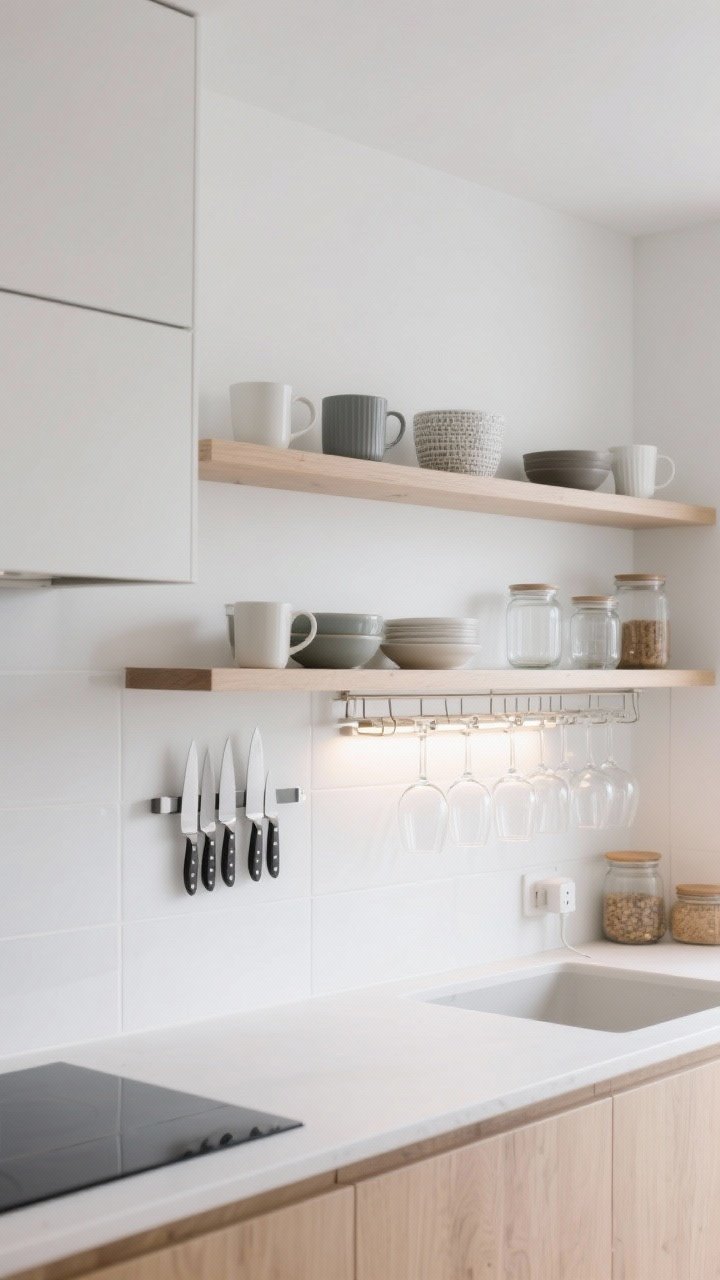
When counter space is tight, get things off the surface. Floating solutions make your kitchen look airy and organized.
Smart Floating Add-Ons
- Open shelves: Store pretty everyday items—mugs, bowls, glass jars. Keep it curated to avoid visual clutter.
- Magnetic knife strip: Saves counter space and keeps blades sharp. Also looks legit cool.
- Under-cabinet racks: Hang wine glasses, paper towels, or add a small plug-in strip light for task lighting.
FYI: If you rent, aim for adhesive or clamp-style options, or install using existing holes to keep the landlord happy.
10. Create a Weekly Reset Routine (Your Secret Weapon)
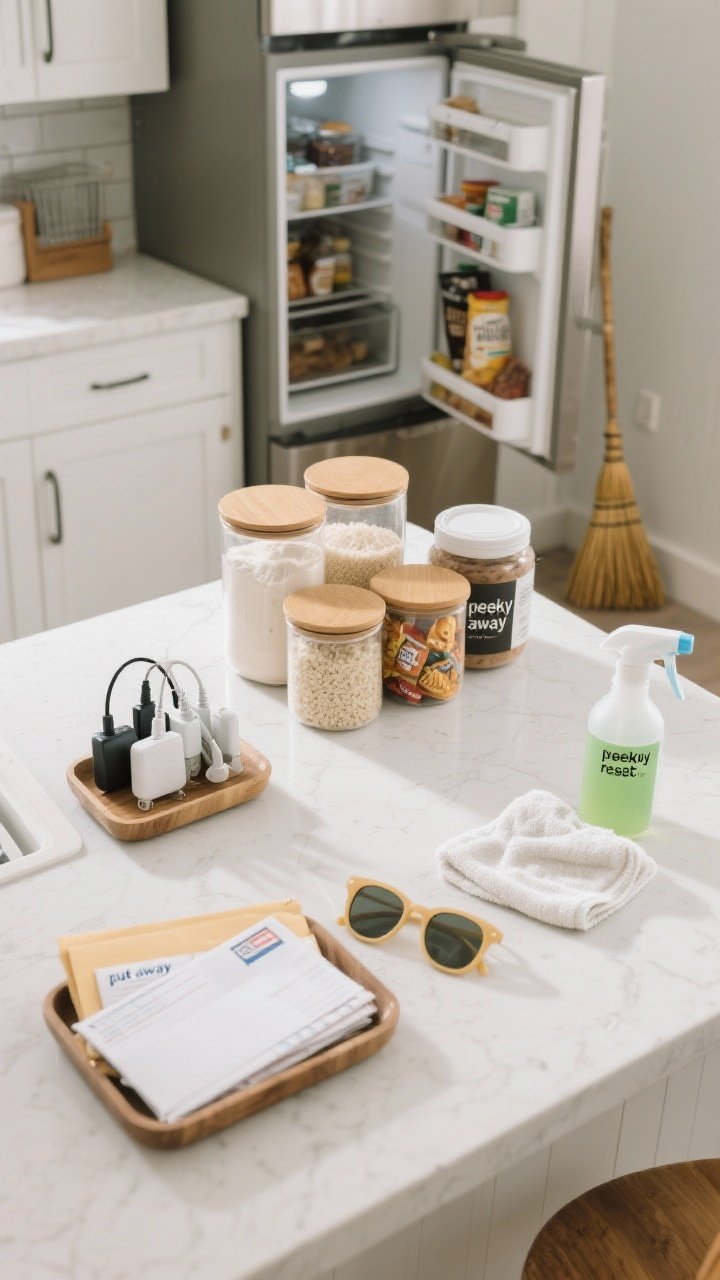
Hot take: The best organization system is the one you actually maintain. A quick weekly kitchen reset keeps clutter from creeping back.
Your 20-Minute Checklist
- Clear counters: Put away anything that wandered out—mail, sunglasses, random chargers.
- Audit the fridge: Toss expired items and put leftovers front and center.
- Refill the basics: Flour, rice, snacks, coffee—top off containers so you never “surprise” run out.
- Wipe and sweep: Fresh surfaces make everything feel organized, even on busy weeks.
Set a timer, put on a favorite playlist, and make it a mini ritual. It’s the low-effort habit that makes every other tip actually stick, IMO.
Bonus Styling Tips That Also Save Space
- Match your materials: Bamboo, glass, or matte black—cohesion reduces visual clutter.
- Corral with trays: Oils, salt, pepper, and vinegar on a tray = intentional, not messy.
- Light it right: Under-cabinet puck lights make small spaces look luxe and help you actually see what you’re doing.
Ready for the glow-up? Start with one zone and one upgrade—like risers in your dishes cabinet or a pegboard by the stove. Small changes compound fast. Your kitchen is about to feel bigger, smarter, and a whole lot more you.