
10 Kitchen Storage Ideas Perfect for Small or Narrow Kitchens You’ll Actually Use
Small kitchen? Narrow galley? Same. But I promise—you’re not out of space; you’re just not using the sneaky spots yet. These ideas squeeze storage out of thin air (no ugly plastic bins required). Grab a coffee and let’s turn your tight kitchen into a well-oiled, clutter-free machine.
1. Go Vertical With Open Shelves (And Keep It Cute)

When floor space is limited, your walls are prime real estate. Open shelves instantly add storage without making a small kitchen feel boxed in. Plus, they’re a chance to show off pretty dishes and keep everyday items within reach.
Tired of snacking when you’re not even hungry? This reset helps you stop the loop and feel back in control.
A simple reset for moments when cravings take over. Easy to use, easy to repeat, and designed to help you feel satisfied instead of stuck.
What to store where
- Top shelf: Display-worthy items or seasonal pieces.
- Middle shelf: Everyday plates, bowls, glasses.
- Bottom shelf: Heavier items like mixing bowls or canisters.
FYI: Keep it organized with matching containers and a tight color palette. It keeps visual clutter down and instantly makes your space feel larger.
2. Install a Rail System (The Backsplash MVP)

Your backsplash is begging to multitask. A simple rail with S-hooks turns dead space into a powerhouse for utensils, pans, strainers, and even mugs. It’s like a jewelry display, but for your kitchen tools.
Smart add-ons
- Magnetic knife strip: Saves drawer space and keeps blades sharper.
- Mini shelves or cups on the rail: Great for spices, wooden spoons, or scissors.
- Foldable towel bar: Doubles as a drying rack for dishcloths.
Bonus: Hanging items means fewer crumbs collecting in drawers. Your future self thanks you.
3. Use Inside-Cabinet Doors Like Secret Drawers

Open a cabinet door and—surprise—there’s more storage hiding there. Add slim racks or adhesive caddies inside doors for wraps, cutting boards, pot lids, and spices. It’s low-profile and high-impact.
Transform Your Home With 7,250+ Stunning Landscaping Designs—No Expensive Designers Needed!
- 🌿 Access 7,250+ stunning landscaping designs.
- 💰 Save thousands—no pro designer needed.
- 🏡 Plans for gardens, patios, walkways, and more.
- ✨ Simple, beginner-friendly DIY layouts.
- 🛠️ Customize any design to fit your yard.
Where this shines
- Under-sink: Store cleaning sprays, gloves, and sponges in a caddy.
- Pantry door: Tiered racks for spices and oil bottles.
- Lower cabinets: Clip-in holders for lids and flat cutting boards.
Pro tip: Measure door clearance so you don’t create a game of cabinet Tetris every time you close it.
4. Embrace Slim, Rolling Carts (Hello, 6 Inches of Magic)

That weird gap between the fridge and the wall? Don’t waste it. A slim rolling cart slides in with spices, cans, oils, and baking jars. It’s the pantry you thought you didn’t have.
How to stock it
- Top tier: Daily-use items—salt, pepper, olive oil.
- Middle tier: Cans, jars, and sauces.
- Bottom tier: Bulk items or backups (paper towels, extra flour).
Look for carts with locking wheels and easy-grip handles. If you can’t buy one, DIY with a narrow bookshelf and small casters.
5. Double Your Drawers With Dividers and Risers

Drawers aren’t just junk pits. With the right inserts, they become ultra-efficient. Use deep drawer dividers for pots and lids, and add expandable cutlery trays to separate tools. Suddenly, everything has a home.
Drawer upgrades to try
- Plate holders: Keep stacks from sliding and make them easy to lift out.
- Risers: Create two layers for short items like ramekins and spice jars.
- File organizer for baking sheets: Stand them upright in a deep drawer or cabinet.
IMO, a well-organized drawer is the difference between meal prep and chaos. It’s the little things.

6. Hang Pots, Pans, and Lids (Free Your Cabinets!)

We love a cookware display that earns its keep. Use a ceiling-mounted rack or a wall-mounted rail for pots and pans, then add a lid organizer nearby. It keeps bulky items off your shelves and within arm’s reach.
Small-space tweaks
- Go vertical: Stagger hooks to stack more pieces without crowding.
- Use uniform hangers: It looks tidy and prevents tangling.
- Keep it light: Hang your everyday pans; store heavy Dutch ovens below.
Not into the exposed look? Mount a rail inside a pantry or behind a door for a stealthy version.
7. Build Upward: Stacked Shelving and Overhead Cabinets
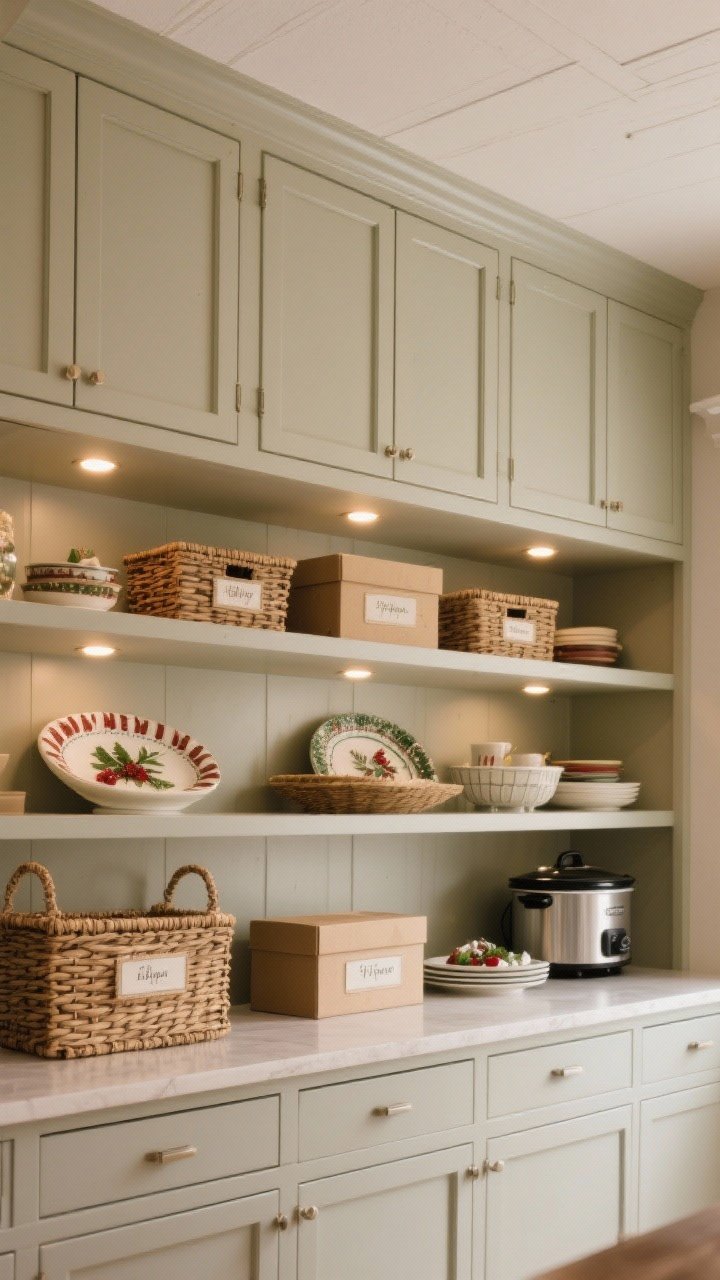
If your cabinets stop short of the ceiling, that’s wasted space—sorry, not sorry. Add stacked shelves or a top row of narrow cabinets for less-used items like holiday platters, slow cookers, and serving pieces.
How to keep it cohesive
- Match finishes: Use the same door style or paint color for a seamless look.
- Bin it: Store items in labeled baskets or boxes to make high shelves functional.
- Lighting: Add simple puck lights under the new layer for a polished vibe.
Think of it as your kitchen’s attic—out of the way but totally accessible when you need it.
8. Turn Corners Into Workhorses

Corner cabinets get a bad rap, but with the right hardware, they’re secretly massive. Install a Lazy Susan, pull-out trays, or a kidney-shaped shelf to make every inch reachable.
What belongs in corners
- Baking supplies: Bowls, mixing tools, and measuring cups.
- Small appliances: Blenders, food processors, stand mixer attachments.
- Bulk goods: Rice, flour, and backup pantry items in airtight containers.
Quick win: Add motion-sensor lights inside dark corners so you’re not searching by feel like a raccoon.
9. Create Zones With Trays, Canisters, and Mini Stations

Clutter usually happens because things don’t have a “home.” Fix that by building micro-stations on counters or shelves. Group items with trays and canisters so everything stays tidy and streamlined.
Station ideas that save time
- Coffee corner: Beans, mugs, filters, spoon—all in one tray under the machine.
- Tea + spice zone: A tiered rack with your go-tos by the stove.
- Baking setup: Flour, sugar, baking powder, and measuring spoons in clear canisters.
Use clear labels and stick to a few colors. It’s functional and looks designer-level organized with minimal effort.
10. Fold, Flip, and Tuck: Space-Saving Surfaces

In a narrow kitchen, horizontal space is gold. Add fold-down wall tables, flip-up counter extensions, or a pull-out cutting board to create work areas that disappear when you’re done.
Where to add them
- End of a cabinet run: A flip-up slab turns into instant prep space.
- Under-counter drawer: A pull-out board near the sink is a game changer.
- Wall-mounted fold table: Breakfast nook by morning, flat wall by noon.
Pair these with nesting bowls and collapsible colanders, and suddenly your tiny kitchen performs like a big one. Magic, but practical.
Quick Bonus Tips To Maximize Every Inch
- Choose stackable everything: Bowls, bins, and food containers that nest save serious room.
- Airtight bins > packaging: Decant pantry items to shave off wasted space and see when you’re low.
- Color-code zones: Warm tones for cooking, cool tones for baking—your brain will love it.
- Lighting matters: Under-cabinet LEDs make small kitchens feel bigger and more functional.
What to Declutter (Without Tears)
- Duplicates: Keep your best spatula, donate the rest.
- Single-use gadgets: If your chef’s knife can do it, let the gadget go.
- Expired spices + snacks: They’re not helping anyone. Out they go.
Small or narrow kitchens aren’t a curse—they’re an excuse to get clever. With vertical storage, smart zones, and a few fold-away tricks, your space can feel bigger, work harder, and look way more polished. Start with one idea, then stack on the rest. You’ve got this—your dream tiny kitchen is basically one hook rail away.


