10 Outdoor Kitchen Ideas That Instantly Elevate Your Backyard (and Your Hosting Skills)
Ready to turn your backyard into the place everyone mysteriously “drops by” on weekends? An outdoor kitchen isn’t just a grill and a folding table—it’s your excuse to design a vibe. The best part: you can start small or go glam. Here are 10 outdoor kitchen ideas that instantly level up your space and make you look like you planned it all along.
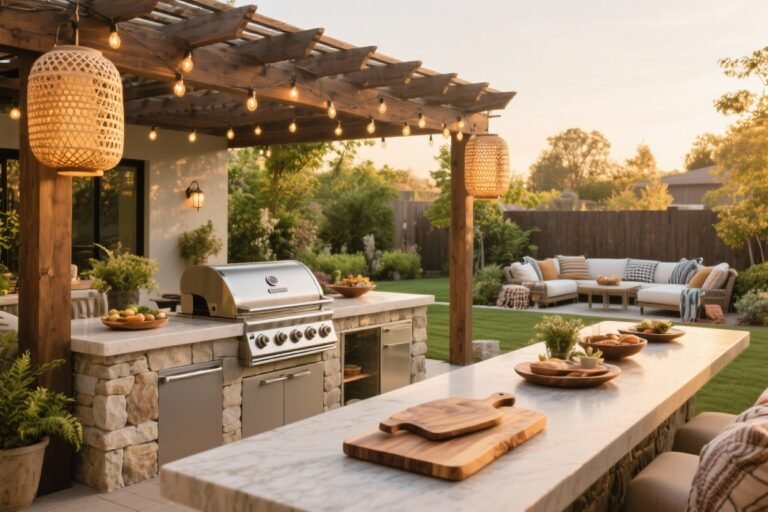
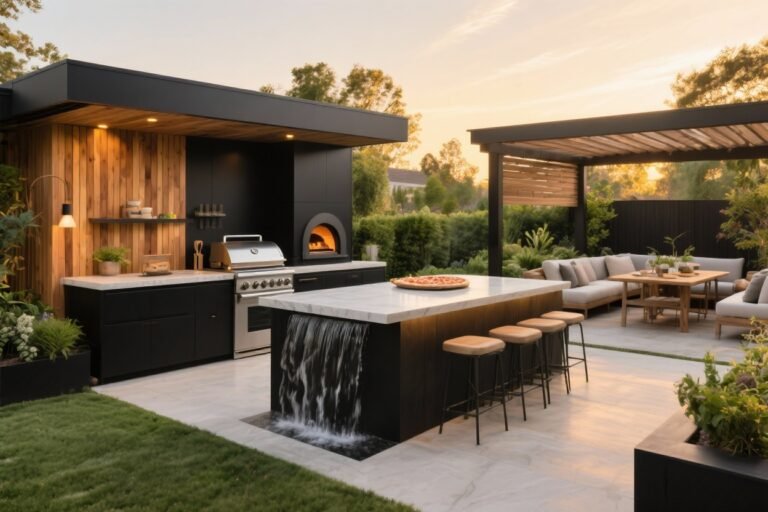
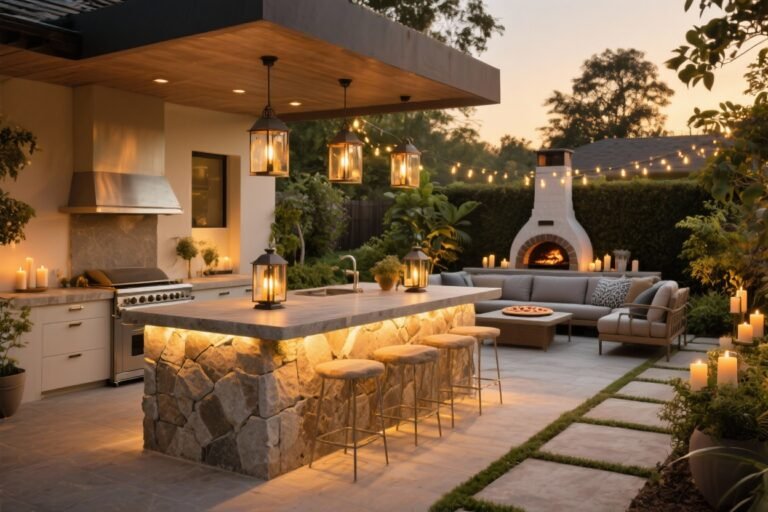
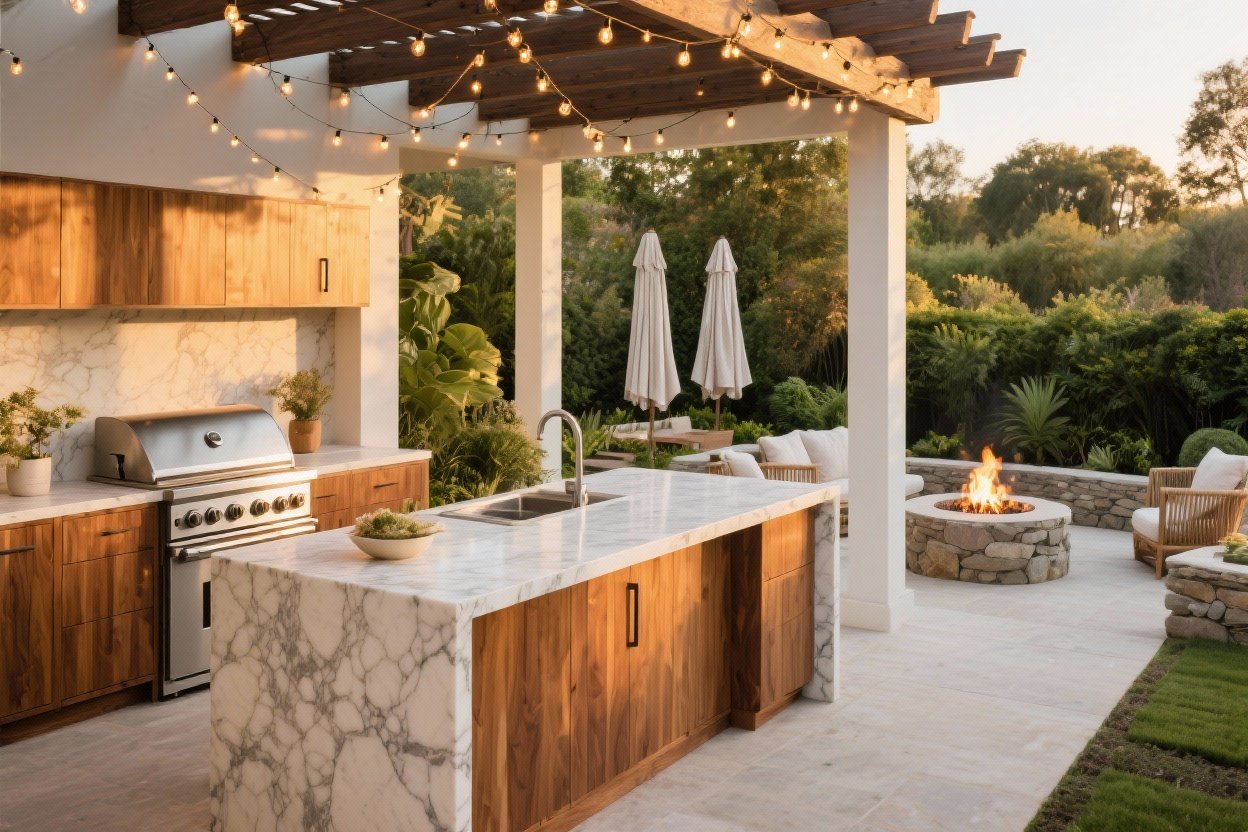
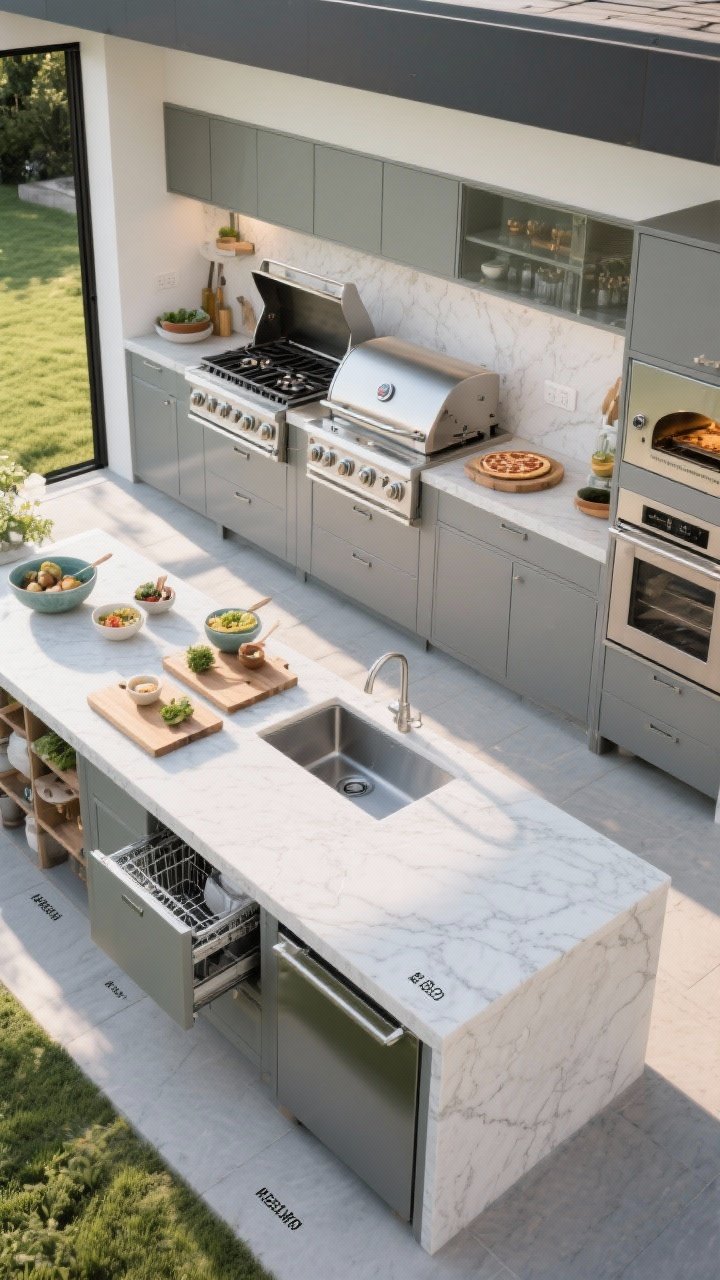
1. Build a Statement Island You’ll Actually Use
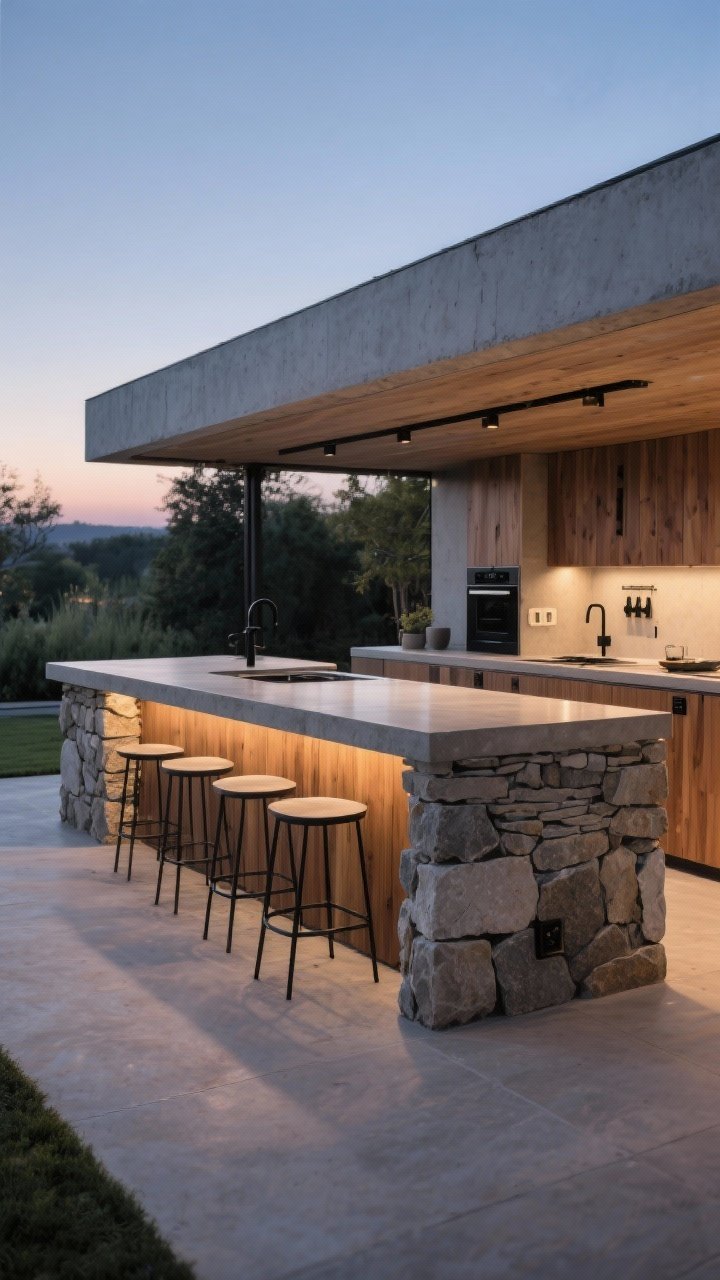
Your island is command central—prep, plating, serving, hanging out. Choose a layout that flows, then add finishes that look high-end without the high-maintenance attitude.
Tired of snacking when you’re not even hungry? This reset helps you stop the loop and feel back in control.
A simple reset for moments when cravings take over. Easy to use, easy to repeat, and designed to help you feel satisfied instead of stuck.
What Makes It Elevated
- Waterfall countertops: Sleek, modern, and durable in stone or concrete.
- Mixed materials: Stone base + wood accents + matte metal hardware = chef’s kiss.
- Overhang for seating: Make room for 3–4 stools so guests can linger (and taste-test).
Pro tip: Run power outlets under the bar for blenders and phone chargers. Small detail, huge win.
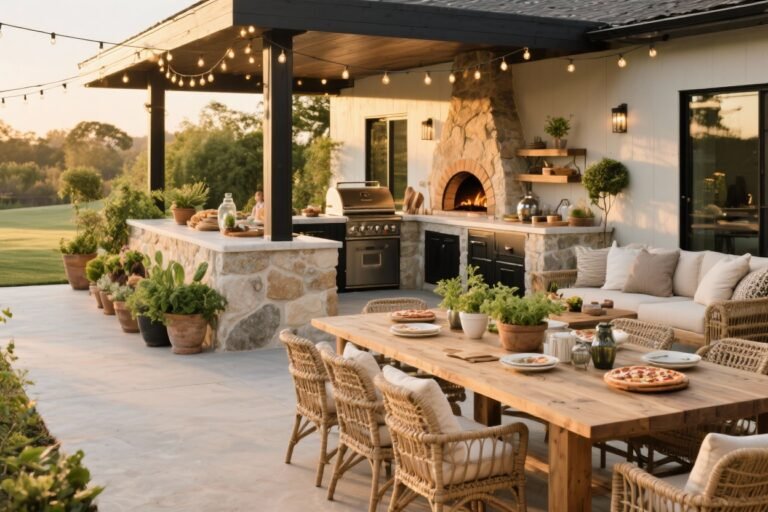
2. Add a Wood-Fired Pizza Oven (AKA Crowd Magnet)
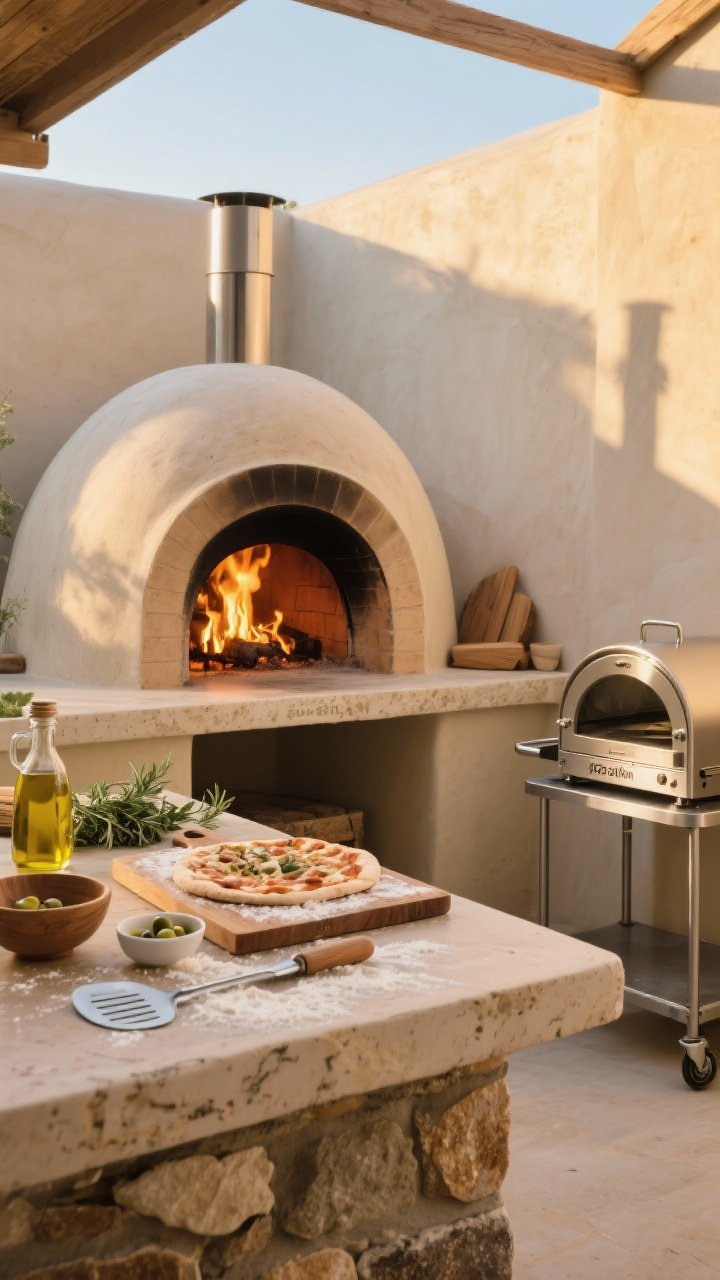
Nothing beats the smell of a pizza oven. It turns a regular hangout into an event, and it’s not just for pizza—think veggies, flatbreads, and even roast chicken.
Buying vs. Building
- Freestanding portable ovens: Budget-friendly, heat fast, and store easily.
- Built-in dome ovens: A total showpiece if you’re ready to commit.
Keep it practical with a prep zone nearby stocked with peels, flour, olive oil, and herbs. FYI: A pizza station is the ultimate DIY dinner party—everyone gets their own pie moment.
3. Design a Smart Layout With Prep, Cook, and Clean Zones
Think like a pro kitchen: zones keep things smooth. No one wants to dodge a sizzling grill to grab ice.
Transform Your Home With 7,250+ Stunning Landscaping Designs—No Expensive Designers Needed!
- 🌿 Access 7,250+ stunning landscaping designs.
- 💰 Save thousands—no pro designer needed.
- 🏡 Plans for gardens, patios, walkways, and more.
- ✨ Simple, beginner-friendly DIY layouts.
- 🛠️ Customize any design to fit your yard.
The Zone Breakdown
- Prep: Counter space near the fridge or pantry cabinet.
- Cook: Grill, side burner, and pizza oven clustered together.
- Clean: Sink, trash pull-out, and dishwasher drawer (if you can swing it).
Keep at least 36″ of uninterrupted prep space. It’s the difference between serene grilling and chaos.
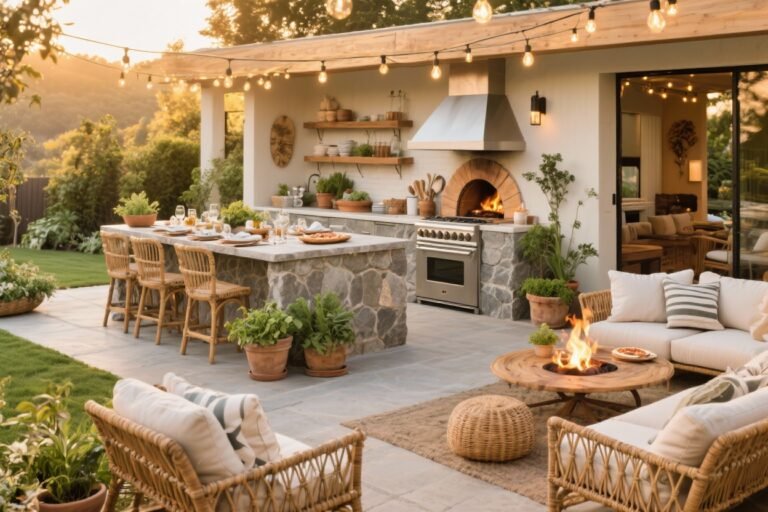
4. Layer Lighting Like You Mean It
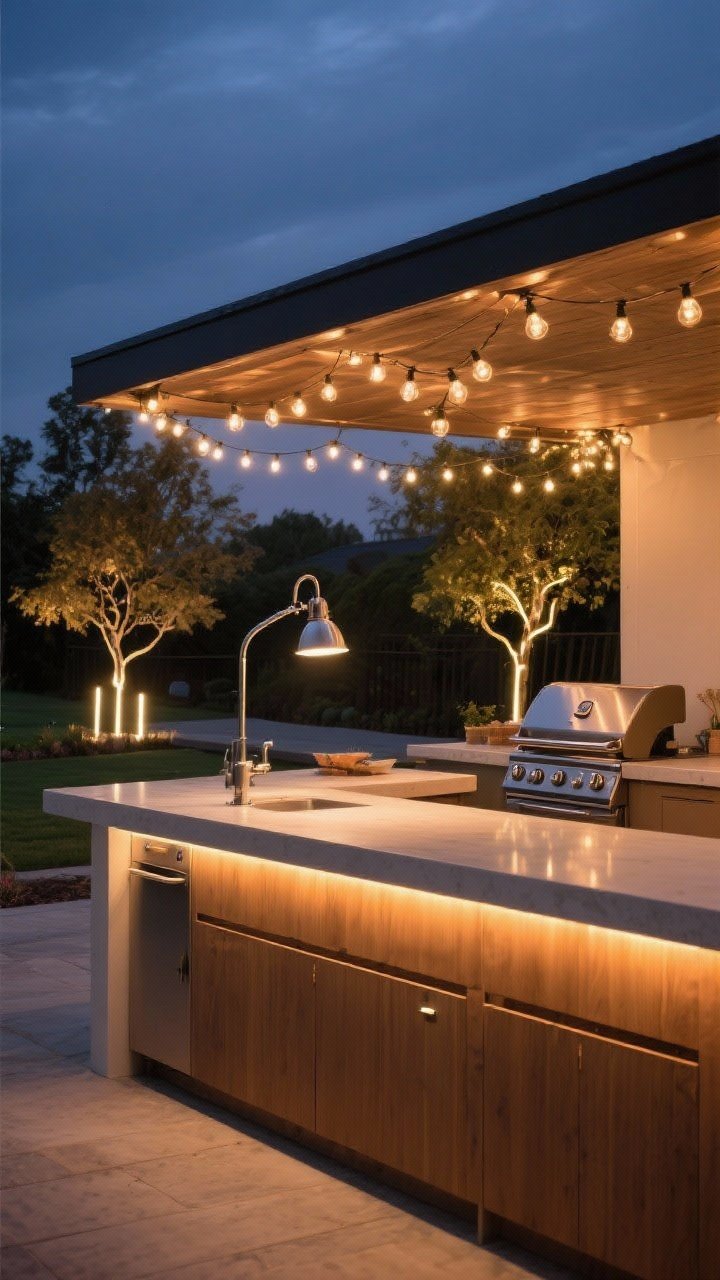
Lighting is everything. It sets the mood and keeps you from slicing limes in the dark.
Your Three-Layer Lighting Plan
- Task lighting: Under-cabinet LEDs or gooseneck lights over the grill and prep zones.
- Ambient glow: String lights, lanterns, and sconces with warm bulbs (2700K–3000K).
- Accent drama: Uplights on trees, step lights, or LED strips under counters.
Put everything on dimmers. That way dinner can be bright, and dessert can be moody-romantic.
5. Upgrade Your Grill Game (Beyond Burgers)
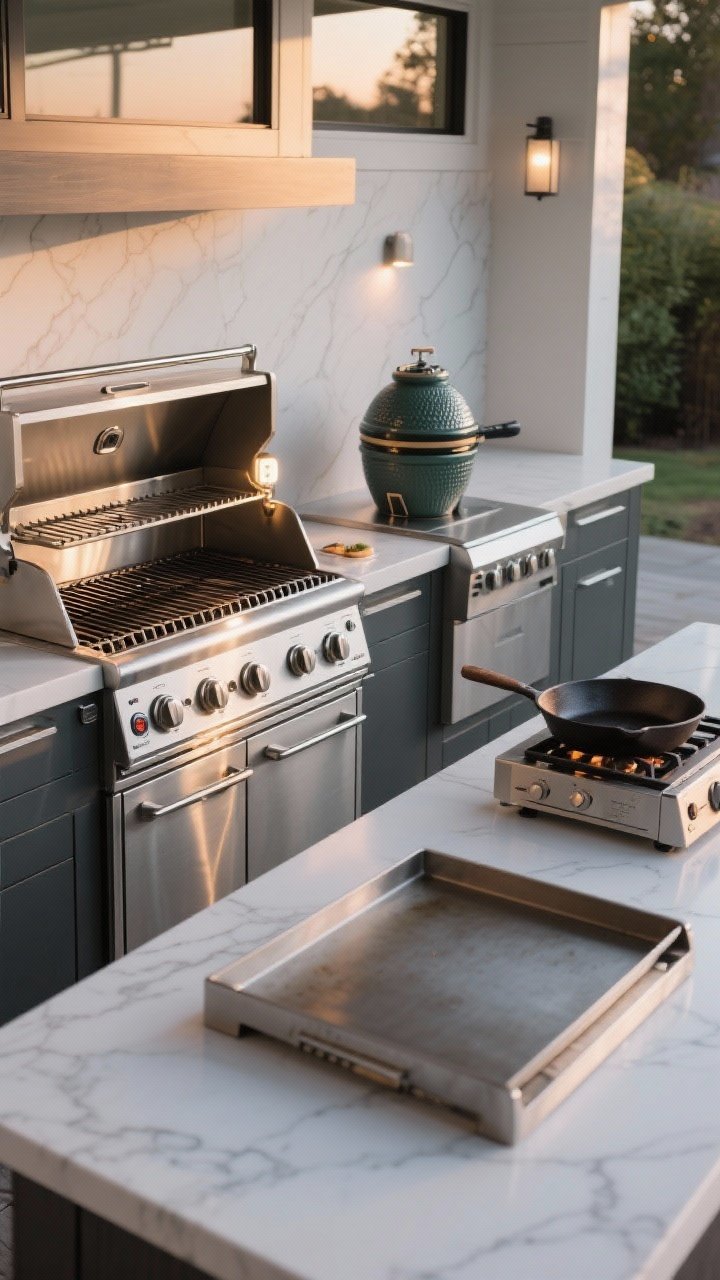
Yes, you need a great grill. But a truly elevated outdoor kitchen has range (pun very intended).
Appliance Mix That Feels Luxe
- Gas or pellet grill: For everyday ease and consistent heat.
- Smoker or kamado: Low-and-slow magic for weekends.
- Side burner: Boil corn, simmer sauces, or sear in a cast-iron pan.
- Flat-top griddle: Smash burgers, fried rice, breakfast for a crowd.
Don’t forget a grill light and built-in thermometer. Sounds basic, saves dinner.

6. Go All In on Weatherproof Materials
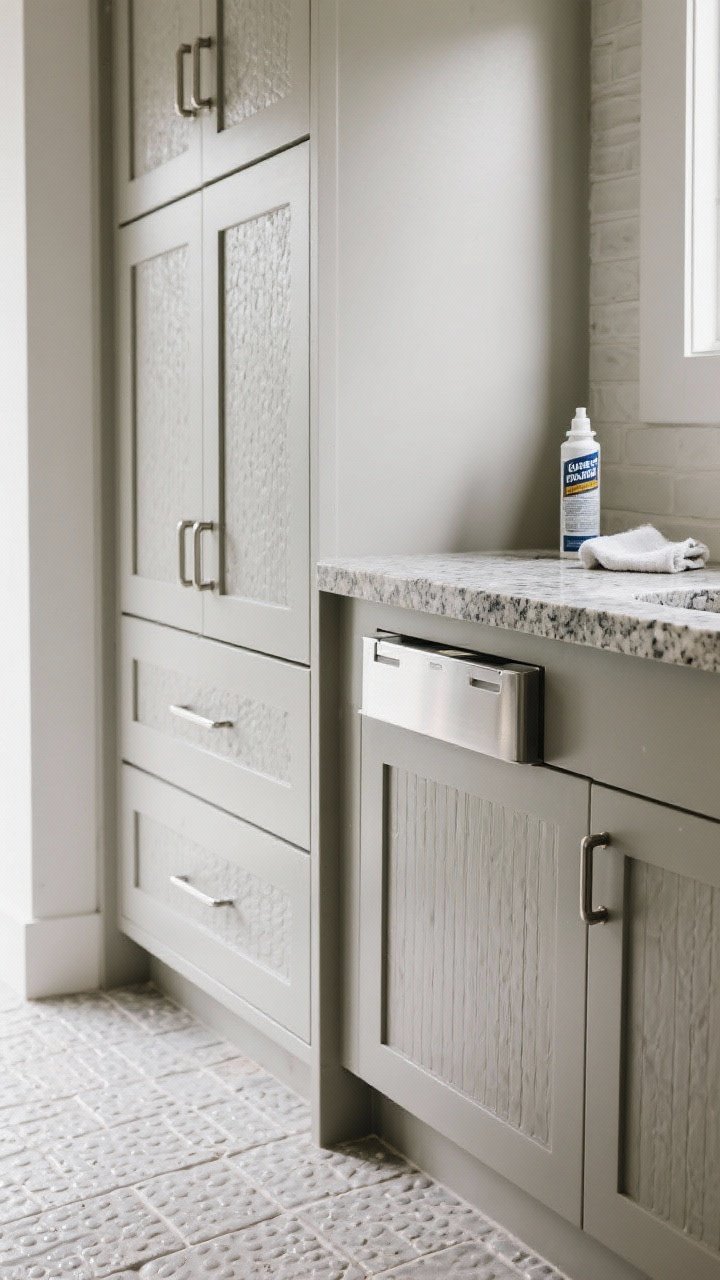
Outdoor kitchens are divas without good materials. Choose finishes that won’t fade, crack, or rust after one season.
Durable Picks That Look Gorgeous
- Cabinetry: Marine-grade polymer (HDPE), powder-coated aluminum, or teak (sealed).
- Countertops: Porcelain slab, concrete, granite, or sintered stone. Avoid marble unless you love patina.
- Hardware: Stainless steel or solid brass. No flimsy finishes, please.
- Flooring: Porcelain pavers, composite decking, or sealed stone for slip resistance.
Seal porous surfaces annually. It’s like sunscreen for your kitchen—future you will be grateful.
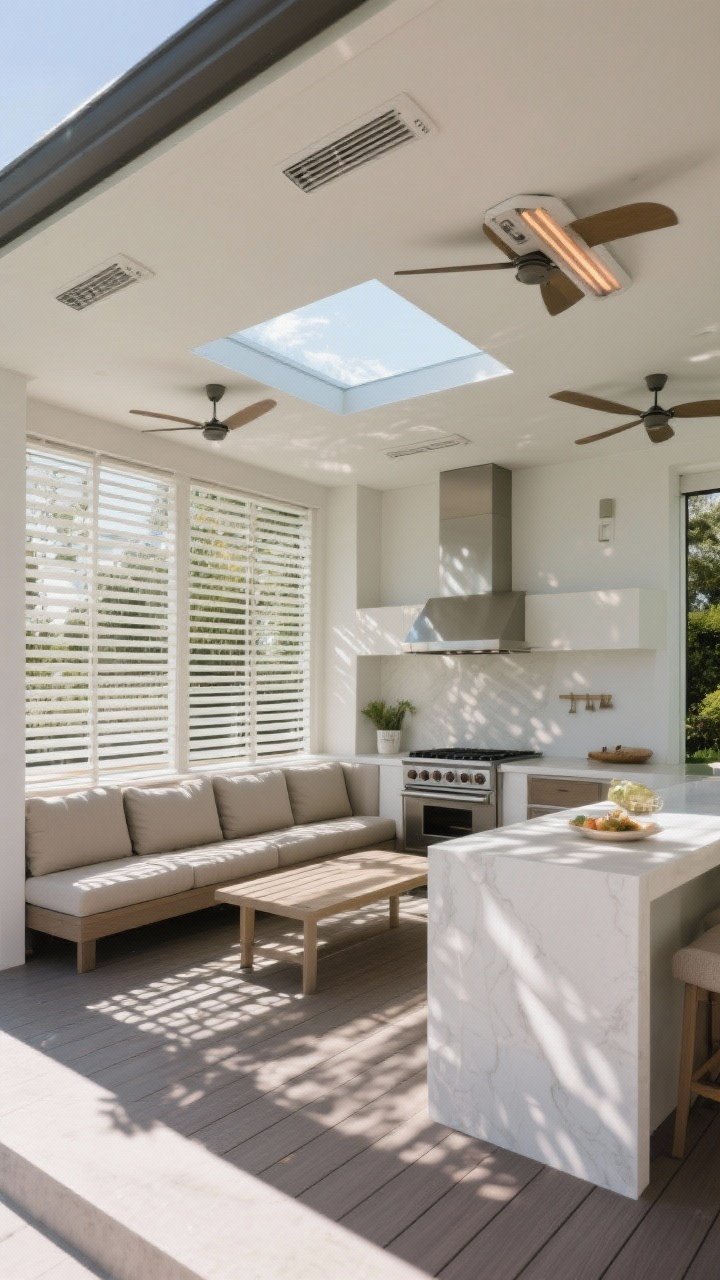
7. Create Shade and Shelter That Feels Resort-Worthy
Shade turns a hot slab into an all-day hangout. Shelter lets you grill through a summer sprinkle without drama.
Stylish Structures
- Pergola: Add louvers, vines, or retractable fabric for adjustable shade.
- Roofed pavilion: Great for four-season zones—throw in heaters and fans.
- Umbrellas: Oversized and tilting for flexible coverage on a budget.
Bonus points for integrated ceiling fans, infrared heaters, and skylights to keep the space comfy and bright. IMO, shelter is the secret to actually using your outdoor kitchen more than twice a year.
8. Add a Beverage Center That Earns Its Keep
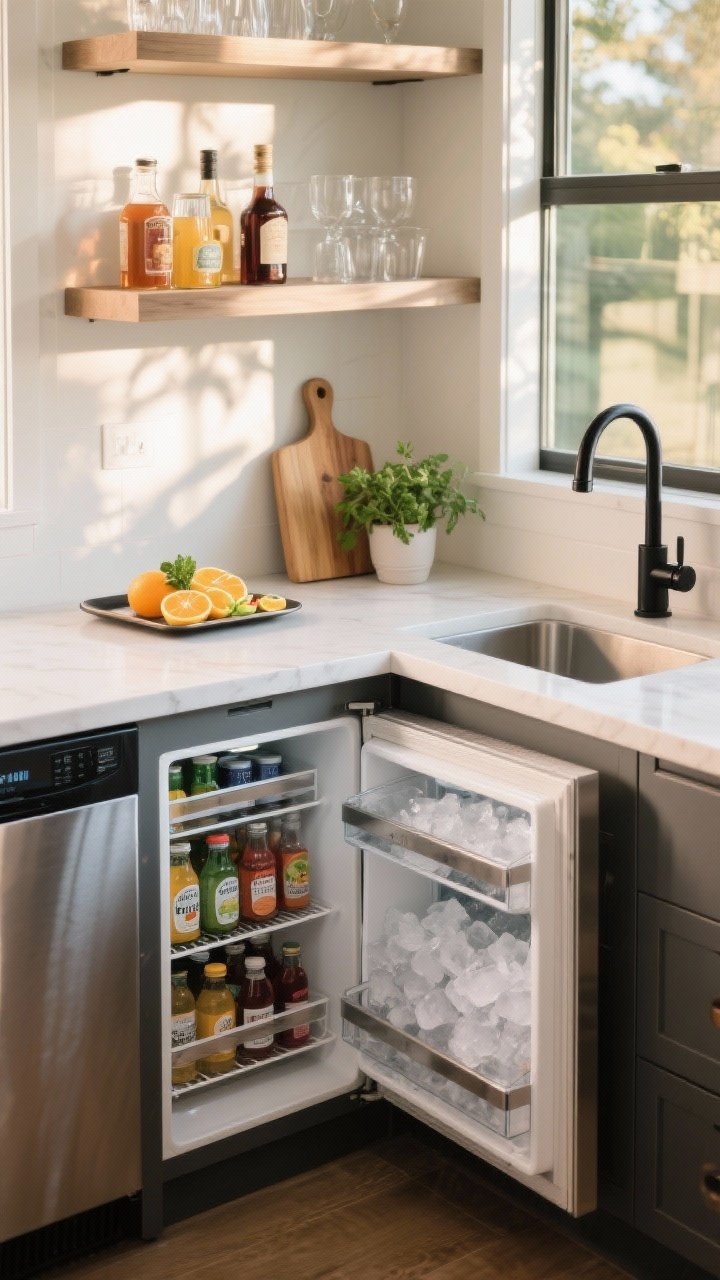
The fastest way to upgrade your hosting: make drinks easy. A good beverage zone keeps people happy and out of your prep space.
What to Include
- Undercounter fridge or drawer fridge: Drinks at kid height = fewer interruptions.
- Ice maker or drop-in cooler: Game-changer for parties.
- Bar sink and faucet: Rinse citrus, fill pitchers, keep things clean.
- Open shelving or rails: Display glassware, syrups, and a few good bottles.
Style it with a tray for garnishes, a cutting board, and a small herb pot. Suddenly you’re a mixologist. Weird how that happens.
9. Style With Textures, Greenery, and Cozy Layers
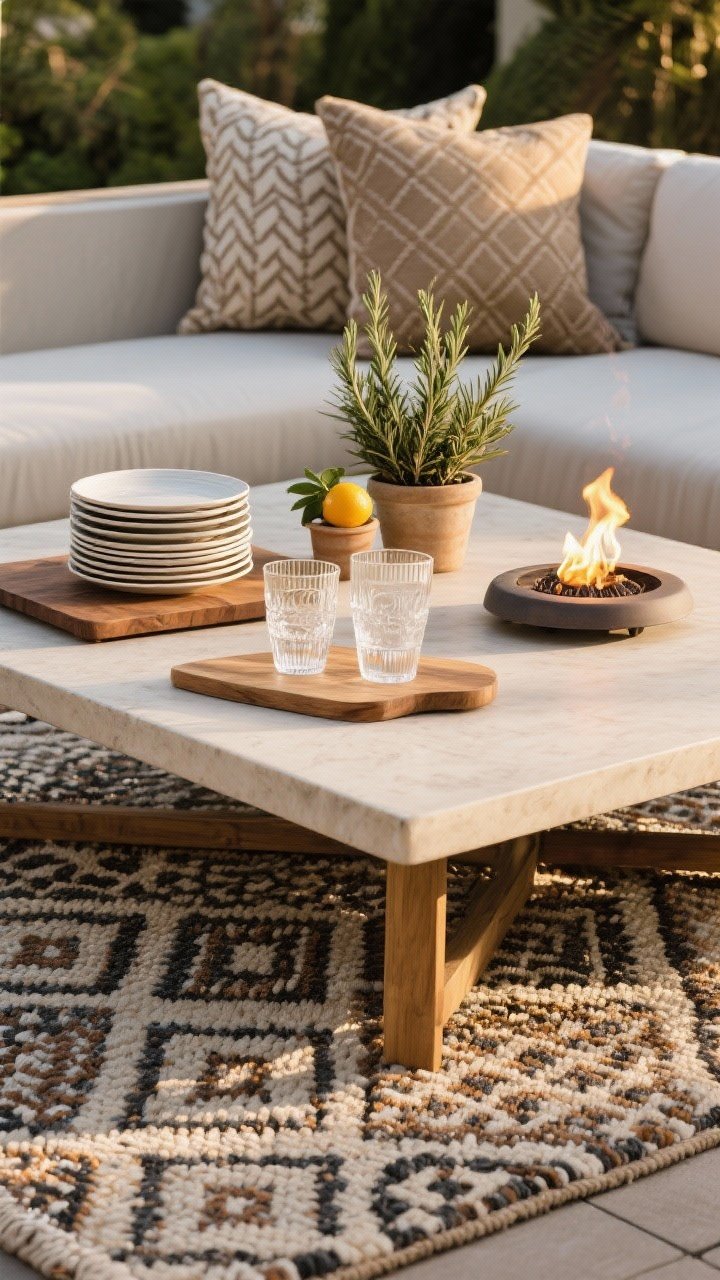
This is where your outdoor kitchen stops being a “setup” and starts being a vibe. Even minimal spaces can look curated with the right styling.
Elevated Styling Moves
- Textiles: Outdoor rugs, washable cushions, and patterned throw pillows to soften hard surfaces.
- Greenery: Potted olives or citrus, rosemary planters, and trailing vines on trellises.
- Serveware: Melamine plates, acrylic glassware, wood boards—practical but pretty.
- Fire element: Fire pit or tabletop burner for late-night s’mores and ambiance.
Keep a storage bench for throws and extra towels. Cozy = longer hangouts.
10. Plan for Storage, Safety, and Real-Life Maintenance
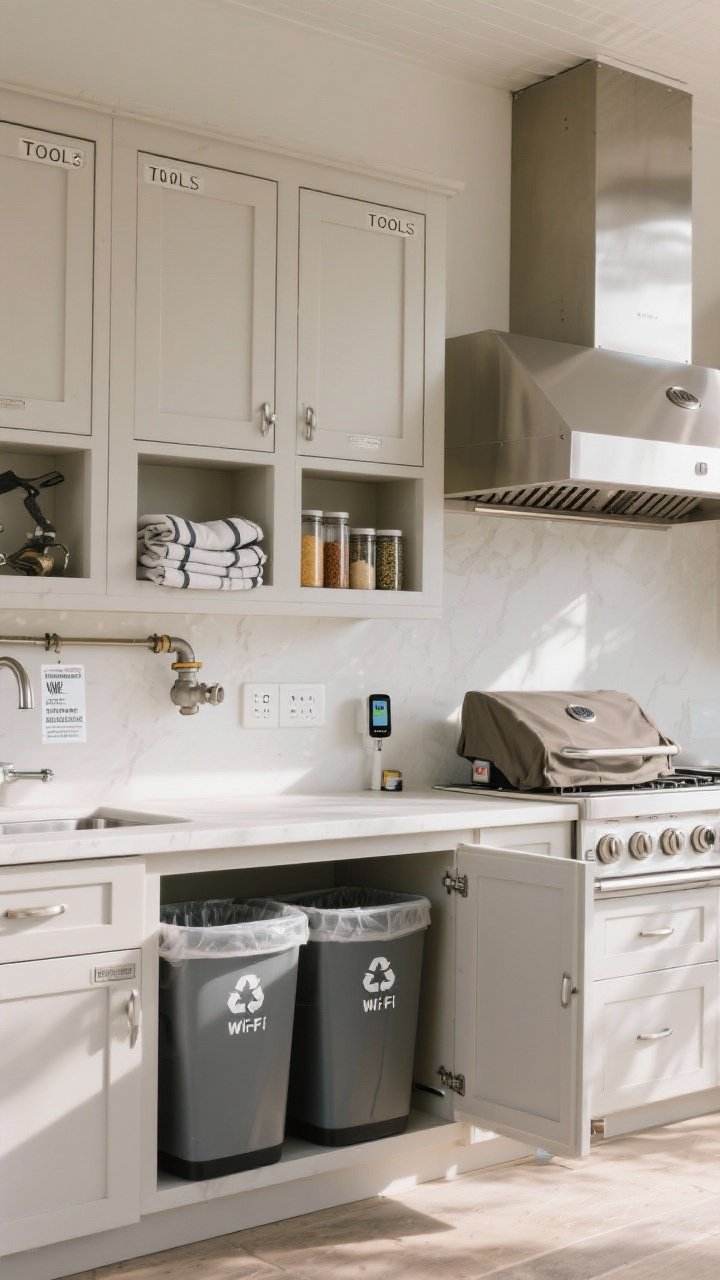
The unsexy stuff that makes your outdoor kitchen a joy instead of a chore. Get the bones right, and everything feels easier.
Must-Haves You’ll Thank Yourself For
- Closed storage: Weather-sealed cabinets for tools, spices, and cleaning supplies.
- Trash + recycling pull-outs: Hide the mess, keep critters out.
- Ventilation + clearances: Proper hood for built-ins and safe spacing from combustible materials.
- Cover + winterization: Fit a custom cover and shut off water before freezing temps.
- Smart controls: Outdoor-rated plugs, Wi‑Fi grill thermometers, and leak detectors near sinks.
Quick rule: store what you use most within arm’s reach. If you always need tongs, stop making them a scavenger hunt.
Bonus Mini-Checklist For Getting Started
- Measure your space and map the zones with painter’s tape.
- Pick 2–3 materials and repeat them for cohesion.
- Start with core appliances, add specialty ones later as you host more.
- Plan lighting and outlets early—retrofits are a pain.
Ready to elevate your backyard? Start with one idea—maybe it’s a killer island or a pizza oven—and build from there. Your future self (and your hungry friends) will absolutely approve.