10 Trending Kitchen Organization Ideas Everyone Is Pinning Right Now (and Actually Using)
Let’s be real: a messy kitchen kills the vibe faster than a dull knife. If your counters are cluttered and your drawers are chaos, you’re not alone—and you’re definitely in the right place. These trending ideas are all over Pinterest because they work. They’re smart, stylish, and totally doable without a full gut reno. Ready to make your kitchen feel bigger, calmer, and way more functional? Let’s dive in.
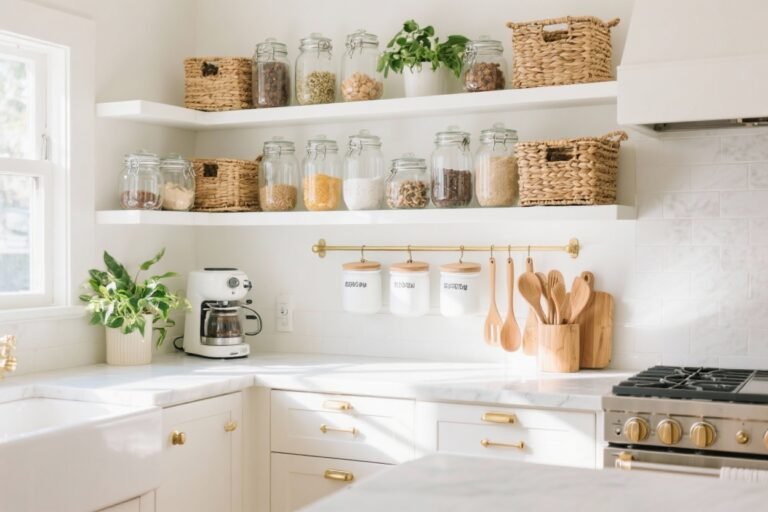
1. The “Decant and Display” Pantry Glow-Up
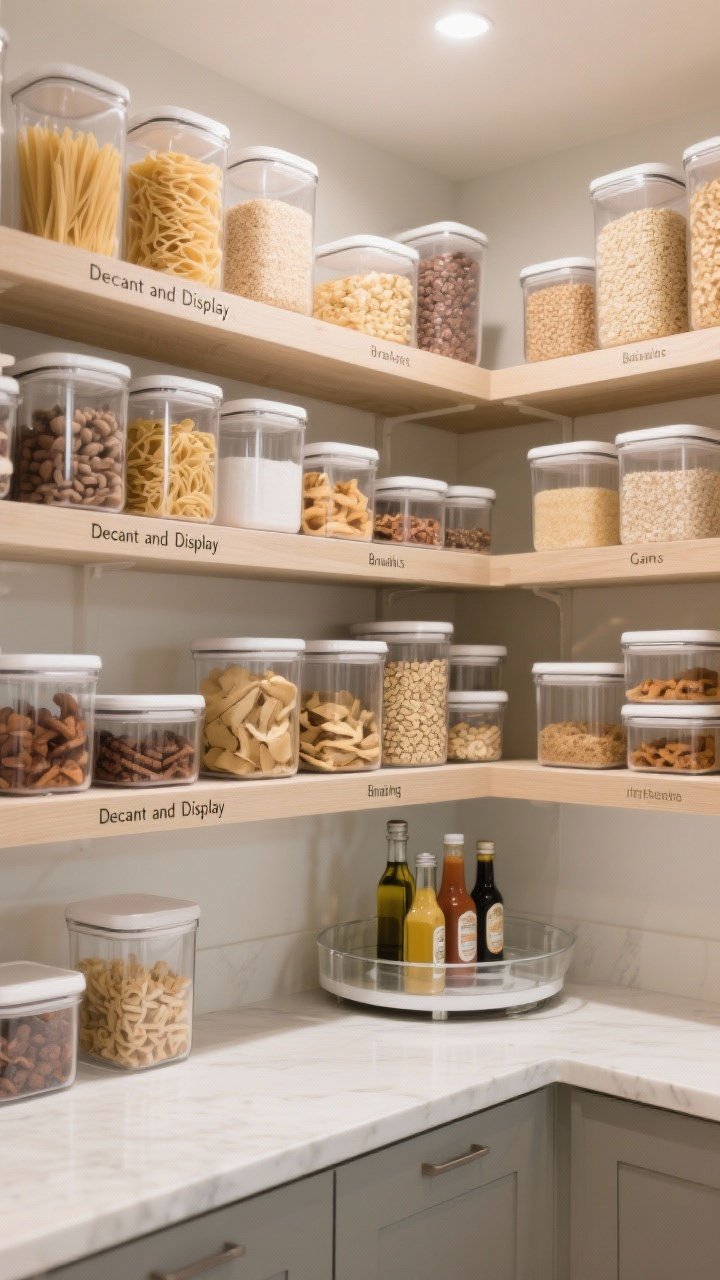
Nothing says “I have my life together” like rows of clear jars filled with pasta, grains, and snacks. It’s not just pretty—decanting actually helps you see what you have and prevents waste. Plus, pantry moths? Not welcome here.
Tired of snacking when you’re not even hungry? This reset helps you stop the loop and feel back in control.
A simple reset for moments when cravings take over. Easy to use, easy to repeat, and designed to help you feel satisfied instead of stuck.
Why It Works
- Clear visibility: You won’t buy duplicates of quinoa again, promise.
- Longer freshness: Airtight seals beat crumpled bags every time.
- Instant aesthetics: Shelfie-ready with zero effort.
Quick Tips
- Use stackable, airtight containers in 3-4 sizes so everything looks tidy.
- Label with a simple font or chalk labels—keep it consistent for that designer look.
- Designate zones: breakfast, baking, snacks, grains. Easy grab-and-go.
Pro move: Add a lazy Susan for oils and sauces. It’s the tiny spin that saves your sanity.
2. Deep Drawer Divas: Go Wide, Not High
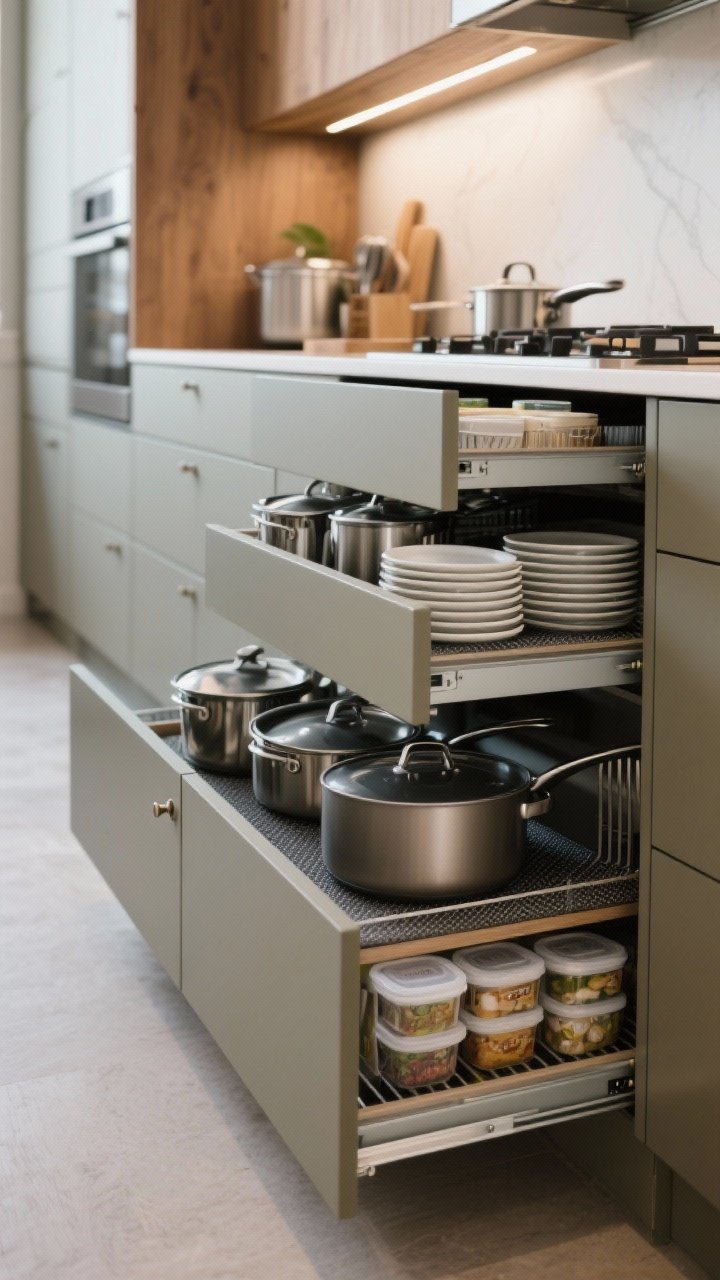
If your lower cabinets are black holes, it’s time for deep drawers. Wide, pull-out drawers let you see everything at once—no squats required.
What To Store
- Pots and pans with a lid organizer to keep tops upright.
- Plate stacks with non-slip liners—surprisingly stable and space-saving.
- Containers and lids (separate the lids, save your sanity).
Setup Tips
- Use adjustable dividers so your layout can evolve.
- Place heaviest items closest to the stove or prep zone.
- Measure your tallest pot before buying organizers—FYI, lids steal height.
Mini tip: Drawer pegs for plates are a game changer—hotel kitchen vibes at home.
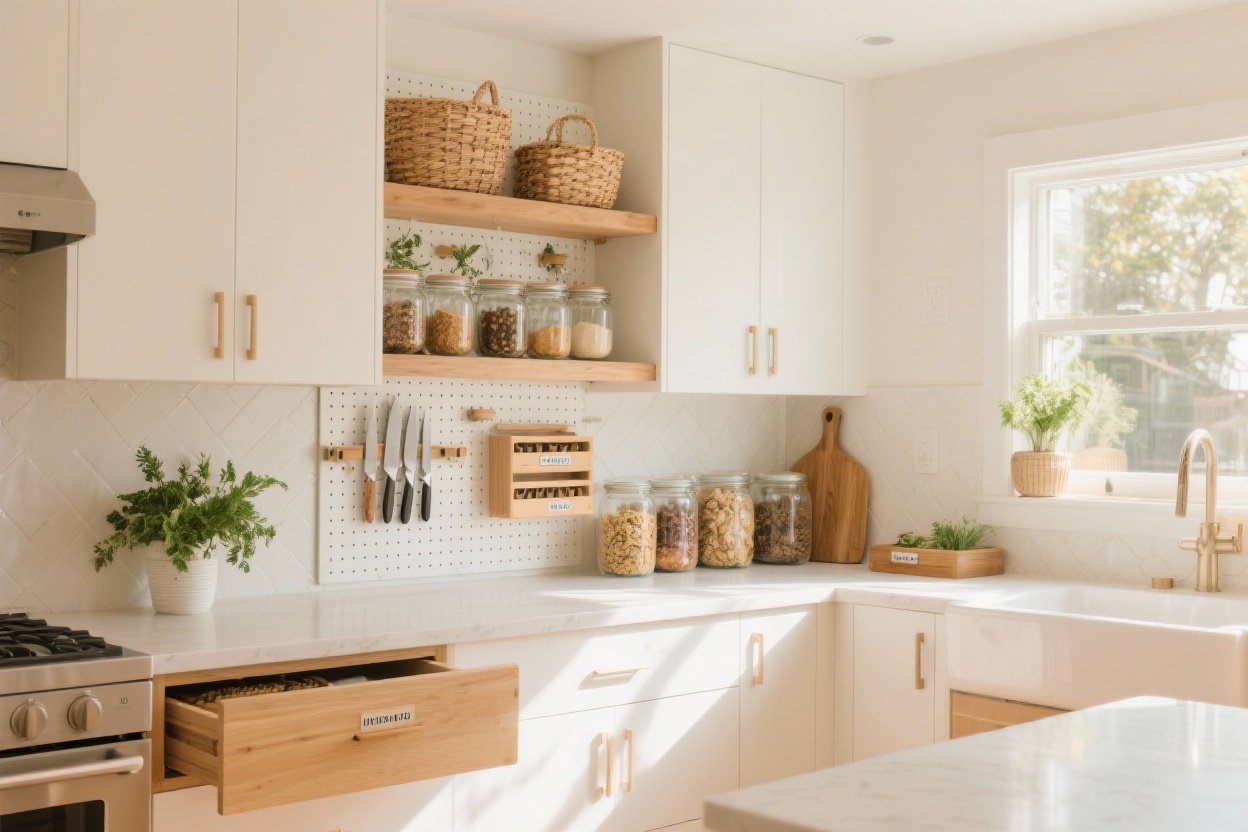
3. Pegboard Walls: Functional Art You’ll Actually Use
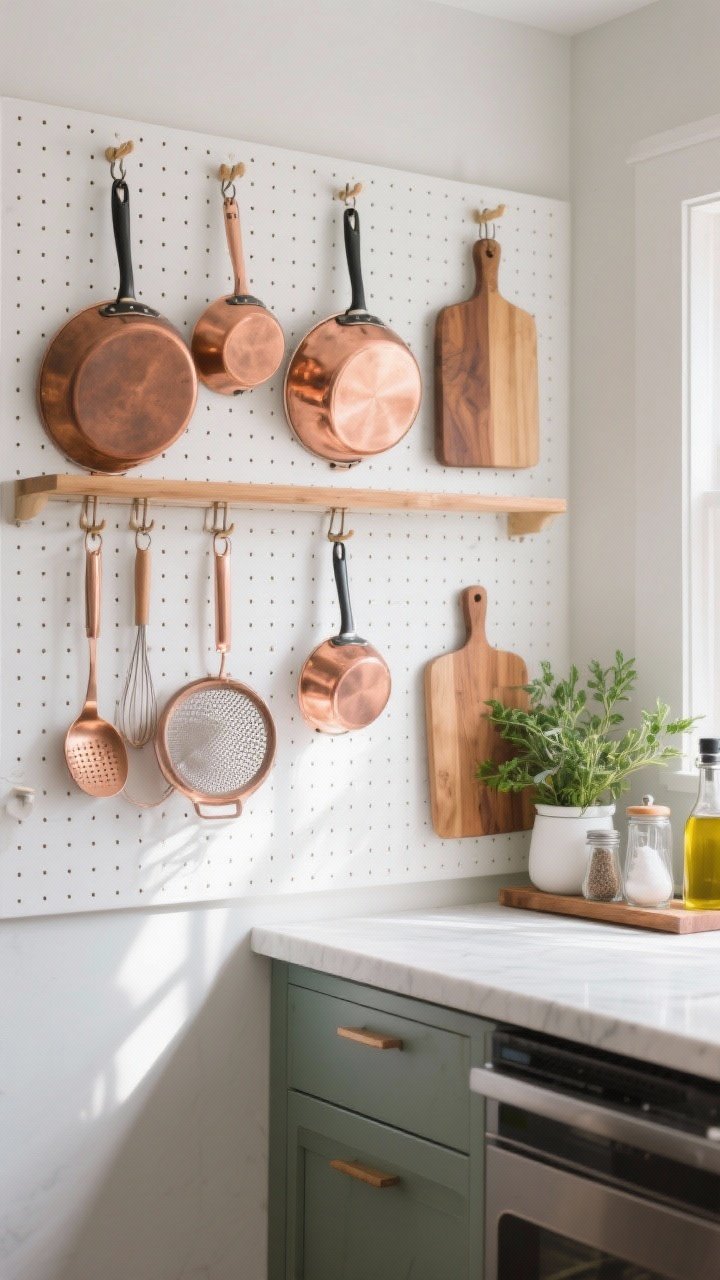
If you’re short on cabinets, go vertical with a chic pegboard. It’s part storage, part gallery wall, all efficiency. Hang your prettiest pans, strainers, and cutting boards like the kitchen-adjacent art they are.
Transform Your Home With 7,250+ Stunning Landscaping Designs—No Expensive Designers Needed!
- 🌿 Access 7,250+ stunning landscaping designs.
- 💰 Save thousands—no pro designer needed.
- 🏡 Plans for gardens, patios, walkways, and more.
- ✨ Simple, beginner-friendly DIY layouts.
- 🛠️ Customize any design to fit your yard.
Why People Love It
- Customizable layout: Hooks and shelves move as your tools change.
- Small-space hero: Perfect for renters or tight kitchens.
- Personality: Show off your copper pans or colorful utensils.
Install Smarts
- Use spacers behind the board so hooks slide in easily.
- Stick to a cohesive color palette for that editorial look.
- Keep the most-used items at eye/arm level for quick grabs.
Bonus: Add a small shelf for herbs, salt, and oil—your “mini mise en place.”
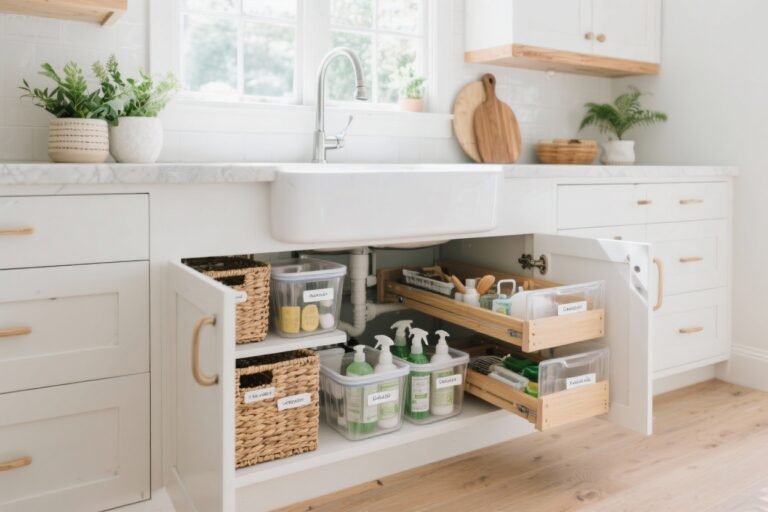
4. The Under-Sink Spa Treatment
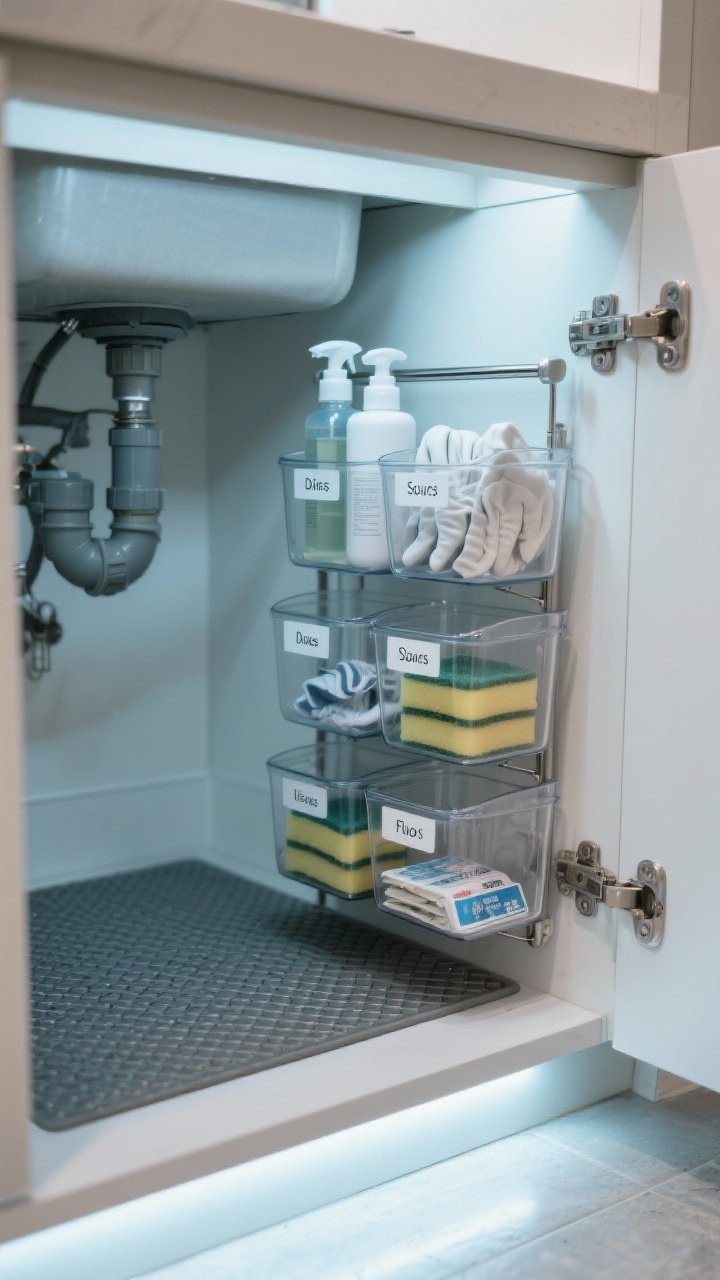
Let’s fix the scariest spot in your kitchen. The under-sink cabinet doesn’t have to be chaos. With a few smart organizers, it becomes a sleek cleaning command center.
What You Need
- Tiered pull-out caddy to dodge plumbing and still store a ton.
- Back-of-door bins for sponges, gloves, and dish tabs.
- Clear bins grouped by tasks: dish, surfaces, floors.
Fast Fixes
- Add a tension rod to hang spray bottles—more space instantly.
- Use a waterproof mat to protect your cabinet base from leaks.
- Decant dish soap and keep refills behind it—clean and streamlined.
Pro tip: Keep only what you use weekly here. Backstock lives in a closet or utility shelf.
5. The “Invisible” Counter: Appliance Garages
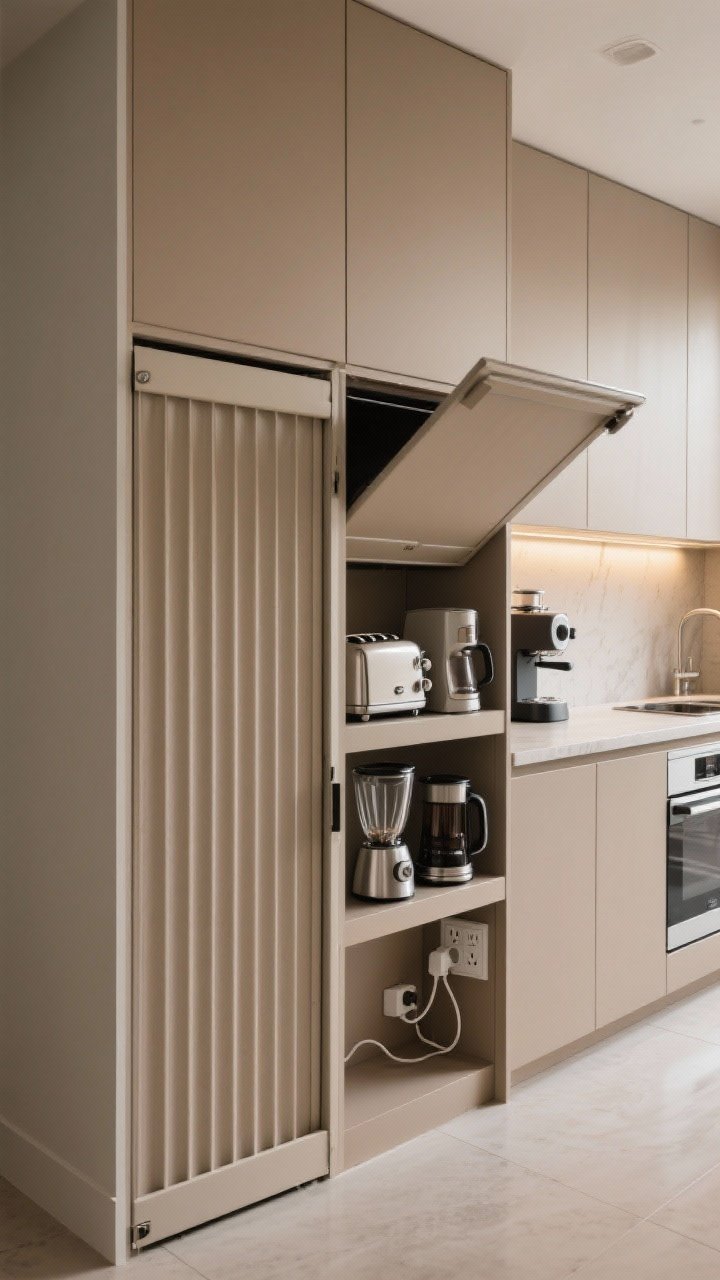
Toaster. Blender. Coffee maker. They’re essential—and also visual clutter. Enter the appliance garage: a sleek cabinet or counter nook that hides them but keeps everything plugged in and ready.
Design Options
- Tambour doors (those cool rolling doors) for a retro-modern vibe.
- Lift-up doors on an upper cabinet with a counter inside.
- Pocket doors that slide back for a clean, open look.
Plan It Right
- Install outlets inside so you can use appliances in place.
- Measure your tallest appliance—espresso machines need extra height.
- Keep it near your prep zone or coffee station for smooth flow.
FYI: Even a simple curtain panel or hinged door can create a budget-friendly garage.

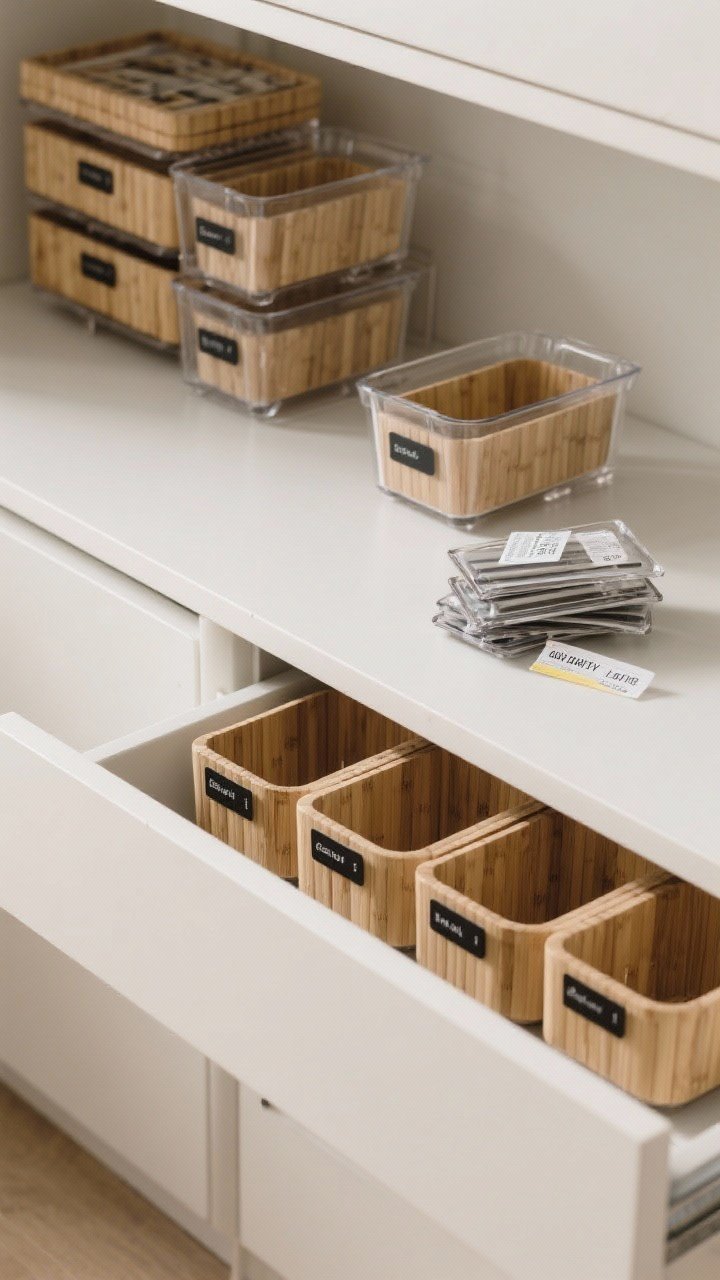
6. Drawer Within a Drawer: The Secret Organizer Hack
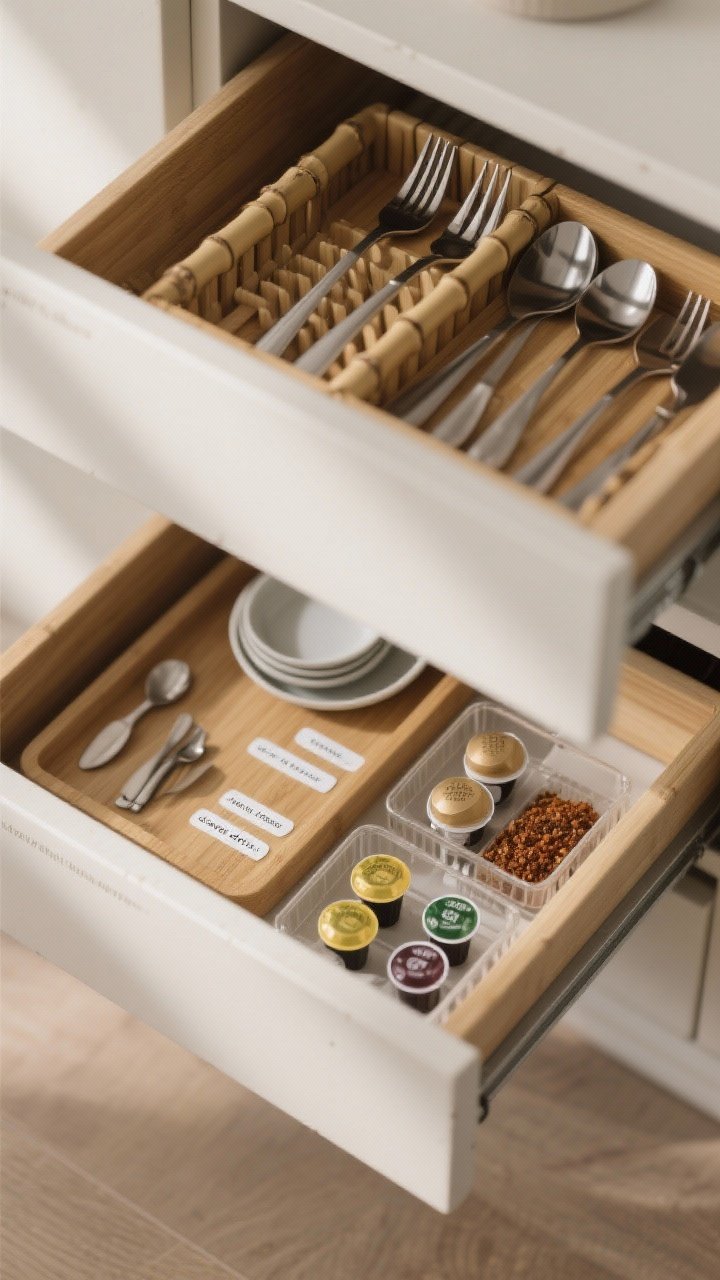
Layered organization is trending hard for a reason. Hidden inner drawers might be the most satisfying upgrade you can add—especially for utensils, tea, or baking tools.
Best Uses
- Flatware on top, serving pieces in the hidden layer.
- Spices flat-lay in a shallow inner drawer for easy reading.
- Tea + coffee pods neatly sorted by flavor.
How To Fake It (If You Can’t Renovate)
- Use stackable organizers with low-profile trays that slide.
- Choose clear or bamboo to keep the look cohesive with your other drawers.
- Label the inner layer so you remember what’s hiding under there.
Mini win: You’ll stop rummaging like a raccoon at midnight.
7. Magnetic Marvels: Knives, Jars, and More

Magnets aren’t just for the fridge. A wall-mounted magnetic knife strip frees up counter space, keeps blades sharp, and looks chef-y. But don’t stop there.
Magnetic Ideas to Try
- Undercabinet magnet bars for spice tins—so satisfying.
- Fridge-side rails with magnetic hooks for oven mitts and towels.
- Magnetic labels on steel shelves so you can rearrange zones on the fly.
Placement Tips
- Keep knives away from stove splash zones for safety and cleanliness.
- Install into studs or anchors—these strips are stronger than they look.
- Use uniform spice tins for a clean, minimalist effect.
IMO: Once you go magnetic for knives, you’ll never go back to a bulky block.
8. Zone Like a Pro: The Work Triangle’s Stylish Cousin
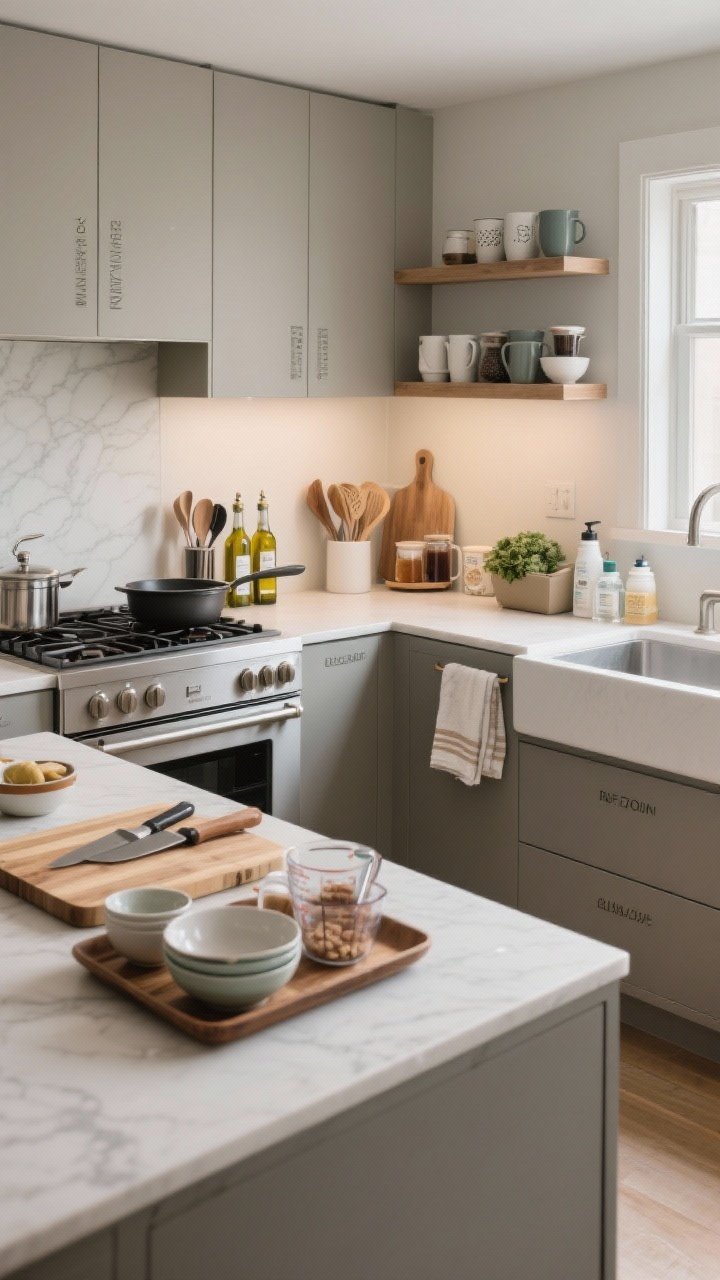
Gorgeous organization isn’t random. The best kitchens are zoned for how you actually cook. Group items by task so your movements are short and your counters stay clear.
Core Zones
- Prep Zone: Cutting boards, knives, bowls, measuring tools near the largest counter.
- Cooking Zone: Oils, spatulas, salt, pans within arm’s reach of the stove.
- Cleaning Zone: Towels, compost bin, soaps, and daily cleaners near the sink.
- Beverage Zone: Mugs, coffee/tea, filters, syrups in one dedicated spot.
Make It Stick
- Use trays to corral items and define micro-zones on counters.
- Keep duplicates only where they’re needed (yes, a second pair of scissors near the pantry is allowed).
- Label shelves so everyone in the house puts things back correctly. Revolutionary, I know.
Pro tip: A small compost caddy in the prep zone keeps counters from becoming a produce graveyard.
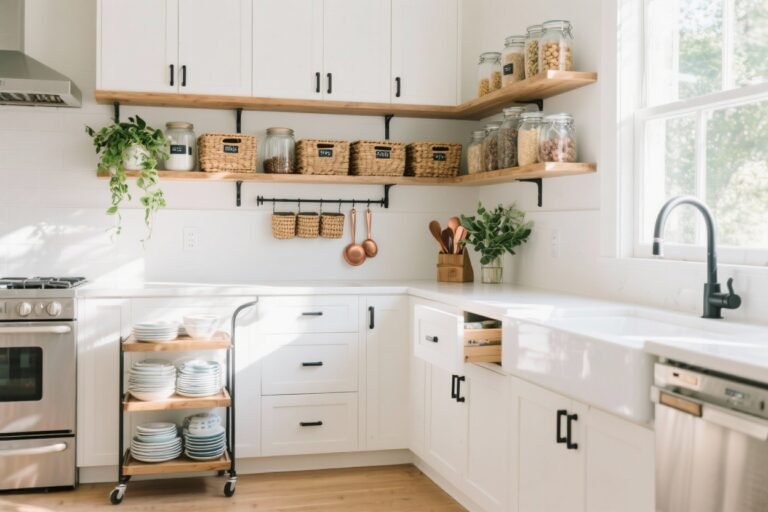
9. See-Through Smart: Glass-Fronts and Open Shelves (Without the Stress)
Open storage is still trending hard, but it can be high maintenance if you dump everything up there. The trick? Curate what you display, and keep the rest behind doors.
What Works on Display
- Everyday dishes in one color family for a calm look.
- Matching glassware and decanters—functional and pretty.
- Cookbooks with a bookend, plus one or two sculptural items.
Keep It Clean
- Use glass-front cabinets if you want the look without the dust.
- Limit each shelf to 2–3 groupings to avoid visual clutter.
- Add LED strip lighting for a soft, boutique glow at night.
FYI: If your shelves get dusty, it means they’re overstuffed. Edit down to the essentials.
10. The Rolling Cart Renaissance: Mobile Storage That Earns Its Keep
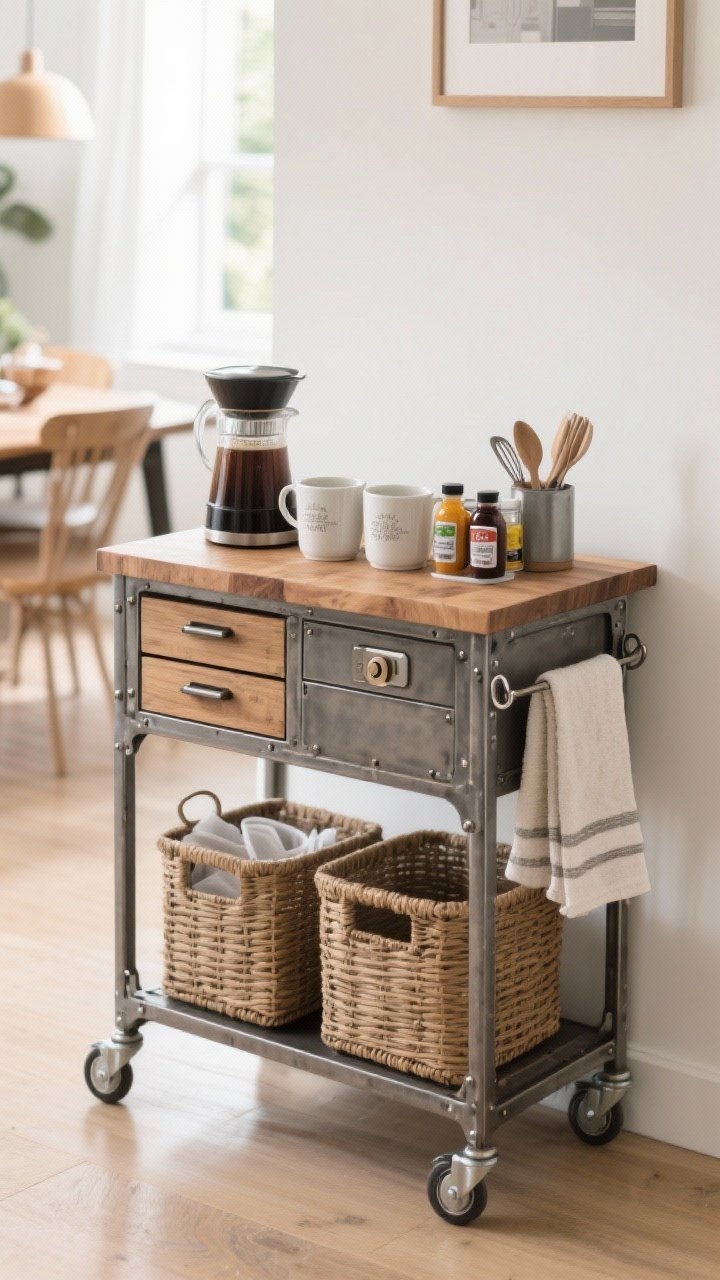
Rolling carts are having a moment, and for good reason. They add flexible storage exactly where you need it—then roll away when you don’t. Perfect for renters, small kitchens, or anyone who hosts.
Great Uses
- Prep cart: Keep knives, boards, bowls, and produce bins layered on shelves.
- Coffee/tea bar: Mugs on top, pods and syrups in drawers, filters below.
- Entertaining station: Bar tools, ice bucket, and glassware—park it near the dining area.
Make It Chic
- Choose narrow, sturdy wheels that glide and lock.
- Use matching bins or baskets to hide visual clutter.
- Top with a butcher block slab for bonus prep space.
Bonus move: Add S-hooks on the sides for towels or utensils. Instant efficiency.
Quick Style + Function Checklist
- Repeat materials (bamboo, clear acrylic, matte black) for a cohesive look.
- Label lightly—you’re not running a warehouse, just guiding good habits.
- Edit quarterly: Donate duplicates, toss expired items, and reshuffle zones as your cooking changes.
Conclusion
Your kitchen doesn’t need to be bigger—it just needs a smarter system. Start with one or two ideas from this list and build from there. A few clear containers, a magnet strip, and a zoned counter can seriously change your daily flow. You’ve got this. And when your kitchen looks like a Pinterest board come to life? Don’t forget to pin it—sharing is caring.