5 Diy Fall Porch Decor Projects That Look Expensive but Aren’t

Ready to make your porch look like a cozy magazine spread—without maxing out your credit card? Same. These five DIY projects bring all the autumn drama (in a good way) with textures, warmth, and those rich fall vibes. They’re simple, customizable, and honestly, your neighbors will assume you hired a stylist. We’ll let them wonder.
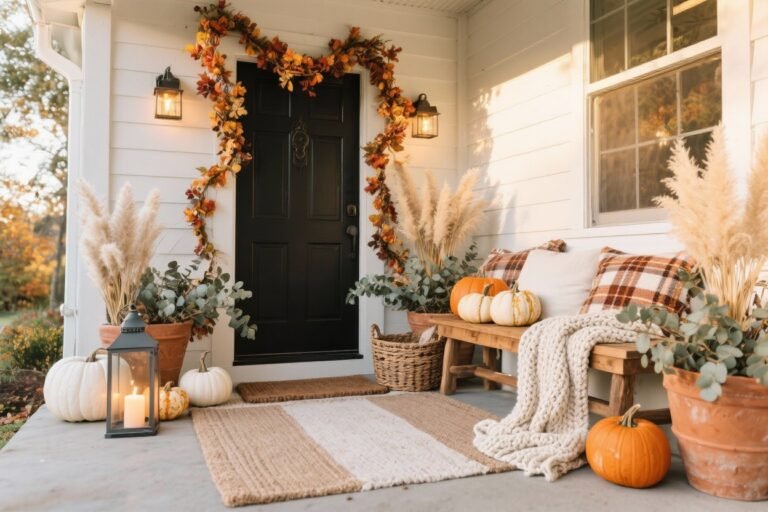
1. Luxe Layered Doormat Moment
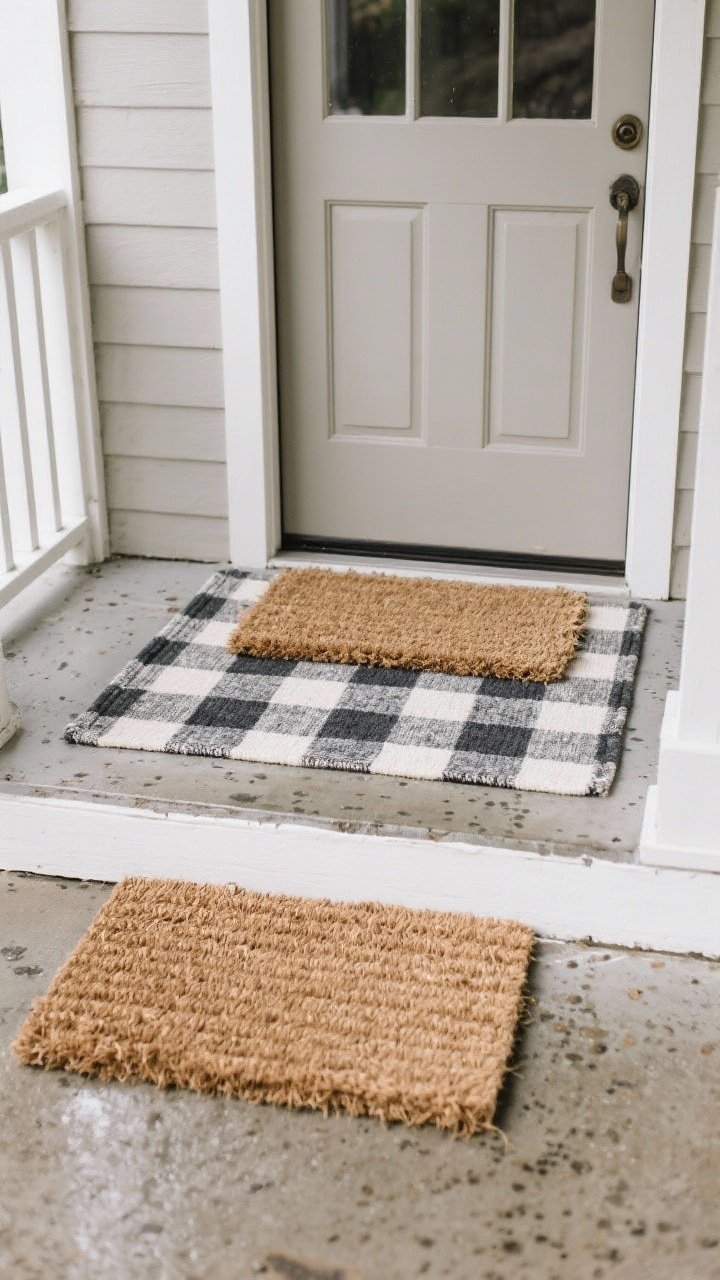
Nothing says “hello, fall” like a layered doormat setup that looks straight off Pinterest. You’ll stack a bold patterned rug under a classic coir mat for instant texture and color. It’s the easiest way to make your entry look curated, not crowded.
Tired of snacking when you’re not even hungry? This reset helps you stop the loop and feel back in control.
A simple reset for moments when cravings take over. Easy to use, easy to repeat, and designed to help you feel satisfied instead of stuck.
What You’ll Need
- Outdoor rug (2×3’ or 3×5’) in a simple stripe or plaid
- Coir doormat with a minimal graphic or a fun fall phrase
- Non-slip rug pad (optional but smart)
How To Style It
- Pick a rug with high-contrast pattern and a neutral palette so it feels classic.
- Center the coir mat on top, leaving a 3–5″ border so the layers read as intentional.
- Angle the bottom rug slightly if your porch is narrow—adds movement and looks designer-y.
Pro tip: If your porch is covered, choose a woven cotton rug. If it’s exposed, go for a polypropylene option that laughs at rain and muddy boots.
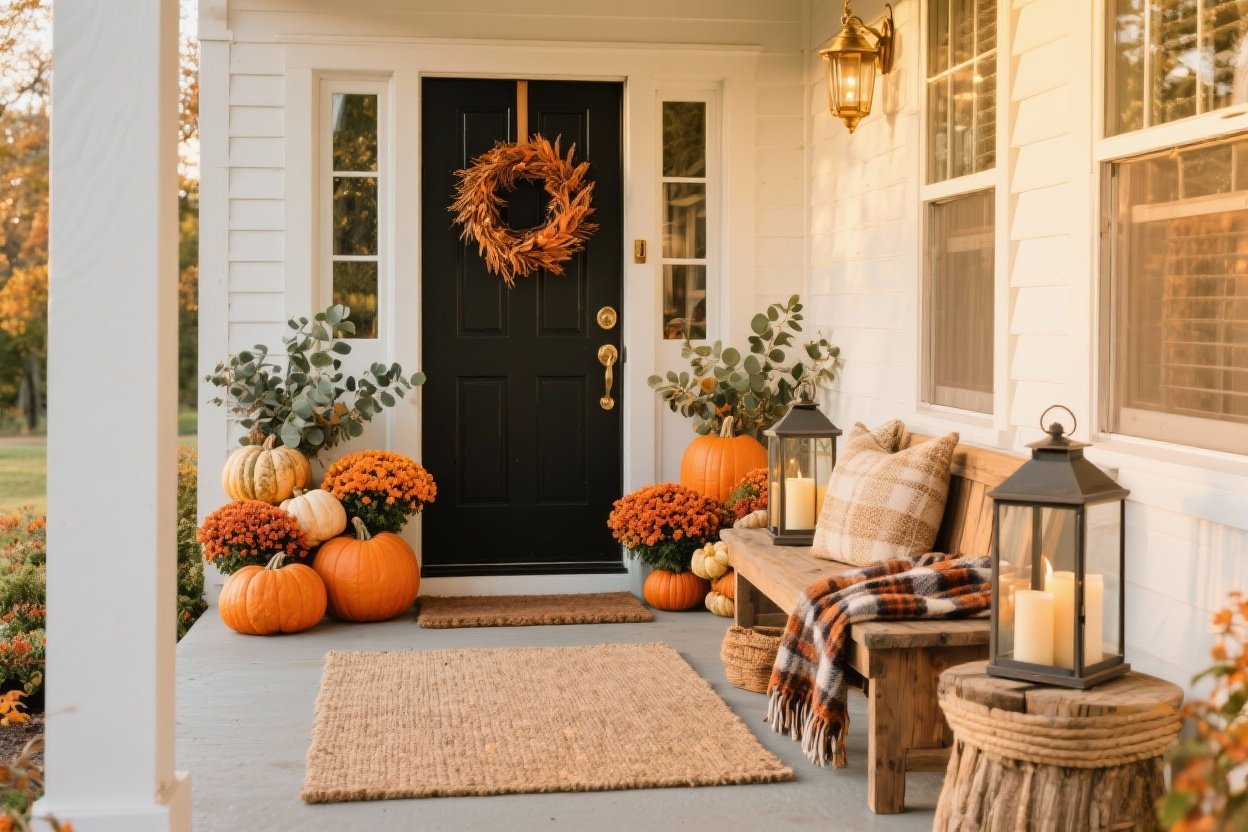
2. Elevated Pumpkin Tower (No Carving Required)
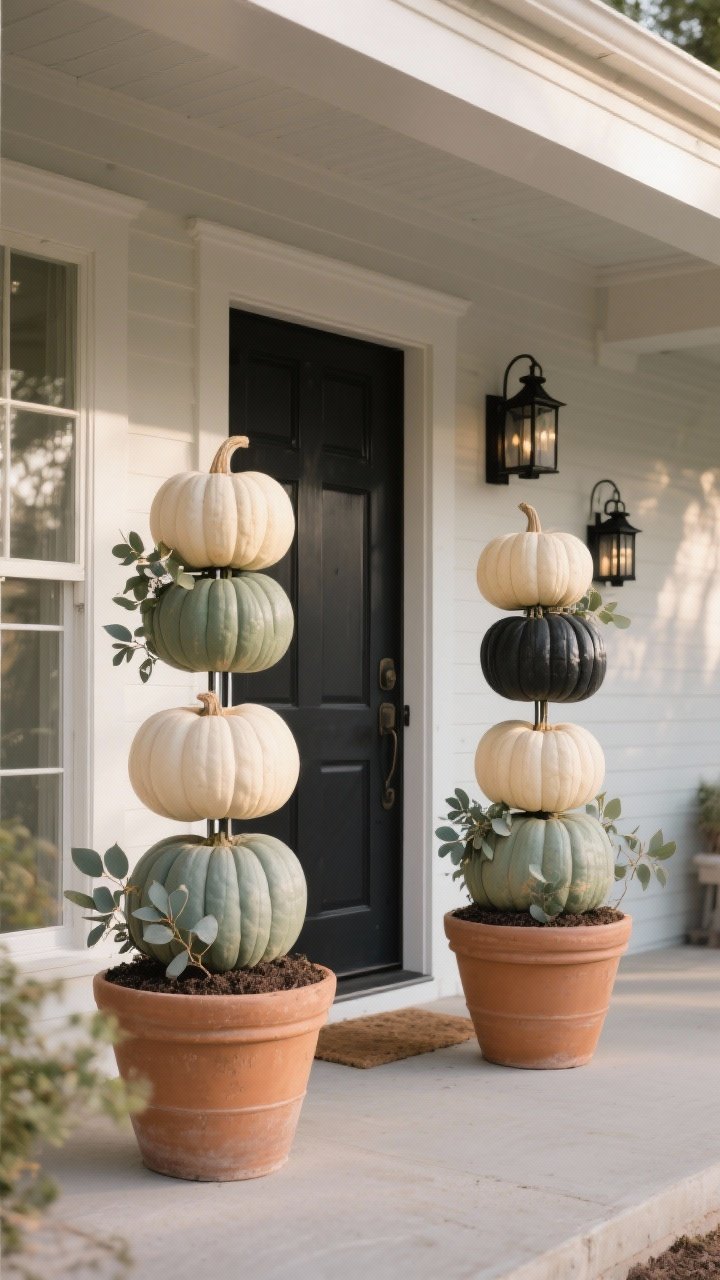
We love a pumpkin moment, but carving is messy and, IMO, overrated. Instead, stack pumpkins like a chic topiary for height and drama. It’s elegant, durable, and way more “grown-up fall” than jack-o’-lantern chaos.
What You’ll Need
- Three pumpkins per tower in descending sizes (Cinderella or heirloom look luxe)
- Wooden dowel or metal rod + planter with soil or sand
- Construction adhesive or floral pins
- Optional: Matte spray paint in cream, sage, or charcoal for a modern palette
How To Build
- Fill a planter with sand/soil and anchor the rod vertically.
- Drill a small center hole under each pumpkin (FYI: go slow) and slide them down largest to smallest.
- Stabilize with adhesive between layers and tuck in eucalyptus or faux fall leaves.
Style it: Flank the door with two towers for symmetry. Or do one tower and balance with a lantern cluster on the other side.
3. “Designer” Foraged Wreath With Ribbon Tail
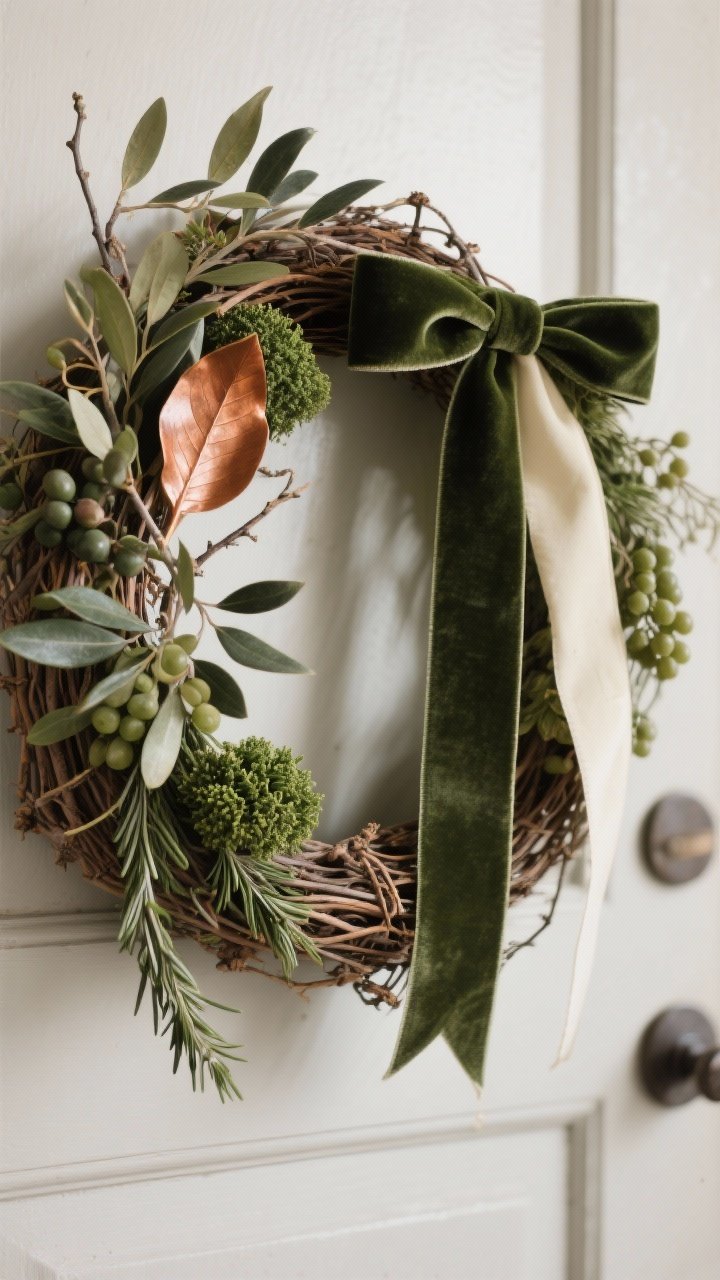
Store-bought wreaths can be… loud. Make your own with a neutral base and a long ribbon tail for that upscale florist vibe. It feels custom because it is, and it’s shockingly easy.
Transform Your Home With 7,250+ Stunning Landscaping Designs—No Expensive Designers Needed!
- 🌿 Access 7,250+ stunning landscaping designs.
- 💰 Save thousands—no pro designer needed.
- 🏡 Plans for gardens, patios, walkways, and more.
- ✨ Simple, beginner-friendly DIY layouts.
- 🛠️ Customize any design to fit your yard.
What You’ll Need
- Grapevine wreath form (18–24″)
- Foraged greens: magnolia leaves, olive branches, boxwood, rosemary
- Floral wire or hot glue
- Extra-wide ribbon (2.5–4″) in velvet, linen, or grosgrain
Assembly
- Cluster foliage in asymmetrical sections (heavier on one lower side) for an editorial look.
- Secure stems facing one direction so it flows naturally.
- Tie the ribbon at the heavy side and let the tails hang long—instant luxury.
Palette ideas: Deep green + copper ribbon, dusty sage + cream velvet, or all-green with a black grosgrain bow for modern minimalism.
4. Cozy Crate Vignette With Hidden Storage
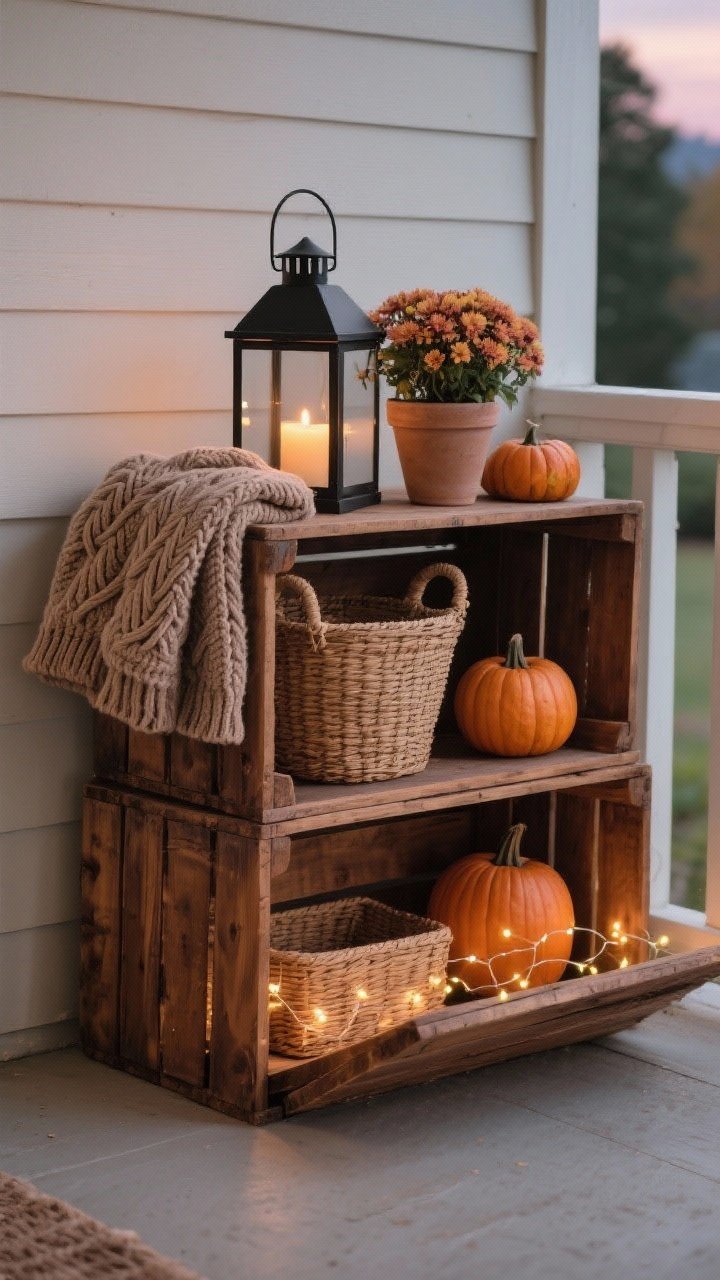
Think of this as your porch’s coffee table moment—layered, cozy, and super functional. Stacked wooden crates can display decor on top and quietly hide extra gloves, dog leashes, or those random things you swear you’ll put away later.
What You’ll Need
- 2–4 wooden crates (stain them walnut or leave raw for rustic charm)
- Chunky throw blanket or two (outdoor-safe if exposed)
- Lanterns with LED candles, a small potted mum, and a mini pumpkin trio
- Optional: small battery fairy lights for nighttime sparkle
How To Style
- Stack crates staggered—one upright, one on its side—to create levels.
- Top with a folded throw, then layer a lantern and plant for height variation.
- Use the inside of a crate to tuck in a basket for storage or fairy lights for glow.
Designer trick: Repeat materials at least twice—wood crates, rattan basket, wood-handled lanterns—so the whole vignette feels cohesive, not random.
5. Moody Candle Glow With Mixed Metals
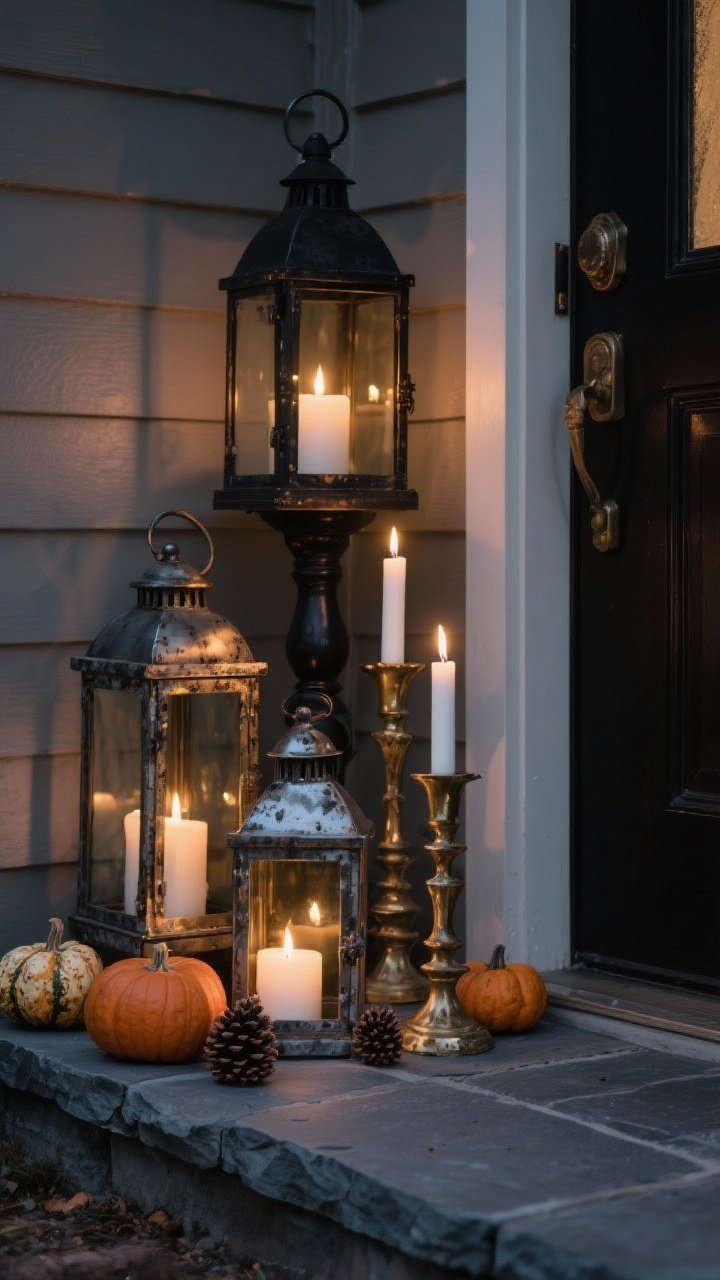
If you want instant ambiance, this is it. Mix lanterns, hurricanes, and brass candlesticks for a moody, layered glow. It looks expensive because of the metal mix and clustered heights, not the price tag.
What You’ll Need
- 3–5 lanterns or hurricanes in black, brass, or antique finish
- LED pillar candles in warm white (outdoor-safe)
- A couple of thrifted brass candlesticks + taper-style LED candles
- Optional: shallow tray or slate stepping stone as a base
How To Arrange
- Cluster in odd numbers on one side of the door for intentional asymmetry.
- Vary heights—tall lantern in back, mid-height in middle, short in front.
- Layer in a few mini pumpkins or pinecones around the base for texture.
Safety FYI: Use LED candles only, especially near fabric or dried foliage. Today’s flicker tech looks real, and your porch won’t, you know, light up.
Quick Styling Checklist
- Color palette: Choose 2–3 hues max (e.g., charcoal, cream, copper).
- Repetition: Echo one element—like plaid or brass—at least twice.
- Scale: One tall piece, one mid, a few smalls. Boom—balanced.
Final thought: None of these projects require pro skills—just a plan and a little layering magic. Pick two or three to start, and you’ll have a porch that looks editorial-level chic by the weekend. Now go make your stoop the neighborhood’s fall mood board.