10 Budget-friendly Kitchen Storage Ideas Under $50 You’ll Wish You Tried Sooner
Your kitchen can look chic and stay organized without lighting your wallet on fire. Promise. These smart, under-$50 storage ideas are easy to install, renter-friendly, and actually cute. Ready to ditch the clutter and make your counters look like you planned it that way? Let’s do it.
1. Shelf Risers That Double Your Cabinet Space
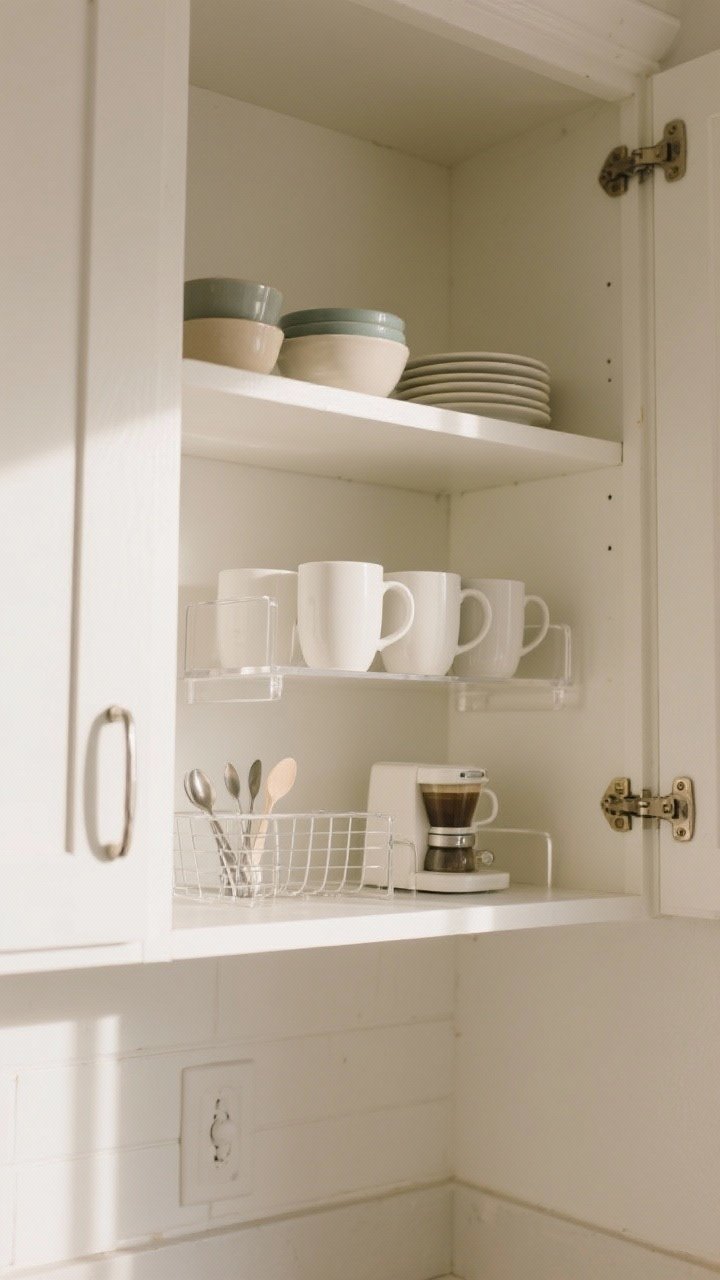
Vertical space is your BFF. Shelf risers instantly add a second level inside cabinets so you’re not stacking plates like Jenga. They’re cheap, sturdy, and no tools required.
Tired of snacking when you’re not even hungry? This reset helps you stop the loop and feel back in control.
A simple reset for moments when cravings take over. Easy to use, easy to repeat, and designed to help you feel satisfied instead of stuck.
Why it works
- Maximizes height so mugs, bowls, and small plates each get their own “floor.”
- Keeps stacks shorter, which means less clattering and fewer chips.
Quick tips
- Measure shelf depth first; most risers come in 10–16 inch widths.
- Use a riser just for coffee station gear: mugs up top, saucers and spoons below.
- Choose wire or acrylic if you want a lighter look; wood if you’re going for cozy.
2. Magnetic Magic: Knife Strips and Spice Tins
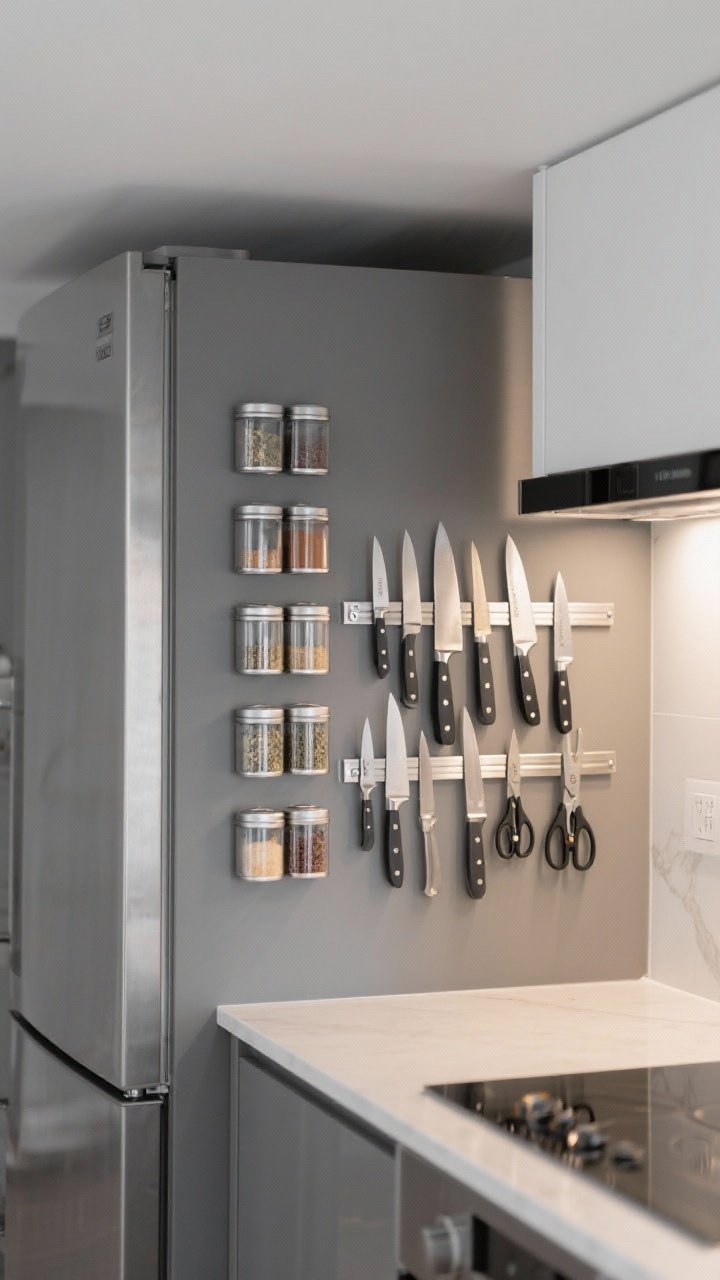
Clear your countertops with magnetic strips and tins. A wall-mounted magnetic knife strip is safer than a drawer jumble, and magnetic spice tins turn the side of your fridge into a minimalist spice rack.
Pro perks
- Frees counter space and keeps blades visible (no more mystery cuts).
- Spices are easy to grab mid-sauté—no cabinet treasure hunt.
How to do it
- Mount a stainless knife strip with heavy-duty adhesive if you’re a renter.
- Fill magnetic tins with your top 8–10 spices and label the lids for a clean look.
- Keep them away from heat so spices last longer.
3. Turn a Drawer Into a Tea, Snack, or Foil HQ
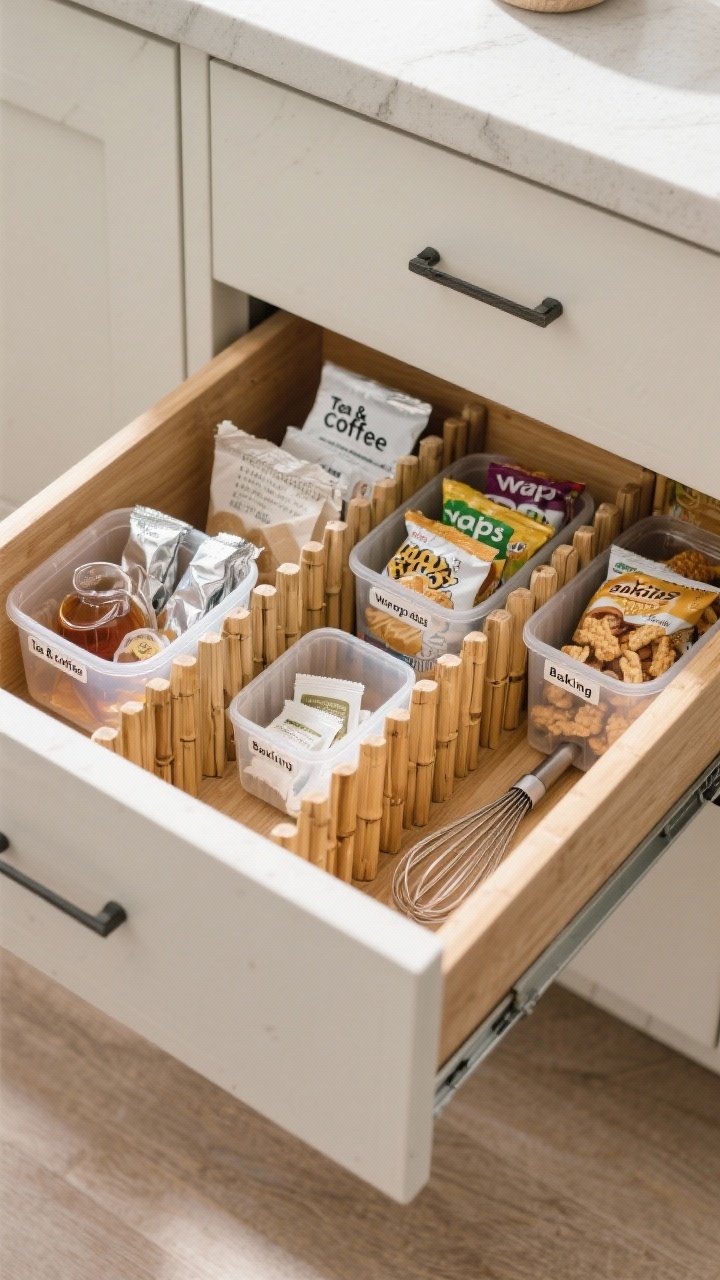
Drawers become chaos without dividers. Use adjustable bamboo organizers or budget plastic bins to create zones so everything has a home—foil, parchment, snacks, tea, you name it.
Set it up
- Measure before buying so dividers fit snugly and don’t slide around.
- Assign categories: tea & coffee, wraps & baggies, snacks, baking tools.
- Add labels so other people stop asking where the sandwich bags are (bliss).
4. Over-the-Door Racks That Work Overtime
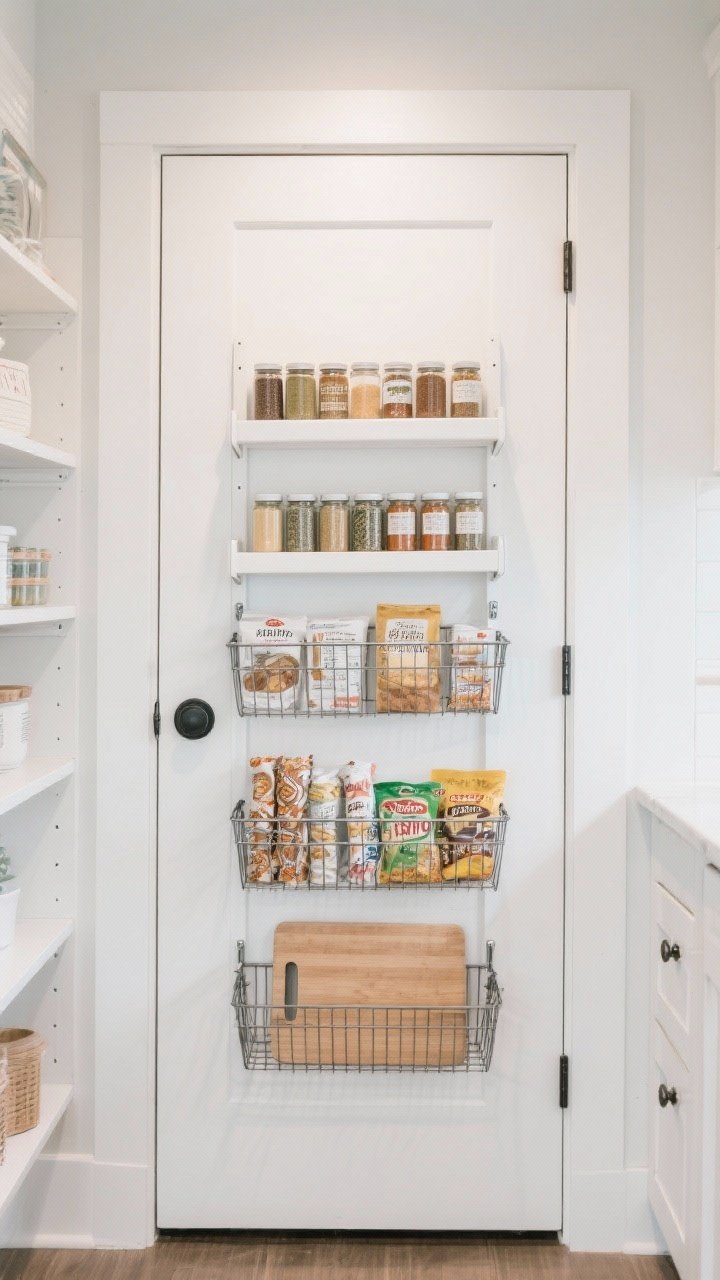
Don’t ignore the back of a door—it’s prime real estate. An over-the-door organizer on your pantry or cabinet door can hold wraps, spices, snacks, cleaning supplies, or even cutting boards.
Why you’ll love it
- No drilling and installs in minutes.
- Great for small kitchens with zero extra cabinet space.
Pro tip
- Choose shallow shelves for spices so the door still closes smoothly.
- Use baskets to corral small packets and baking supplies.
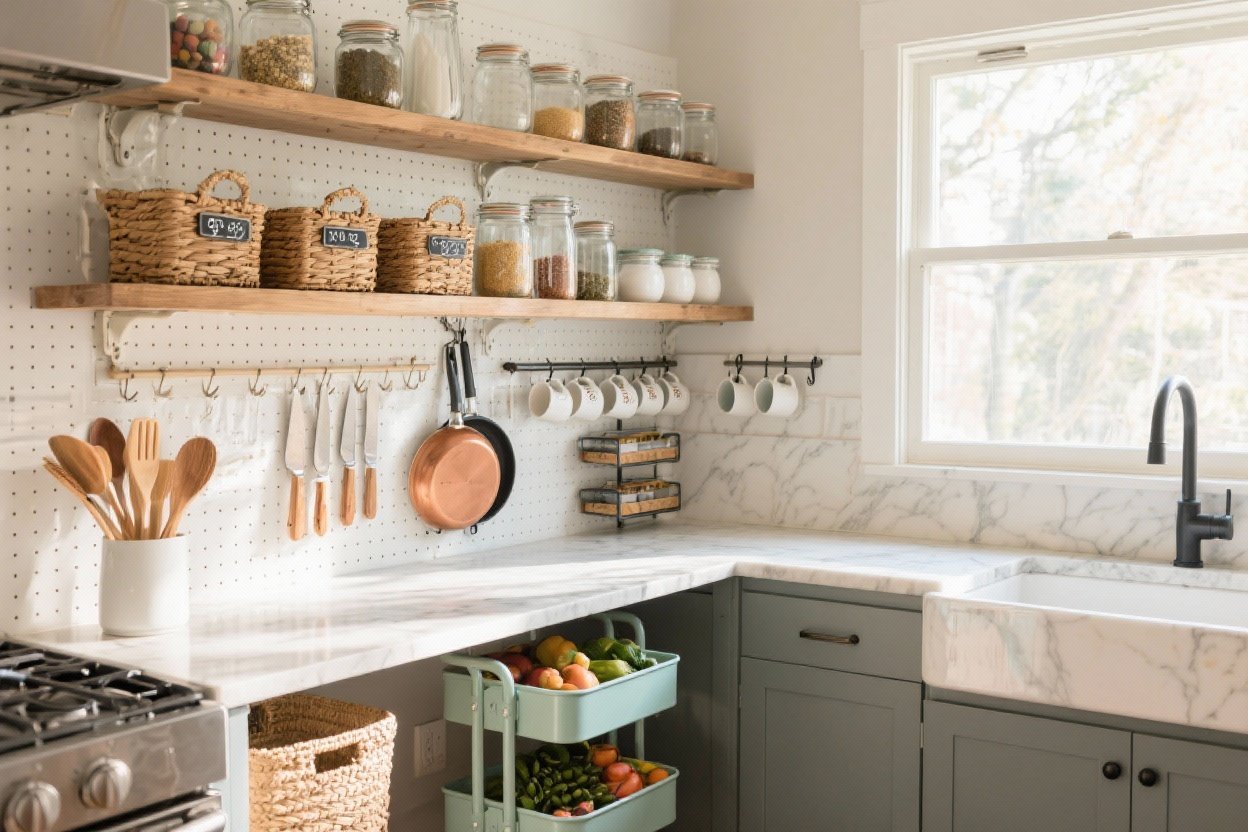
5. Pegboard Wall: The Prettiest Catch-All
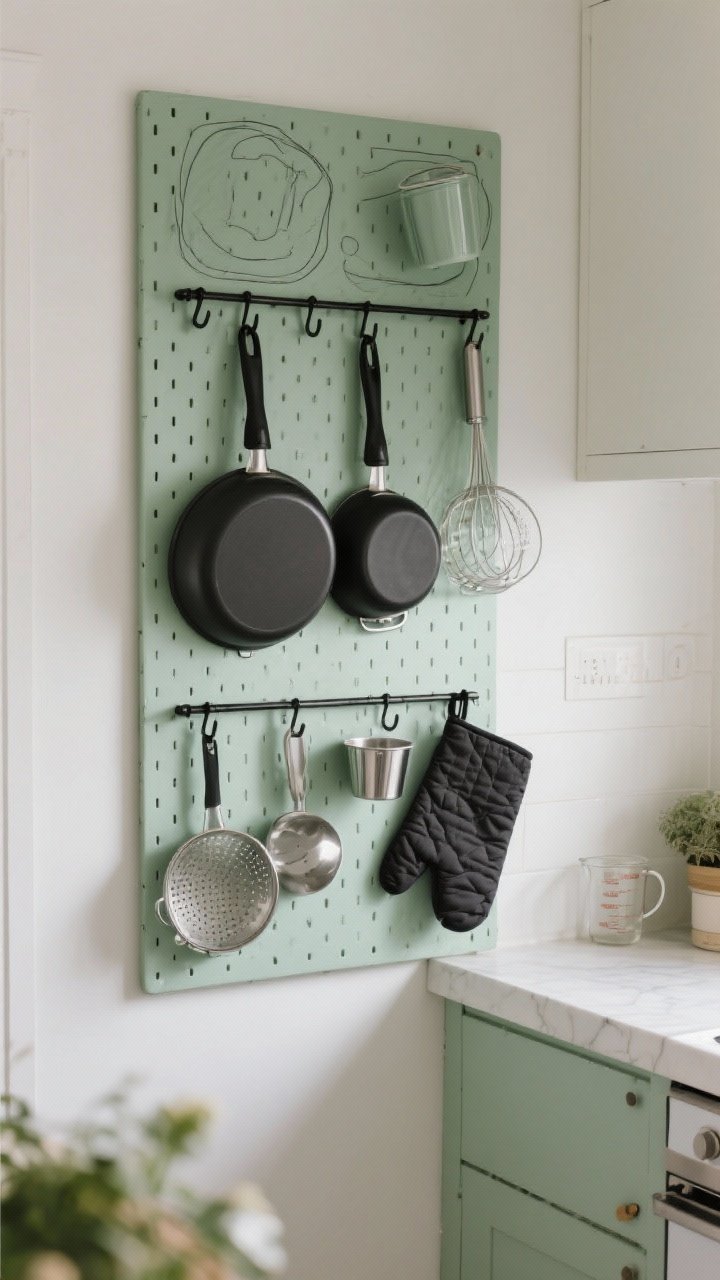
A painted pegboard looks cool and flexes with your needs. Hang pans, strainers, measuring cups, and oven mitts in one place—bonus points if you color-coordinate your hooks.
Transform Your Home With 7,250+ Stunning Landscaping Designs—No Expensive Designers Needed!
- 🌿 Access 7,250+ stunning landscaping designs.
- 💰 Save thousands—no pro designer needed.
- 🏡 Plans for gardens, patios, walkways, and more.
- ✨ Simple, beginner-friendly DIY layouts.
- 🛠️ Customize any design to fit your yard.
How to style it
- Stick to one metal finish for hooks (brass, black, or chrome) for a curated look.
- Hang items by frequency: daily-use tools at eye level, special tools up high.
- Outline each item with a subtle pencil mark if you love a “put-it-back-here” system.
FYI: A small pegboard panel and hooks set typically stays well under $50.

6. Lazy Susans: Not Just for Grandma’s Table
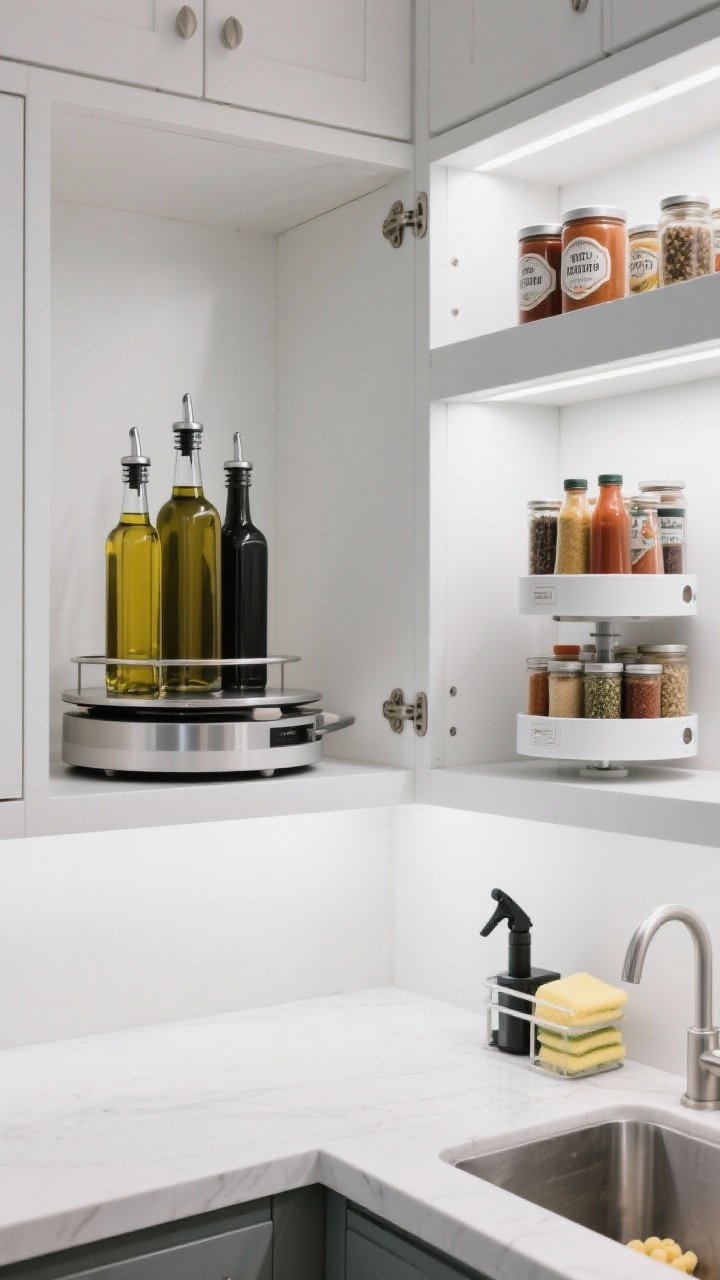
Turntables make deep cabinets behave. Place one in a corner cabinet or fridge shelf to spin your way to sauces, oils, and condiments without knocking things over.
Best bets
- Low-lip turntables for oils and vinegars; high-lip for sauces and jars.
- Use a two-tier turntable for spices to double capacity without stacking.
Where to use
- Under-sink cleaning supplies (sprays and sponges stay in view).
- Breakfast nook: honey, nut butter, jams—instant calm morning vibes.
7. File Your Lids and Bakeware Vertically
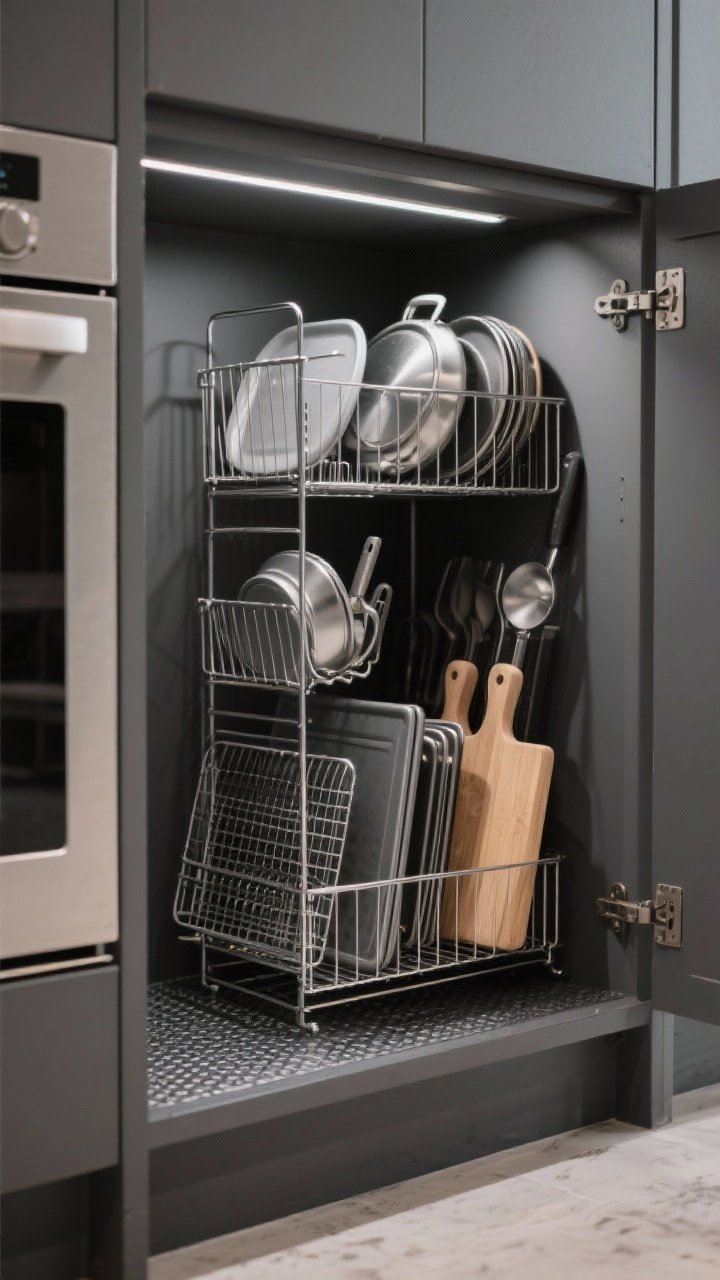
Stop stacking pans like a tower of stress. Use vertical organizers or a simple metal file rack to store pot lids, baking sheets, and cutting boards upright.
Why this is genius
- No more clattering when you need the one on the bottom.
- Makes it easier to spot sizes and grab only what you need.
Setup tips
- Place rack near the oven for baking sheets and cooling racks.
- Use grippy shelf liner under the organizer to keep it from sliding.
8. Stick-On Hooks and Rails For Vertical Wins
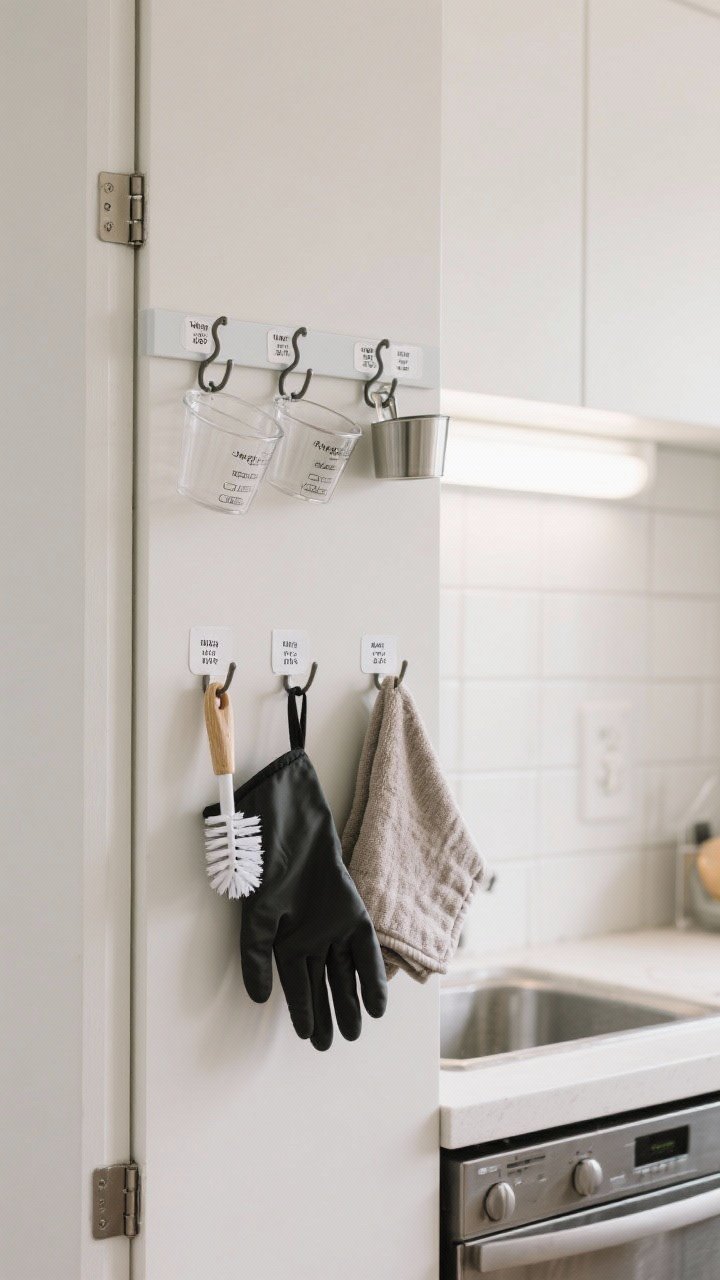
Walls, cabinet sides, and even the inside of doors can hold more than you think. Use adhesive hooks or a budget-friendly rail to hang measuring cups, potholders, mitts, and towels.
Good spots
- Inside sink cabinet door for dish brushes and gloves.
- Side of a cabinet for oven mitts and a microfiber towel.
- Above the backsplash for a minimal rail with S-hooks for utensils.
Pro tip
- Check the weight rating on adhesive hooks—most handle 2–5 lbs comfortably.
9. Stackable Clear Bins That Actually Keep You Honest
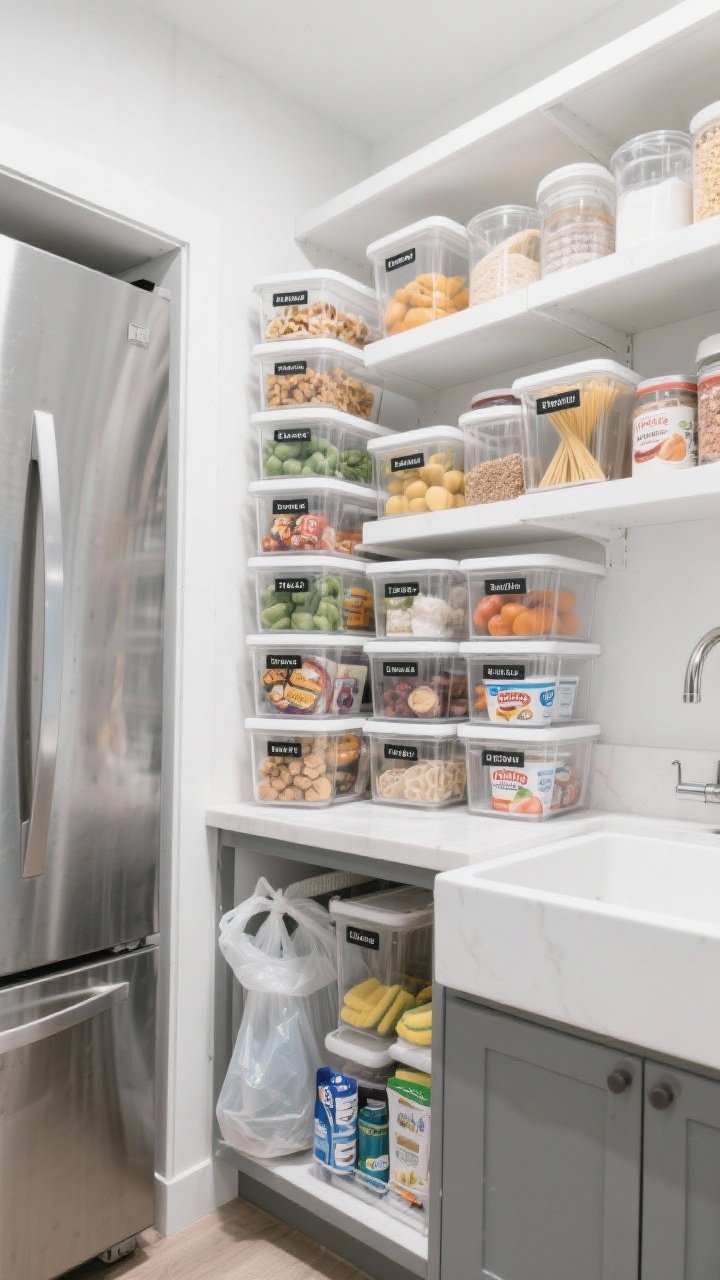
Clear stackable bins stop the “I bought paprika again?” problem. When you can see everything, you buy smarter and waste less.
Where to use
- Pantry: snacks, pasta, baking ingredients—labels help even more.
- Fridge: produce, deli items, and yogurt so nothing gets lost in the back.
- Under-sink: trash bags, dishwasher pods, extra sponges.
Make it stick
- Choose one bin style so they stack neatly.
- Use wipeable labels (IMO, a game-changer for rotating contents).
10. Decant Your Dry Goods Like a Minimalist Chef
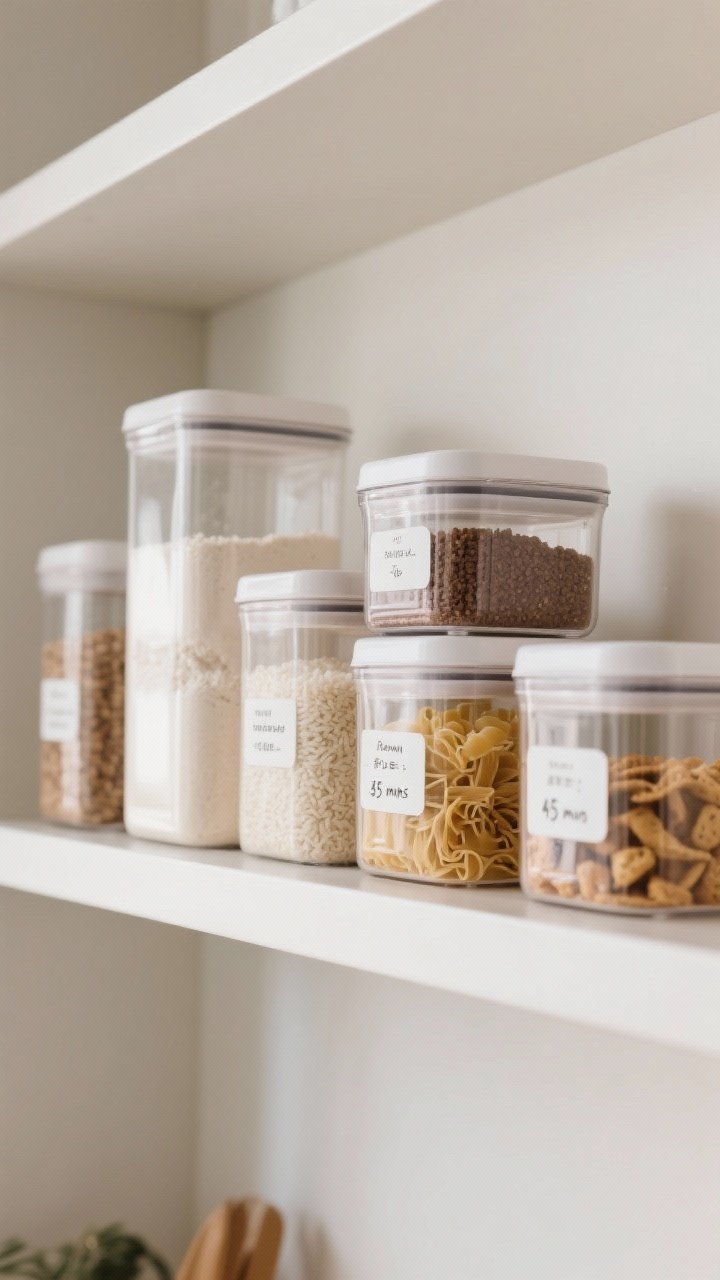
Decanting into airtight canisters isn’t about being extra—it saves space and keeps food fresh. Flour, rice, pasta, and snacks look tidy and stack like champs.
How to start for under $50
- Buy a starter set of 4–6 canisters; mix tall and short sizes.
- Transfer staples you reach for weekly. Don’t decant everything—just the MVPs.
- Add simple labels with cooking times or notes (brown rice: 45 mins, you’re welcome).
Bonus: Decanting reduces visual noise. Your shelves instantly look calmer—Instagram-worthy without trying too hard.
Mini Shopping Guide (All Under $50)
- Shelf risers: $10–$20 each
- Magnetic knife strip: $15–$30; spice tins set: $10–$20
- Drawer dividers: $12–$25
- Over-the-door rack: $20–$40
- Pegboard + hooks: $20–$40 (small setup)
- Lazy Susan: $10–$25; two-tier: $20–$30
- Vertical bakeware rack: $15–$30
- Adhesive hooks/rail: $8–$25
- Clear bins: $6–$15 each
- Airtight canister set: $20–$45
Quick Layout Formula
- Countertops: Only daily-use items. Everything else gets a home elsewhere.
- Upper cabinets: Plates, glasses, mugs on risers. Spices on turntables or door racks.
- Base cabinets: Pots, pans, and lids in vertical organizers. Bulky appliances in the lowest zone.
- Pantry: Clear bins + labels; decanted dry goods at eye level.
- Walls/doors: Pegboard, rails, and over-the-door storage for flexible overflow.
You don’t need a renovation to make your kitchen feel bigger and work smarter—just a few strategic tools and a little restraint. Start with one or two ideas, then build from there. Your counters will breathe again, and you’ll actually find the cumin when you need it. Go forth and organize—on a budget and in style.


