10 Landscape Ideas That Turn Boring Yards Into Showstoppers—fast
Ready to stop apologizing for your bland yard? Good. These ideas will take your outdoor space from “meh” to “meet me outside” without needing a full-blown renovation. Think layers, texture, and a few bold moves that make your yard feel curated, not chaotic. Let’s dig in—pun absolutely intended.
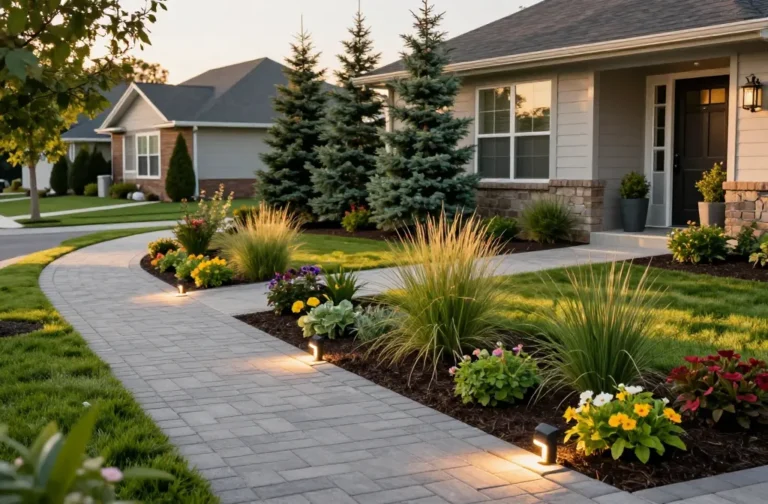
1. Frame Your Yard With Bold Edging
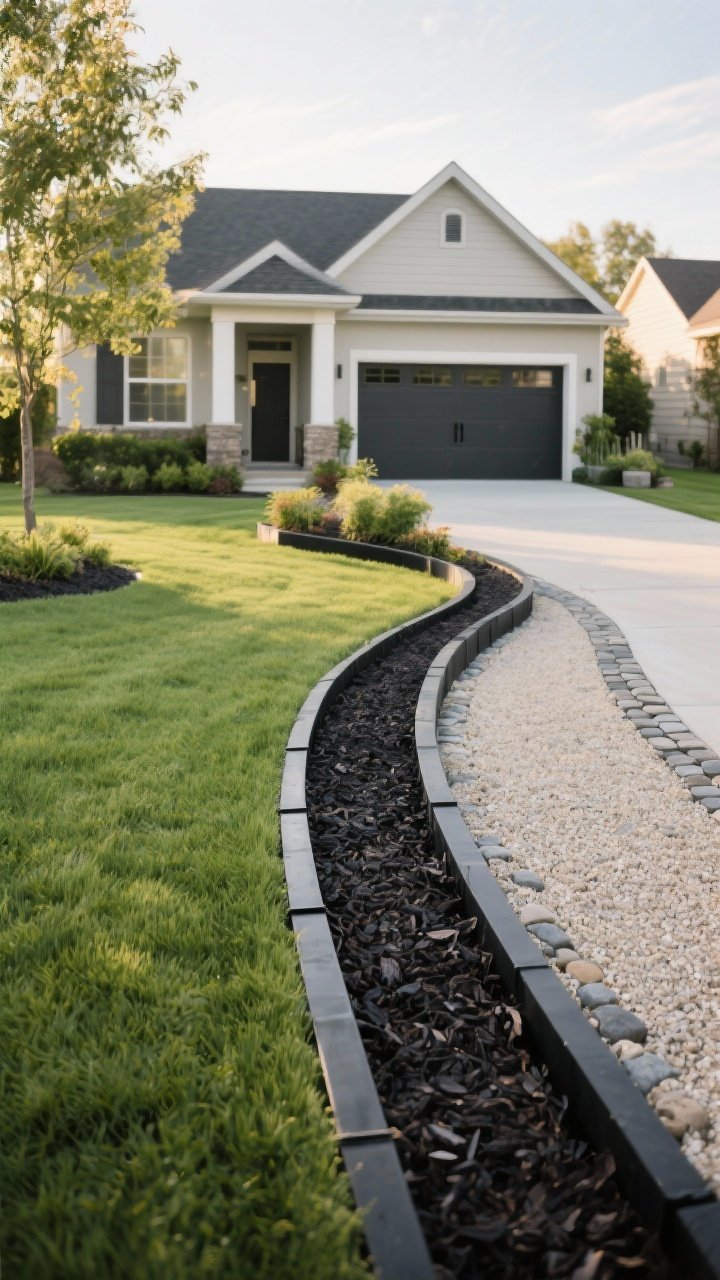
Just like good brows frame your face, sharp edging frames your yard. Clean lines make even basic grass look intentional, and they instantly separate “garden” from “random patch of plants.”
Tired of snacking when you’re not even hungry? This reset helps you stop the loop and feel back in control.
A simple reset for moments when cravings take over. Easy to use, easy to repeat, and designed to help you feel satisfied instead of stuck.
Why It Works
Edging creates structure, which makes everything else feel elevated. It’s a small move with big visual payoff.
- Materials to try: steel edging for modern vibes, cobblestone for classic charm, or black rubber edging for a budget-friendly option.
- Pro tip: Keep curves gentle. Tight wiggles look messy; wide arcs look luxe.
- Bonus: Add a 2–3 inch deep trench to stop mulch from escaping onto pathways.
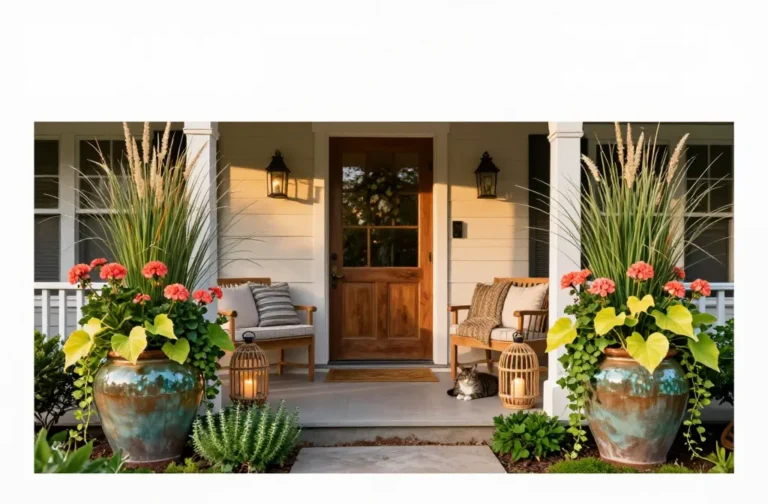
2. Layer Plants Like a Stylist
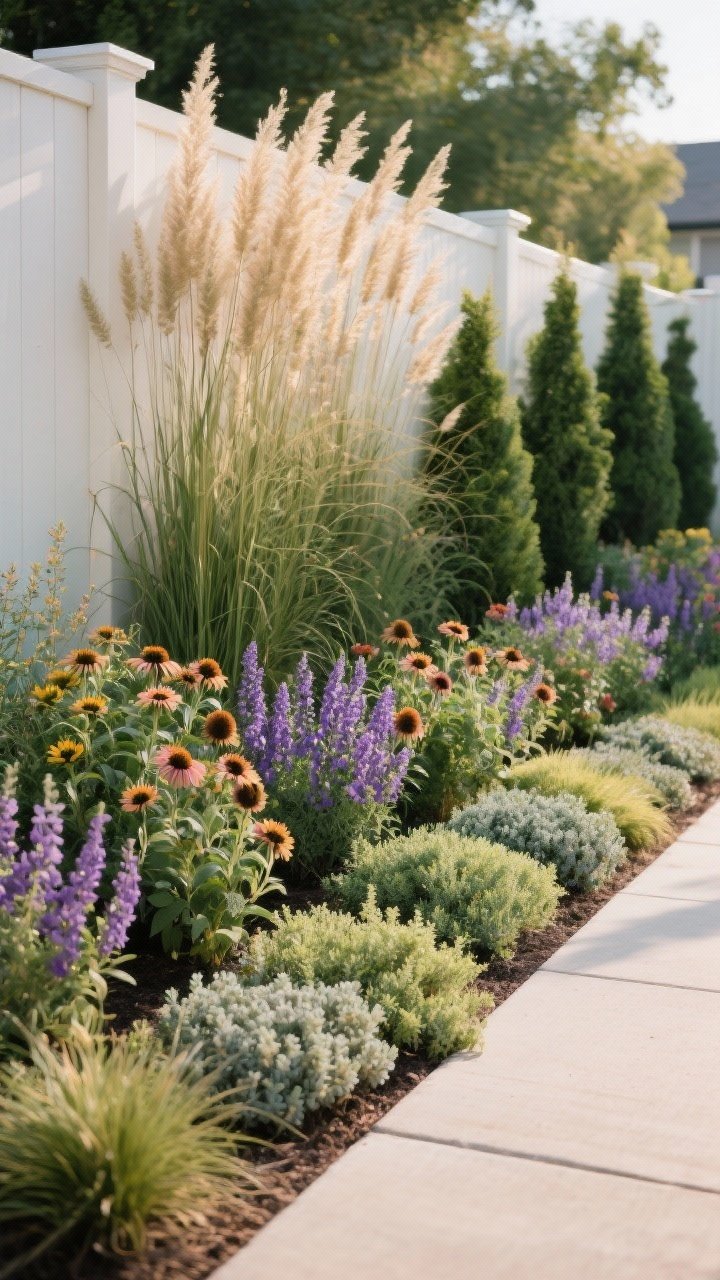
Flat gardens are boring. Layering creates dimension, drama, and that “wow, did they hire a designer?” moment. Think of your plants as a cast: tall, medium, and ground-hugging stars all have a role.
The Formula
- Back row: Tall anchors—ornamental grasses, hydrangeas, or evergreen shrubs for year-round structure.
- Middle row: Flowering perennials like salvia, coneflower, or lavender for seasonal color.
- Front row: Creeping thyme, sedum, or mondo grass to soften edges.
Pro tip: Repeat plants in groups of 3 or 5 for cohesion. Random singles can look chaotic fast, IMO.
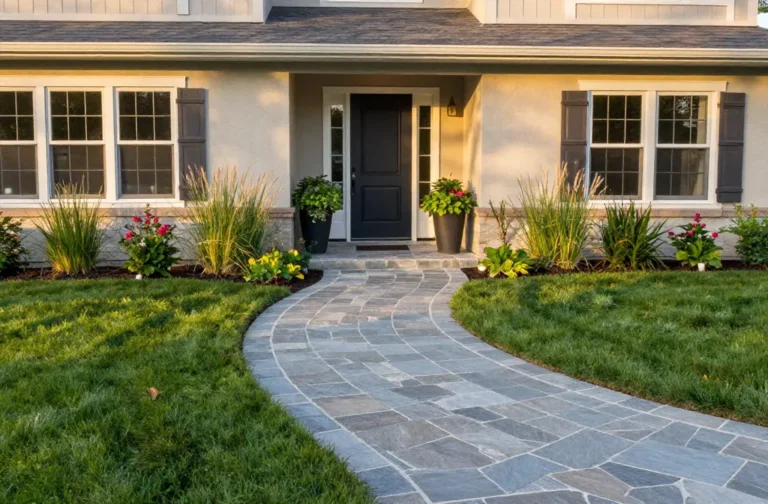
3. Build a Statement Path (And Actually Use It)
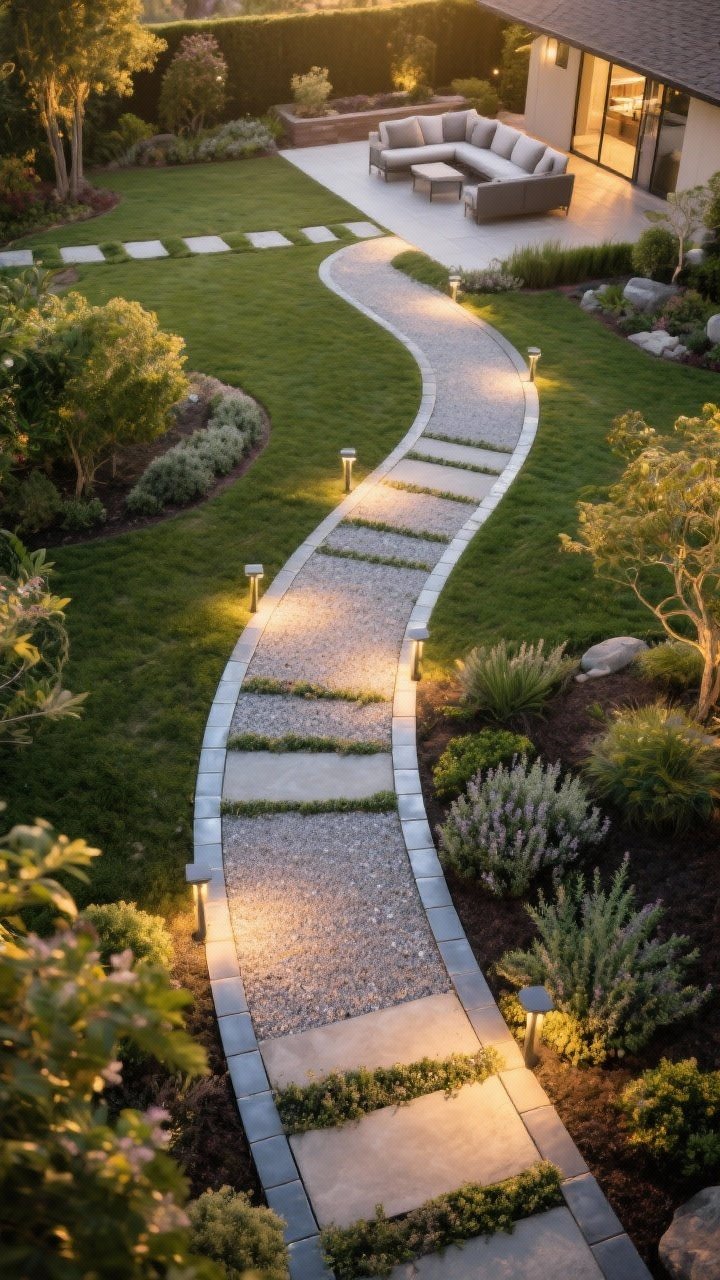
Paths do more than connect A to B—they guide the eye and create that “inviting journey” designers won’t stop talking about. Make it wide enough for two people to walk side by side. Trust me, it feels fancy.
Transform Your Home With 7,250+ Stunning Landscaping Designs—No Expensive Designers Needed!
- 🌿 Access 7,250+ stunning landscaping designs.
- 💰 Save thousands—no pro designer needed.
- 🏡 Plans for gardens, patios, walkways, and more.
- ✨ Simple, beginner-friendly DIY layouts.
- 🛠️ Customize any design to fit your yard.
Design Moves
- Materials: Decomposed granite, large pavers with groundcover in between, or gravel with clean steel edging.
- Style: Straight paths feel formal. Gentle curves feel relaxed and organic.
- Light it: Add low-voltage or solar lights every 6–8 feet to make it usable (and gorgeous) after dark.
FYI: Leave at least 36 inches of width; 42–48 inches feels luxe.
4. Create a Focal Fire Feature
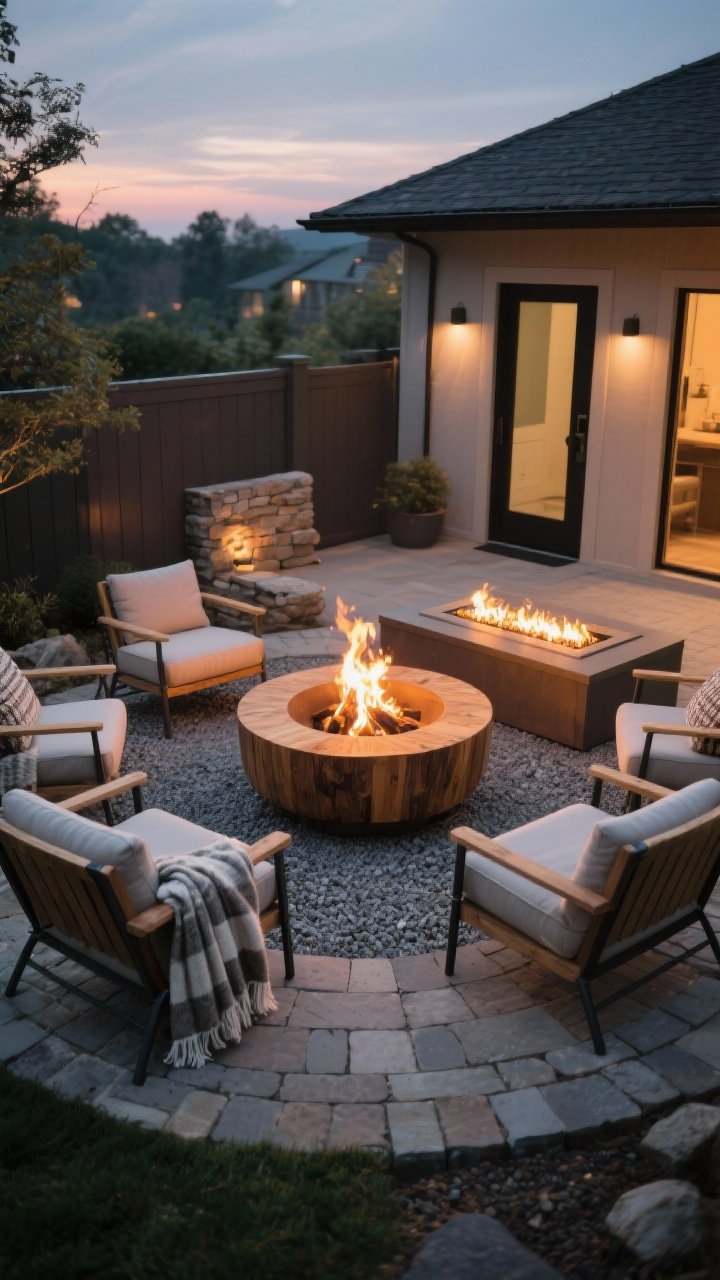
There’s nothing like a fire feature to turn “backyard” into “destination.” Go classic wood-burning for crackle and nostalgia, or keep it easy with a gas bowl for instant ambiance.
Placement & Safety
- Spot: Center it where seating naturally gathers—ideally not too close to doors or fences.
- Surface: Use gravel, pavers, or stone. Avoid placing directly on grass.
- Shape: Round fire pits = cozy. Rectangular fire tables = modern lounge energy.
Styling tip: Mix wood + metal with cushioned chairs and throw blankets. Instant outdoor living room.
5. Add a Water Moment (Zen Without the Maintenance)
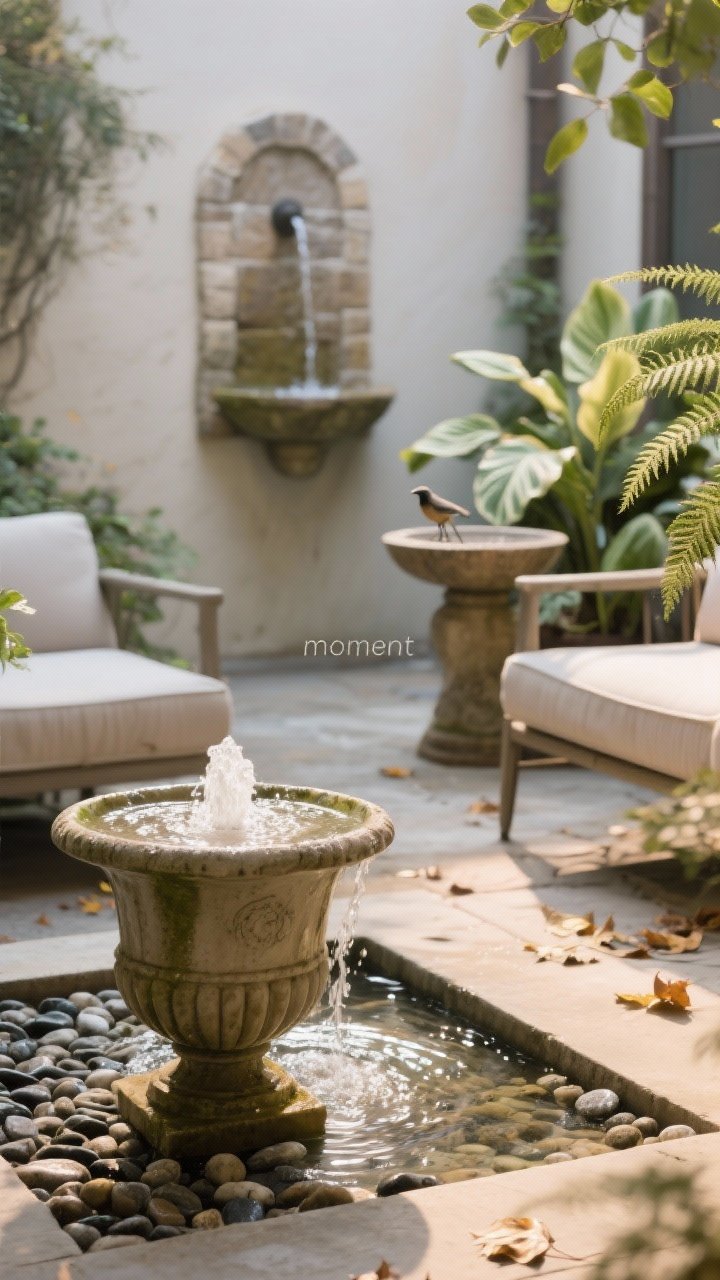
Water calms everything down. You don’t need a full koi pond—try a small bubbling urn, wall fountain, or birdbath with a hidden pump. The sound adds a layer of luxury you can’t fake.
Low-Lift Options
- Urn fountain: Self-contained kits are plug-and-play and look high-end.
- Wall fountain: Great for small patios—mount on a masonry wall or freestanding backdrop.
- Birdbath + plants: Surround with shade lovers like hosta and ferns for an old-world courtyard vibe.
Pro tip: Place near seating but away from heavy leaf fall. You’ll thank yourself during cleanup.

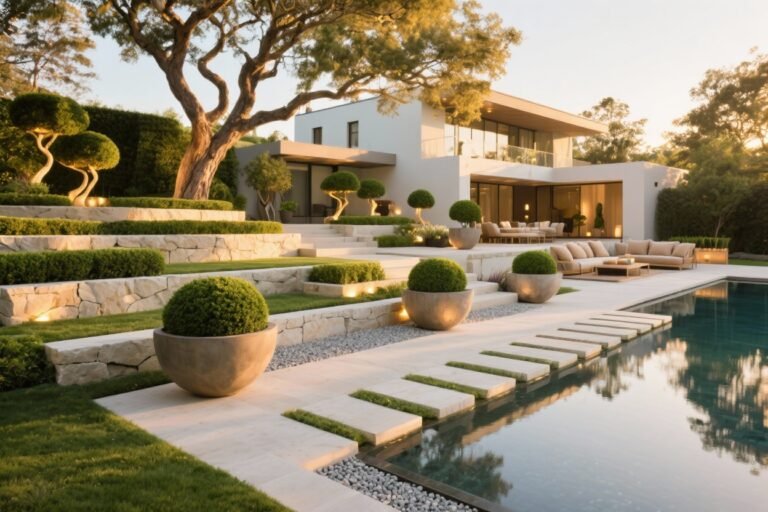
6. Mix Hardscape Textures for Instant Depth
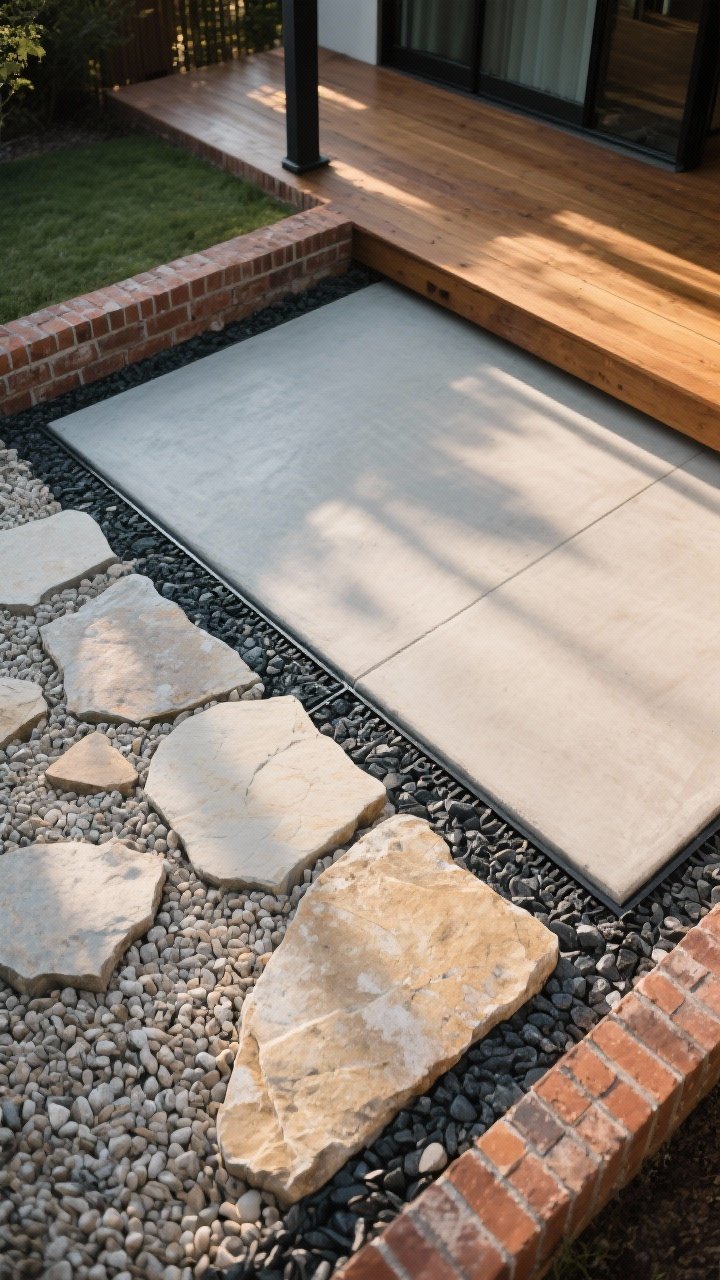
Monotone patios are fine. But if you want “designer,” mix textures. Contrast is your secret sauce: smooth against rough, dark against light.
Textures That Work Together
- Flagstone + gravel: Organic meets casual. Great for cottage or Mediterranean styles.
- Poured concrete + wood deck: Clean and modern with warmth from the wood.
- Brick borders + pavers: Adds definition and a heritage feel without overwhelming the budget.
Edge it: Use black steel or brick soldier courses to stop materials bleeding into each other. Clean = chic.
7. Plant a Four-Season Color Story
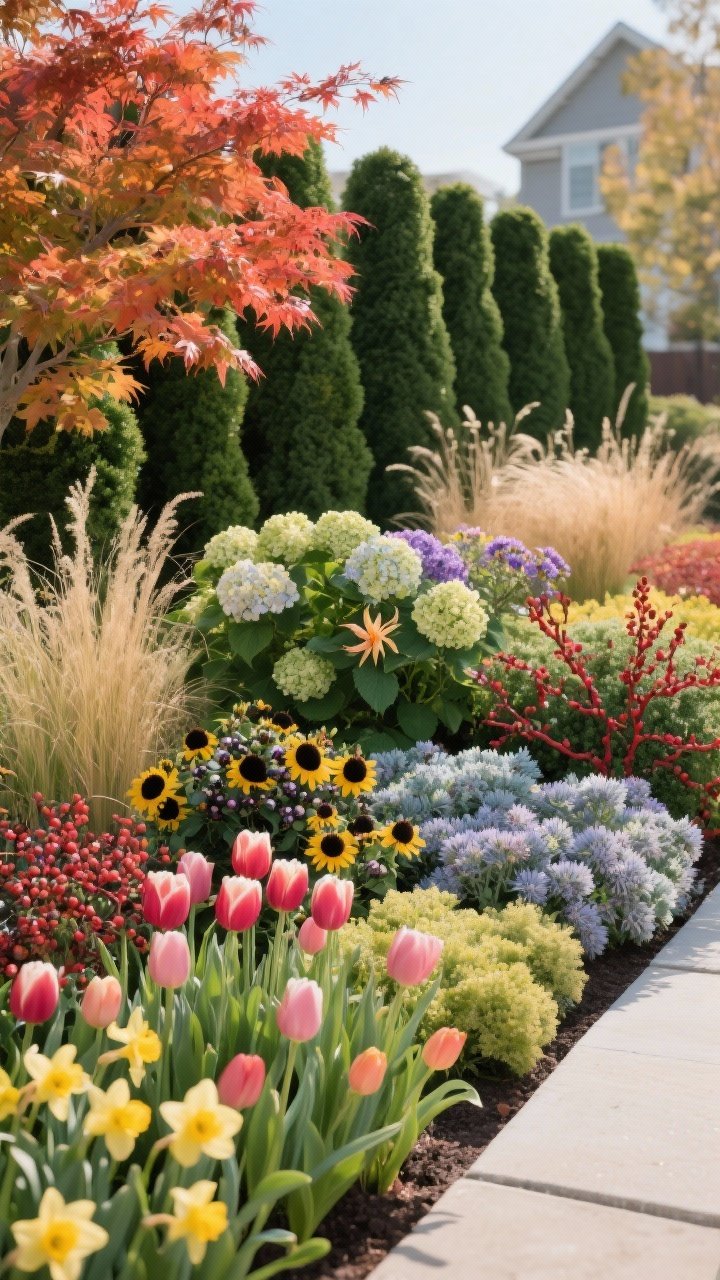
If your yard only looks good for two weeks in May, we need to talk. Choose plants that trade off the spotlight throughout the year so there’s always something happening.
Seasonal Stars
- Spring: Tulips, daffodils, and flowering trees like redbud or serviceberry.
- Summer: Hydrangea, daylily, black-eyed Susan, and ornamental grasses.
- Fall: Japanese maple, asters, sedum, and anything with fiery foliage.
- Winter: Evergreens (boxwood, holly), red twig dogwood, hellebore, and grasses left standing.
Pro tip: Repeat evergreen structure so beds don’t go bald in winter. Your future self will be very pleased.
8. Elevate With Outdoor Lighting Layers
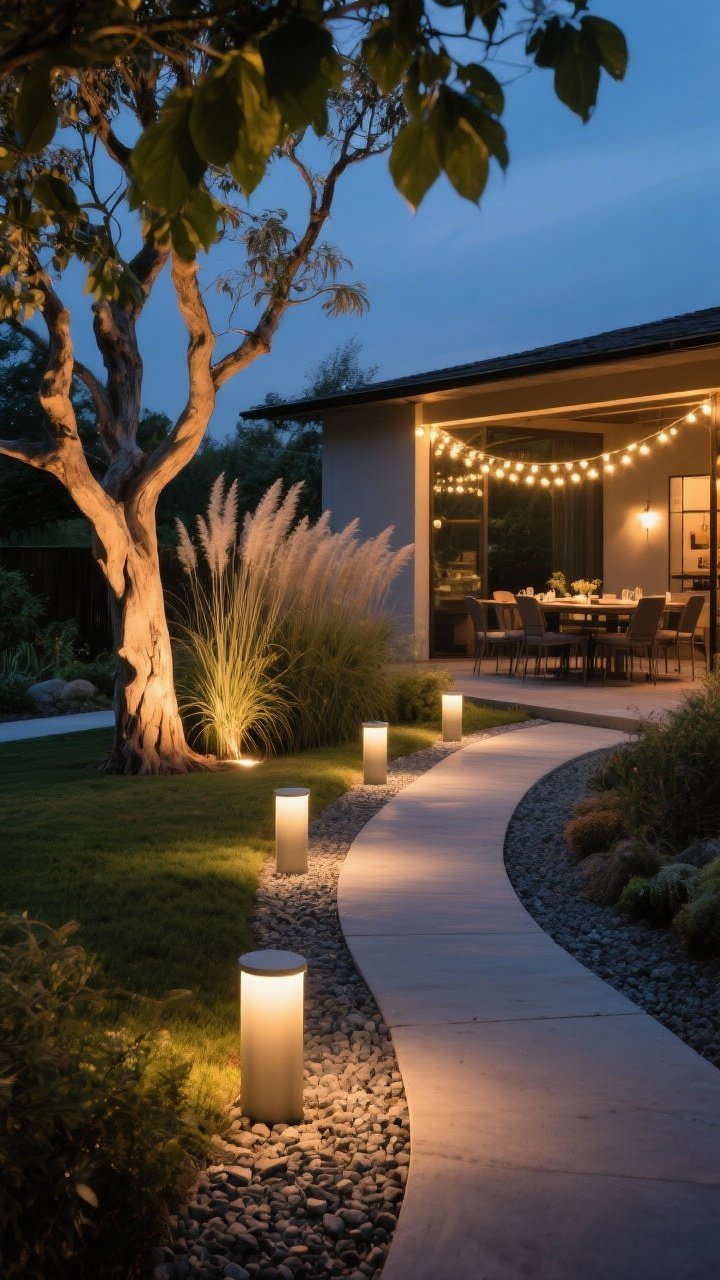
Lighting turns a nice yard into a showpiece after sunset. It’s also the fastest way to add drama without planting a single thing.
Three Layers to Use
- Path lights: Safety and sparkle—stagger them, don’t line up like a runway.
- Uplights: Aim at trees, tall grasses, or architectural features for instant drama.
- String or bistro lights: Over dining or lounge areas for warm, festive vibes.
FYI: Warm white (2700–3000K) looks cozy. Anything bluer starts to feel like a parking lot.
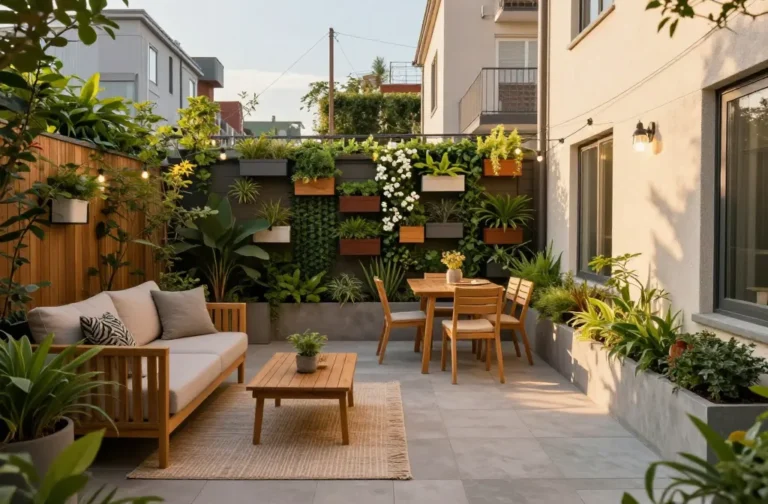
9. Carve Out a Destination Nook
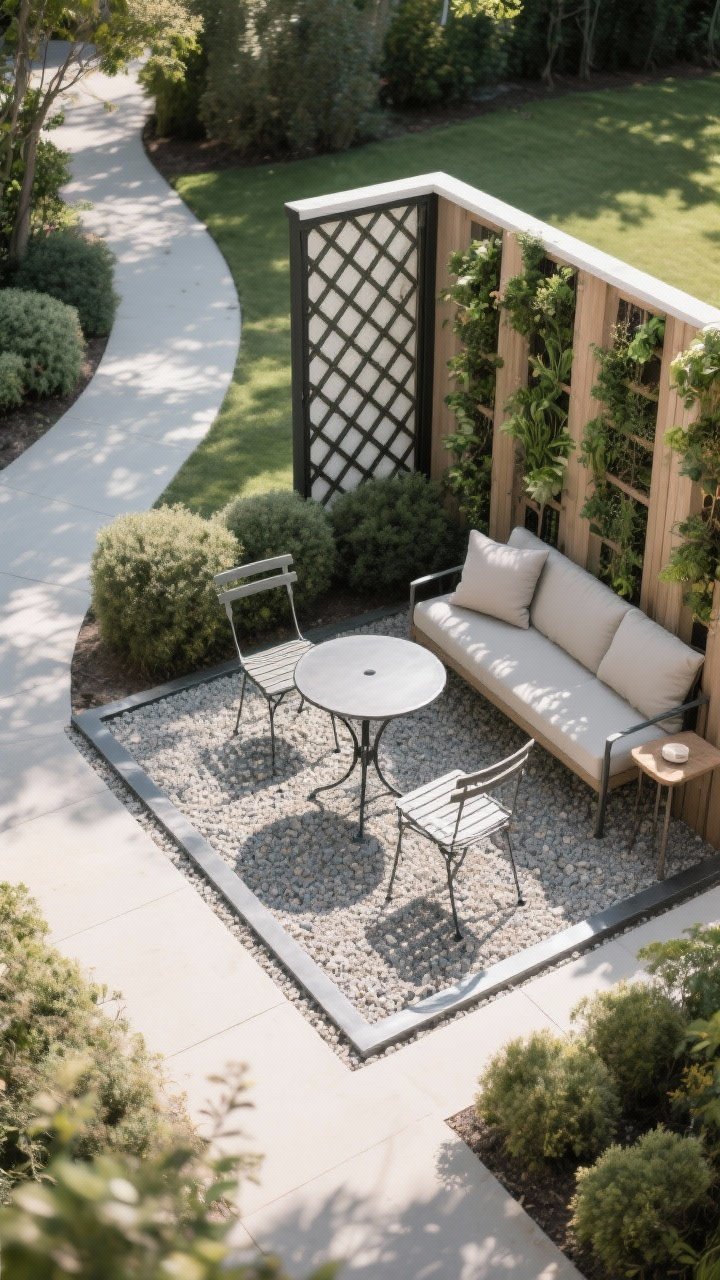
Your yard needs a “moment”—a tucked-away destination that makes guests wander and discover. Could be a reading corner, a hammock zone, or a tiny cafe patio for morning coffee.
How to Create It
- Define the spot: Use a gravel pad, pavers, or deck tiles to visually claim the area.
- Back it: Add a trellis, hedge, or vertical planter wall for a sense of enclosure.
- Furnish: Bistro set, Adirondack chairs, or a bench with outdoor cushions and a side table.
Designer move: Place the nook along a curved path, partially hidden. Discovery = delight.
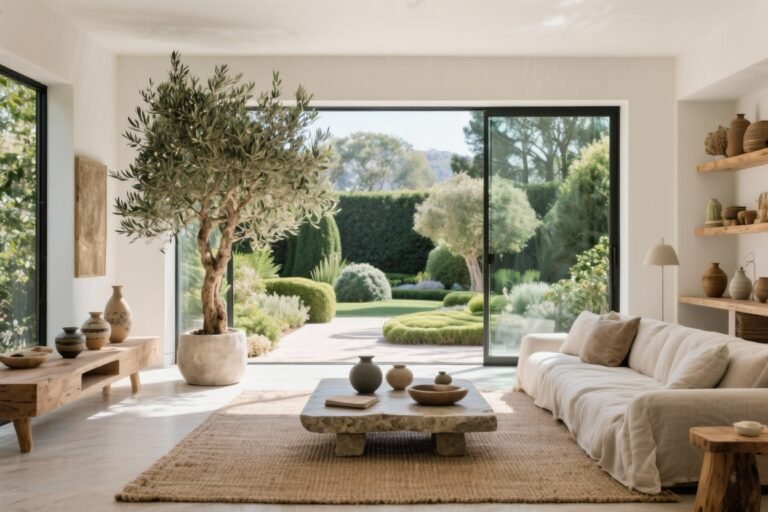
10. Go Big With a Statement Tree or Sculpture
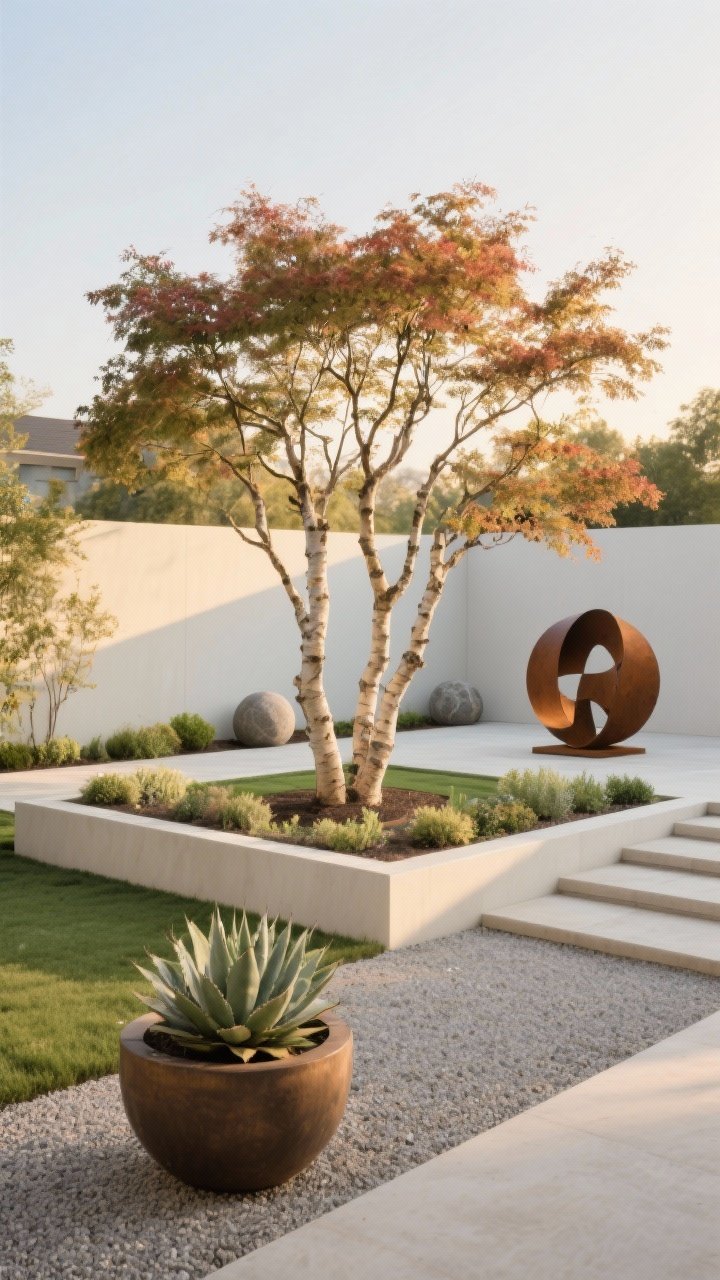
Every showstopping yard has a star. A sculptural tree or bold art piece anchors everything and gives your landscape a signature look.
Pick Your Star
- Specimen trees: Japanese maple, olive (in warm zones), desert willow, or a multi-stem birch.
- Sculpture: Corten steel, stone spheres, or a minimalist metal piece for modern yards.
- Planter drama: Oversized pots with architectural plants like yucca, agave, or topiary.
Placement matters: Give it space. Let it breathe with simple underplanting so it actually reads as “statement,” not “stuff.”
Quick Wins To Tie It All Together
- Mulch smart: Use dark mulch in shady beds for contrast; fine gravel in modern spaces.
- Color palette: Limit flower colors to 2–3 hues plus green. Cohesion beats chaos.
- Irrigation: Drip lines under mulch keep leaves dry and plants happy. Low effort, big results.
- Scale up: Bigger plants and larger pavers look more intentional than lots of tiny pieces, FYI.
You don’t need acres or a massive budget to create a showstopper—just a few bold choices, layered thoughtfully. Start with structure, add texture, then bring in light and a focal point. Before you know it, your backyard will be the place everyone wants to be (and yes, they will totally ask who designed it). Now grab a shovel—or a margarita—and make some magic out there.