10 Creative Garden Hacks Every Plant Lover Needs to Try Right Now
If your plant babies are your personality (same), you’re going to love these hacks. They’re smart, cute, and—best of all—they work whether you’ve got a tiny balcony jungle or a sprawling backyard. Grab your watering can and let’s make your garden look like it belongs on your mood board.
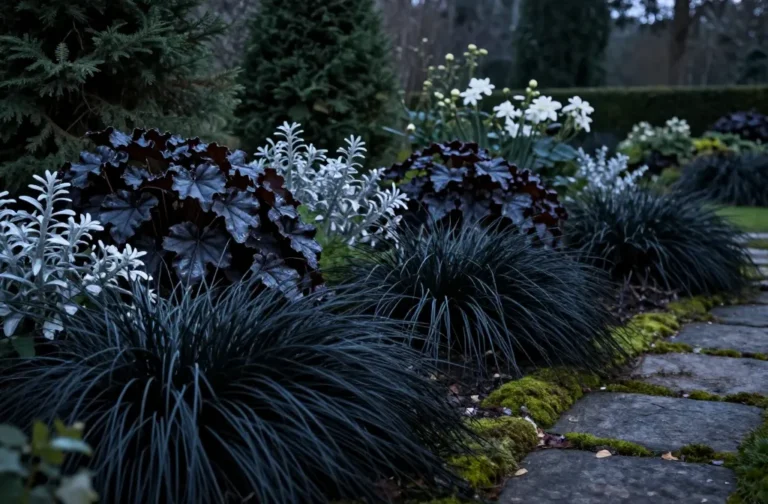
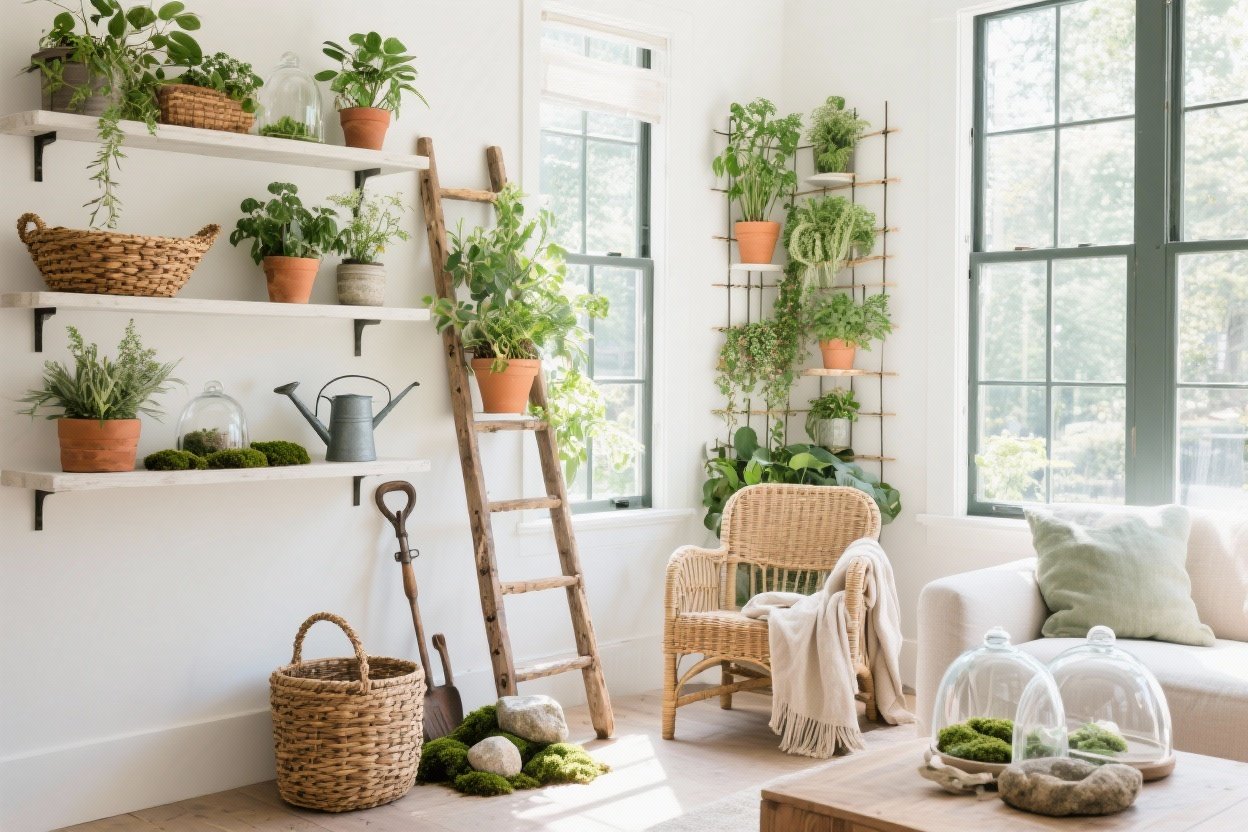
1. Elevate With Layered Heights (Instant Designer Vibes)
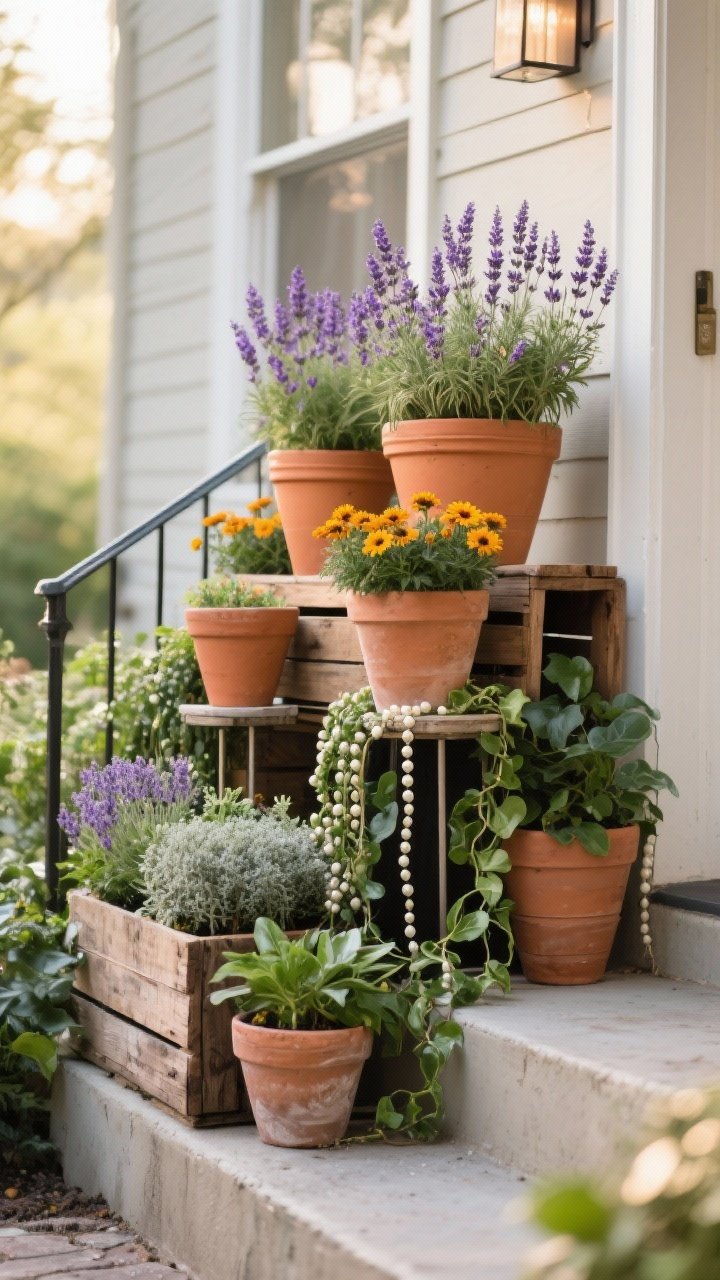
Flat gardens are fine. Layered gardens? Chefs kiss. Playing with height instantly makes your space feel lush and curated—like you hired a landscape designer who charges by the word.
Tired of snacking when you’re not even hungry? This reset helps you stop the loop and feel back in control.
A simple reset for moments when cravings take over. Easy to use, easy to repeat, and designed to help you feel satisfied instead of stuck.
How To Layer Without Overthinking
- Tier your containers: Use plant stands, overturned terracotta pots, or sturdy crates to lift smaller plants behind bigger ones.
- Stagger along steps: If you have stairs or a stoop, line pots on alternating steps for built-in dimension.
- Mix forms: Choose upright plants (like lavender) with trailing friends (like ivy or string of pearls) and a few mounding types (like marigolds) to fill gaps.
Bonus: Taller pots protect delicate plants from curious paws and rogue soccer balls. FYI, visual height = instant drama with zero fussy upkeep.
2. DIY Drip Irrigation With Recycled Bottles
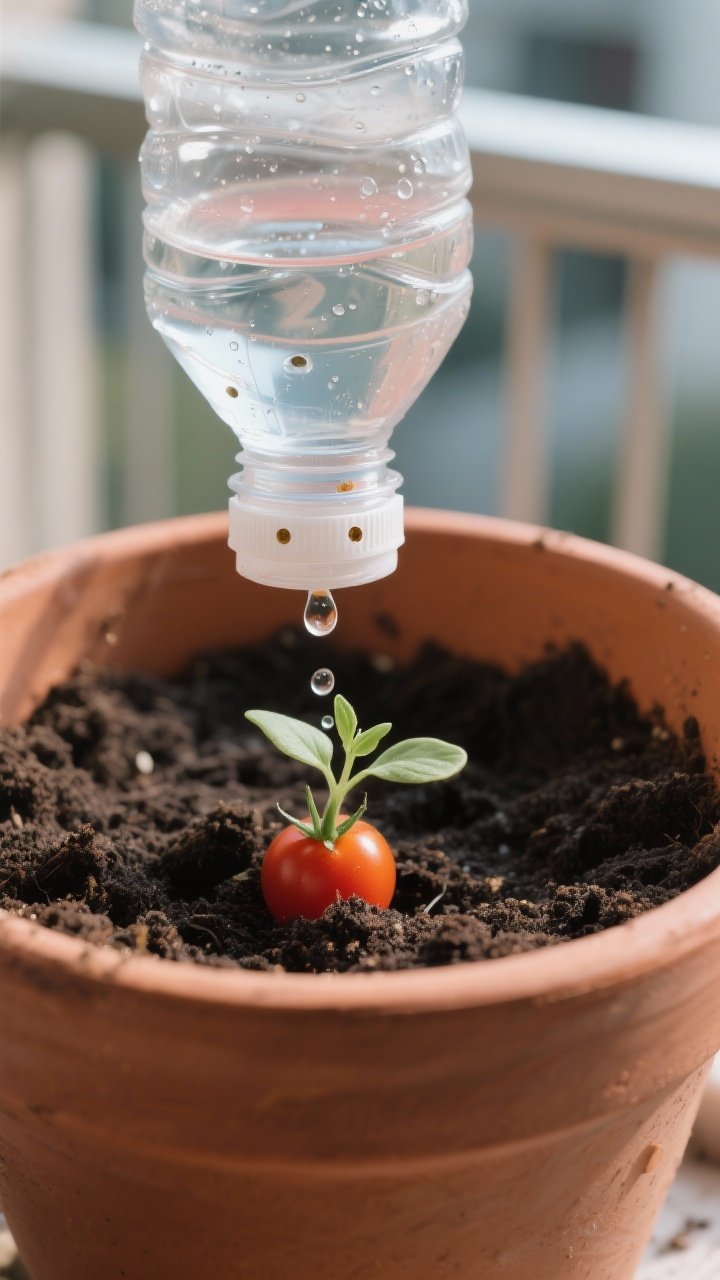
Overwatering happens. Underwatering also happens. Meet the lazy-but-genius solution: a bottle drip system that waters while you nap.
Set It Up In Minutes
- Grab a plastic bottle: Poke 2–3 tiny holes in the cap with a pushpin.
- Fill and invert: Fill with water, screw on the cap, flip it upside down, and bury the neck a few inches into the soil.
- Slow release: The water trickles out slowly, keeping roots evenly moist.
Works in pots and garden beds. For bigger containers, use a 2-liter bottle. Need fertilizer? Add a weak liquid feed to the bottle and turn it into a drip-feeder. Efficient and sneaky-smart.
3. Create Microclimates With Portable Screens
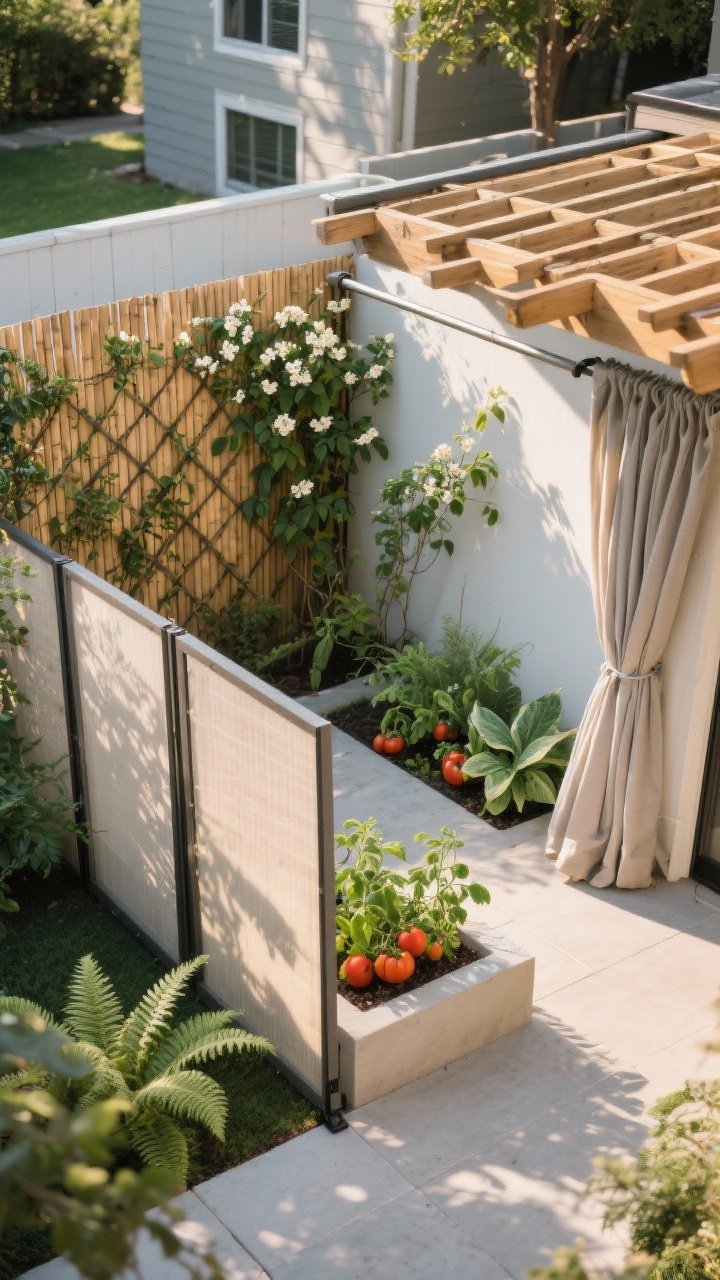
If one corner of your yard fries plants while another grows moss, congratulations—you have microclimates. Use them to your advantage with portable screens that control sun, wind, and privacy.
Transform Your Home With 7,250+ Stunning Landscaping Designs—No Expensive Designers Needed!
- 🌿 Access 7,250+ stunning landscaping designs.
- 💰 Save thousands—no pro designer needed.
- 🏡 Plans for gardens, patios, walkways, and more.
- ✨ Simple, beginner-friendly DIY layouts.
- 🛠️ Customize any design to fit your yard.
Easy Screening Ideas
- Bamboo panels: Lightweight, chic, and perfect for blocking harsh afternoon sun.
- Trellis walls: Add climbers like jasmine or sweet peas for scent and dappled shade.
- Outdoor curtains: Hang weatherproof curtains on tension rods along balconies or pergolas to protect tender plants from wind.
Place heat lovers (basil, tomatoes) near south-facing walls and shade lovers (ferns, hostas) where screens soften the light. Your plants get custom care without moving house.
4. Make Supercharged Compost Tea (Plants Will Literally Glow)
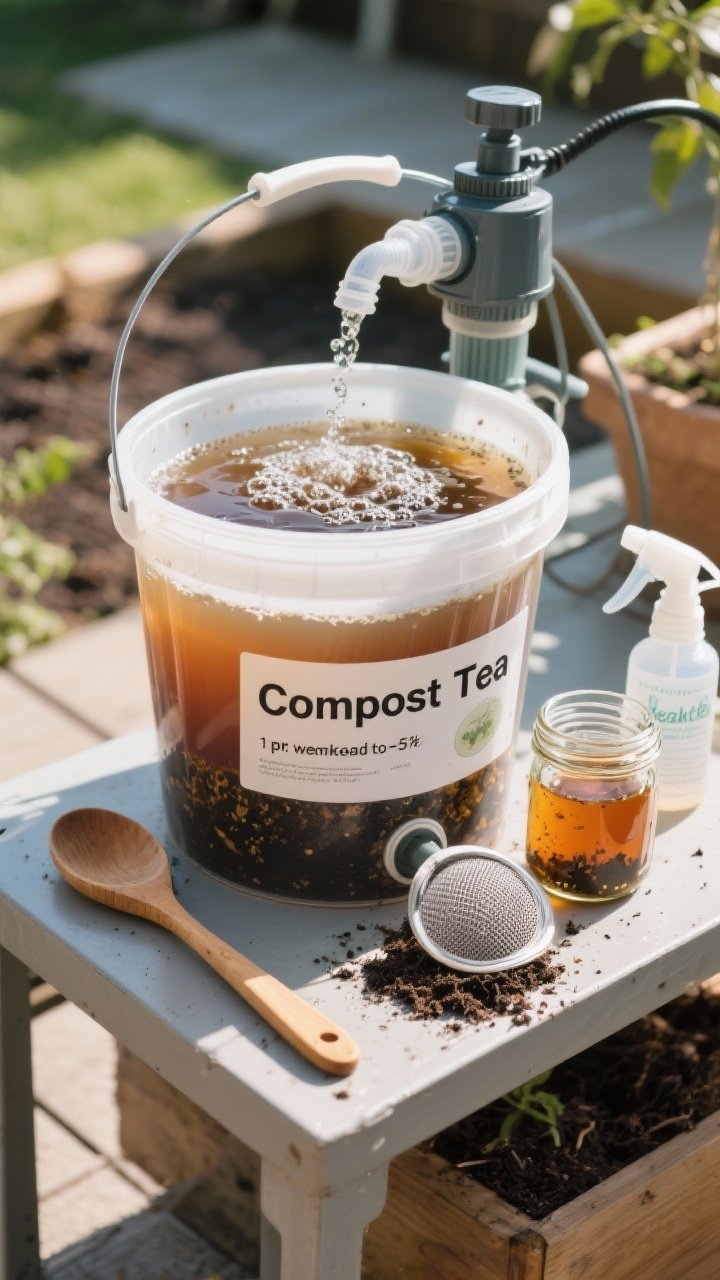
Want that deep green, glossy leaf glow? Compost tea is your secret potion. It’s like espresso for your garden—minus the jitters.
Simple Brew Method
- Bucket + compost: Add 1 part well-aged compost to 5 parts water.
- Soak 24–48 hours: Stir occasionally. If you have an aquarium pump, bubble it for an aerobic brew.
- Strain and spray: Dilute until it looks like weak tea. Water the soil or mist leaves in the morning.
This boosts nutrients and beneficial microbes. Avoid soaking leaves on sunny days to prevent burn. IMO, do this monthly during the growing season and watch growth take off.
5. Grow Up: Vertical Garden Towers That Actually Work
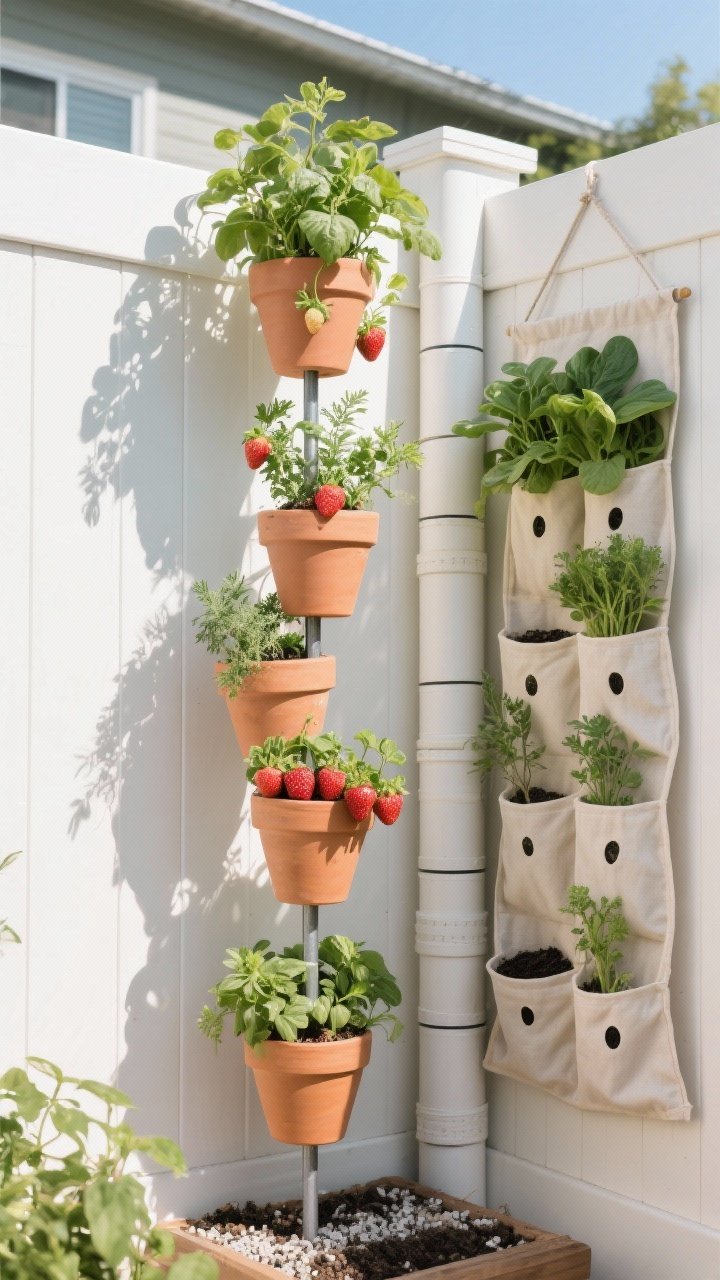
Short on space? Go vertical and multiply your growing area overnight. Towers are perfect for herbs, strawberries, and leafy greens.
Build Or Buy Options
- Stacked pots: Thread a sturdy dowel through nested pots with side cutouts for planting pockets.
- PVC pockets: Cut horizontal slits in large PVC pipe, drill drainage holes, and fill with lightweight potting mix.
- Hanging shoe organizer: Use a fabric organizer with drainage holes for a budget-friendly herb wall.
Pro tip: Use light soil mixed with perlite and water from the top slowly. Position sun-hungry plants higher and shade-tolerant ones lower.

6. Mulch Like You Mean It (The Secret To Low-Maintenance)
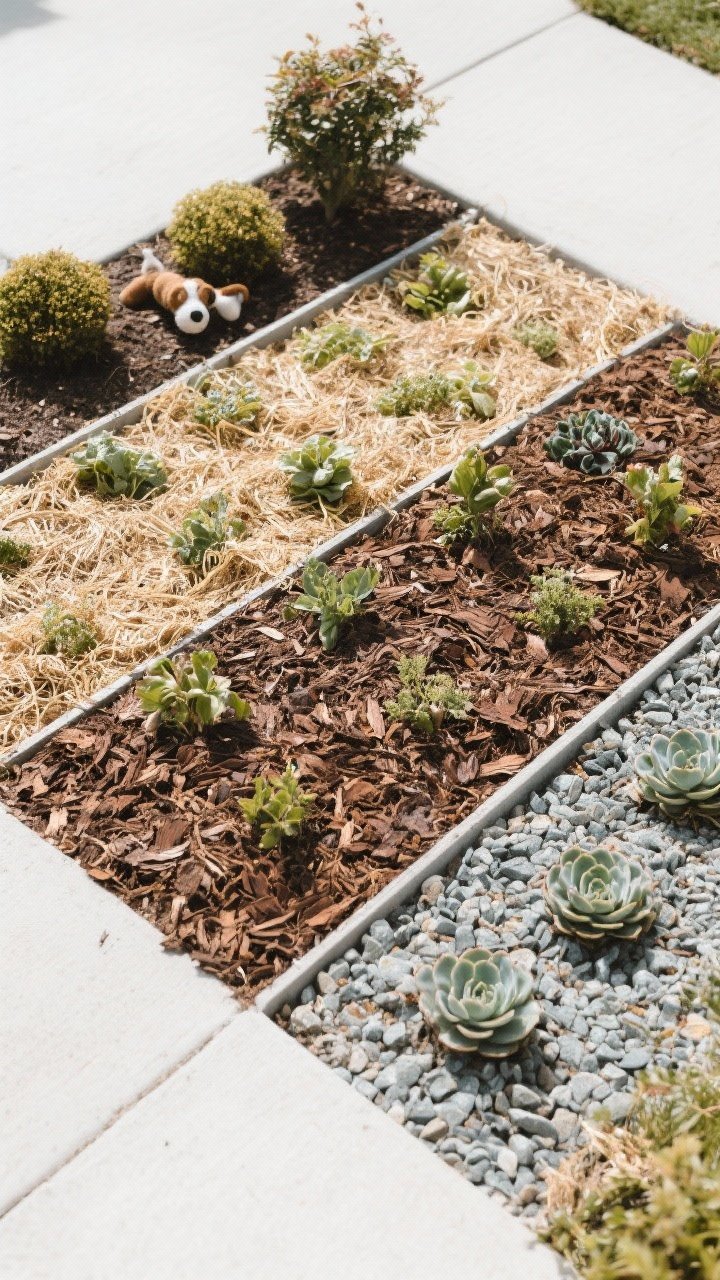
Weeds are freeloaders. Mulch keeps them in check and saves you from constant watering. It also makes your garden look instantly polished.
Choose The Right Mulch
- Shredded bark or wood chips: Great for beds and paths. Suppresses weeds for months.
- Cocoa hulls: Smell amazing, look elegant—avoid if you have dogs.
- Straw: Perfect for veggie patches. Light, cheap, and easy to move.
- Gravel: Ideal for succulents and Mediterranean plants—excellent drainage and modern vibes.
Lay mulch 2–3 inches thick, keeping a small gap around stems to prevent rot. Bonus: It regulates temperature, so roots don’t have a meltdown mid-July.
7. Propagate Like A Pro With Water Stations
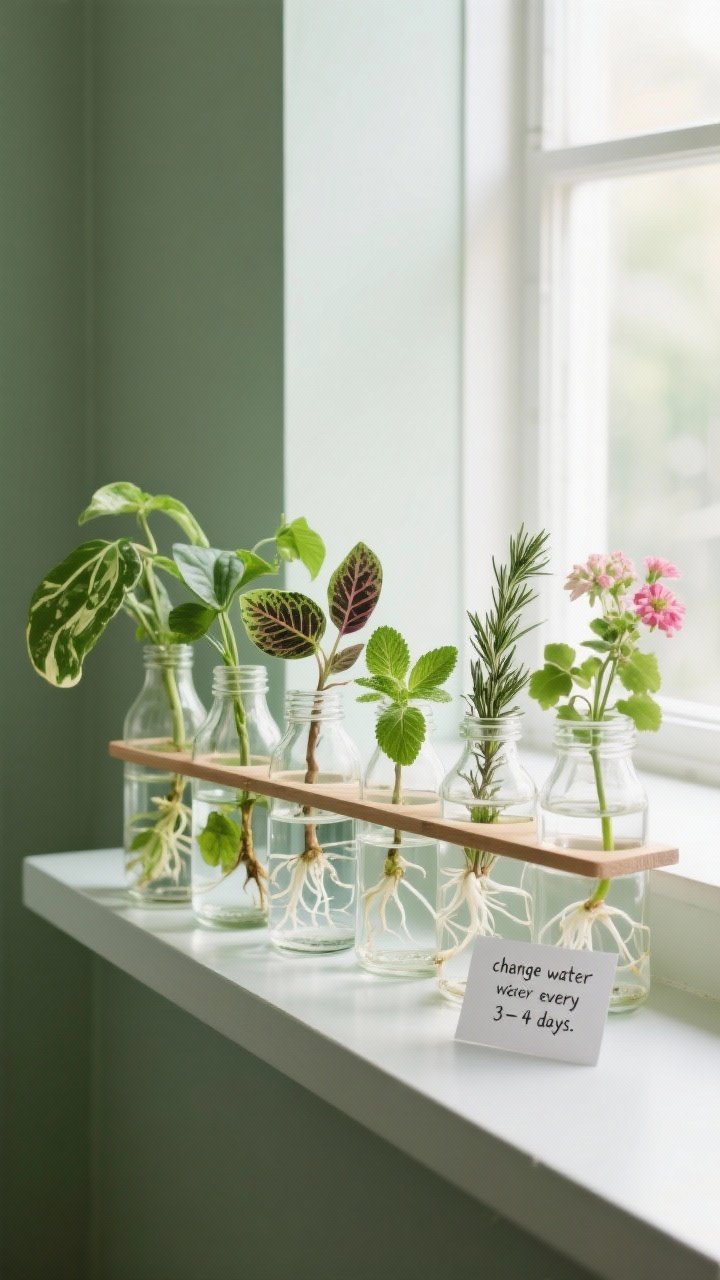
Want more plants for free? Welcome to propagation, the gateway hobby. A simple water propagation station turns trimmings into future jungle residents.
How To Nail It
- Choose easy growers: Pothos, coleus, basil, mint, rosemary, and geraniums root quickly.
- Trim smart: Cut below a node (that little bump) and remove lower leaves.
- Glass jars + bright shade: Place cuttings in clean water with indirect light. Change water every 3–4 days.
- Plant when ready: Pot up when roots are 2–3 inches long. Keep soil lightly moist at first.
Create a cute display with mismatched bottles on a shelf. It’s functional decor and, yes, your friends will ask for cuttings.
8. Turn Kitchen Scraps Into Plant Fuel
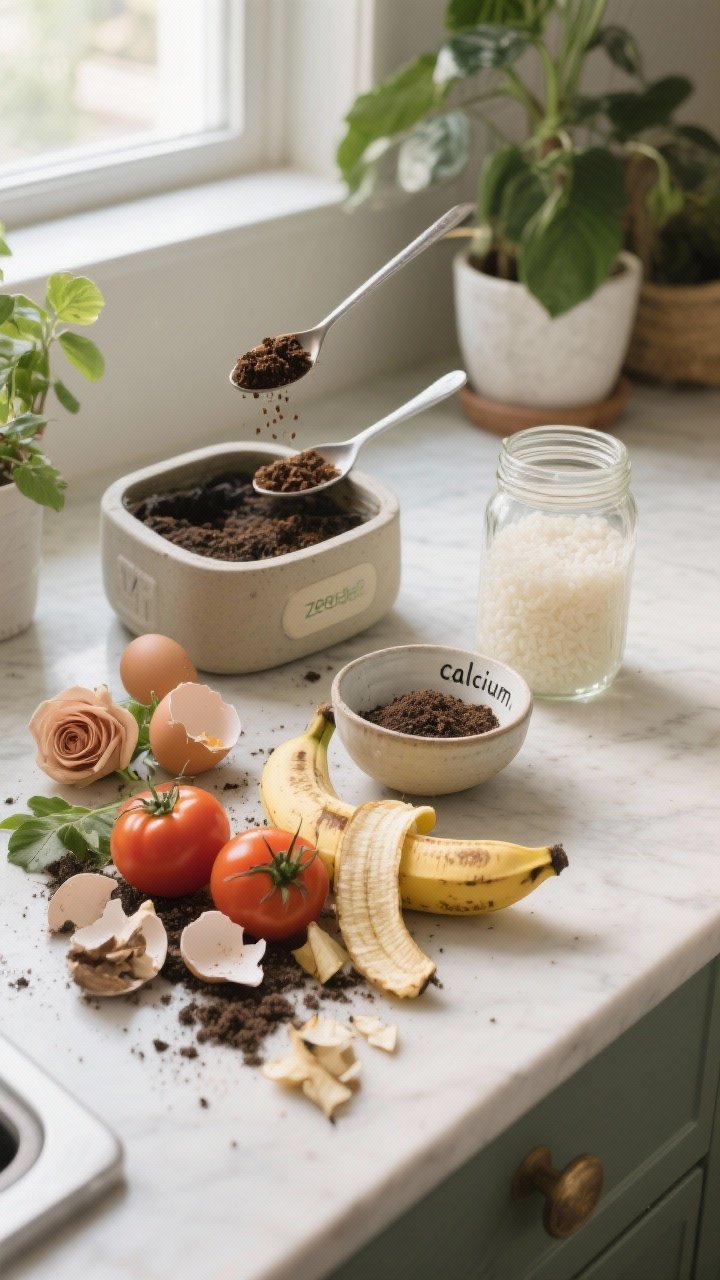
Before you toss it, ask: can this feed my garden? A lot of pantry stuff moonlights as fertilizer or pest control. Your plants—and your wallet—will thank you.
Scraps That Pull Their Weight
- Banana peels: Chop and bury near roses and tomatoes for potassium. Or soak in water for 24 hours and dilute to make a gentle feed.
- Eggshells: Rinse, dry, and crush for calcium around peppers and tomatoes to help prevent blossom-end rot.
- Coffee grounds: Add thinly to compost or mix into soil for acid-lovers like blueberries and azaleas. Don’t overdo it—thin layers are key.
- Rice water: The cloudy water after rinsing rice has trace nutrients—cool for houseplants and herbs.
Just skip citrus peels in worm bins and avoid dumping big amounts of anything directly into pots. Balance is the name of the game.
9. Light The Night: Solar Glow-Up For Evening Magic
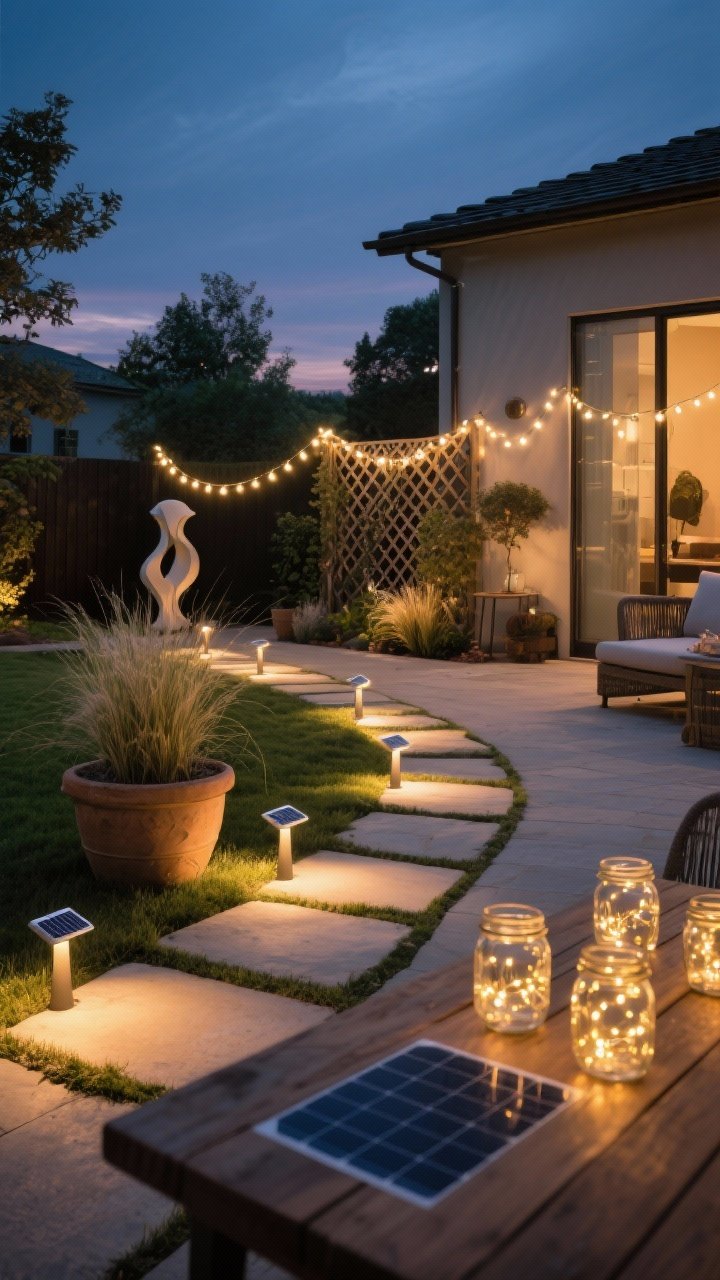
Daytime gardens are lovely, but nighttime gardens? Dreamy. A few well-placed solar lights turn your space into a cozy retreat you’ll actually use.
Where To Put The Glow
- Path markers: Line walkways with low-profile lights for safety and ambience.
- Uplight heroes: Aim small spotlights at trees, grasses, or a statement pot for dramatic shadows.
- String lights: Drape over fences or trellises. Warm white = classy. Multicolor = party mode.
- Jar lanterns: Pop solar fairy lights into mason jars for instant table charm.
Choose warm LEDs to keep it cozy, and place panels where they get solid sun. Low-effort, high-mood payoff.
10. Plant For Pollinators (Nature’s Most Fabulous Guests)
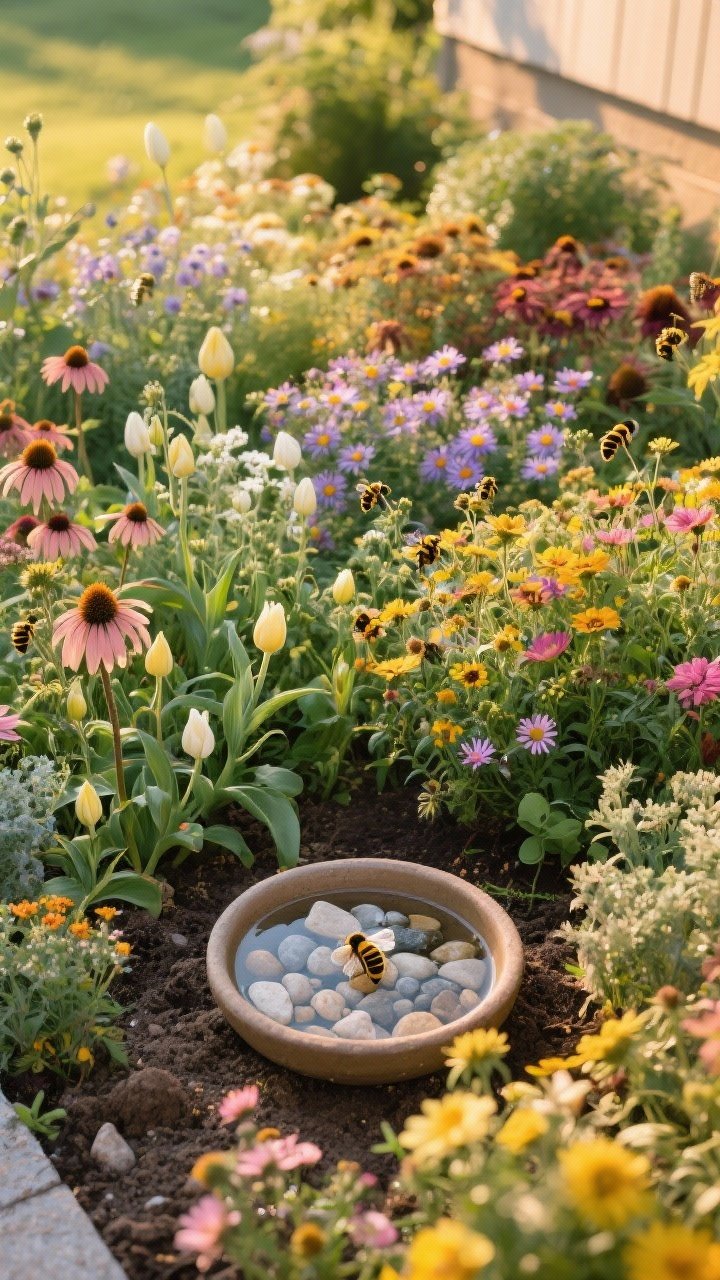
Invite bees, butterflies, and hummingbirds, and your garden will thrive. Plus, it’s basically free garden labor—they pollinate while you sip iced tea.
Build A Pollinator Buffet
- Mix bloom times: Spring bulbs, summer coneflowers, fall asters—so something’s always on the menu.
- Go native: Choose regional plants that local pollinators know and love.
- Choose open, simple flowers: Avoid super-frilly blooms that hide nectar.
- Water station: A shallow saucer with pebbles gives bees a safe landing spot.
Avoid pesticides, and leave a small sunny patch of bare soil for ground-nesting bees. Tiny effort, big ecological win—FYI, your fruit and veggie yields will notice.
Wrap-Up: You don’t need endless time or a gardening degree to have a gorgeous, thriving space. Try a couple of these hacks this weekend—layer your heights, set up a drip bottle, and add a pollinator corner. Before you know it, you’ll have that lush, “I totally know what I’m doing” garden. Happy planting!