10 Kitchen Storage Ideas That Instantly Upgrade Your Cabinets (without a Remodel)
You don’t need new cabinets—you need smarter storage. If your shelves are a jumble of mismatched lids and mystery Tupperware, welcome. These 10 ideas will make your kitchen feel bigger, calmer, and way more functional. And yes, they’ll look good too.
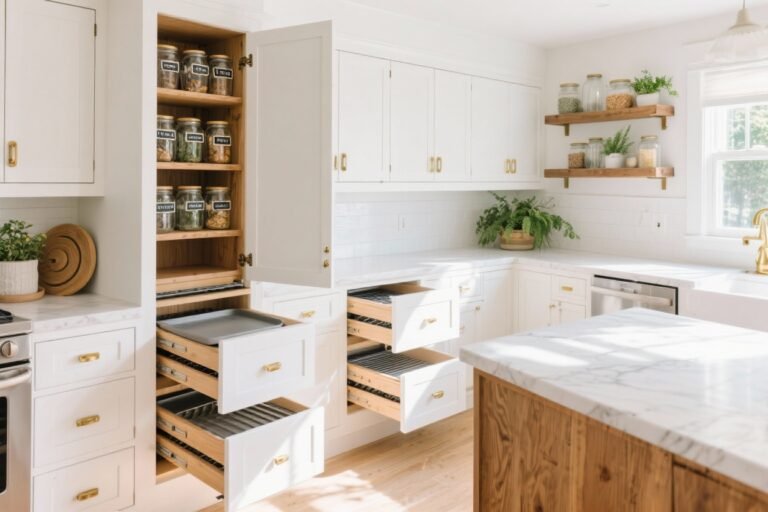
1. Add Roll-Out Trays, Save Your Back

Digging into the back of your cabinets is basically a core workout no one asked for. Roll-out trays turn any deep cabinet into a fully accessible drawer, so you can actually see what you own.
Tired of snacking when you’re not even hungry? This reset helps you stop the loop and feel back in control.
A simple reset for moments when cravings take over. Easy to use, easy to repeat, and designed to help you feel satisfied instead of stuck.
Why It Works
- Maxes out depth—no more dead zones in the back.
- Easy install with pre-made kits that fit standard base cabinets.
- Perfect for heavy items like cast iron and small appliances.
Pro Tips
- Choose full-extension glides so the tray clears the face frame and you see everything.
- Use 2 shallow trays instead of one deep one for better stacking and visibility.
- Label the tray fronts if you share your kitchen with, shall we say, “free spirits.”
2. Use Vertical Dividers for Trays, Lids, and Cutting Boards
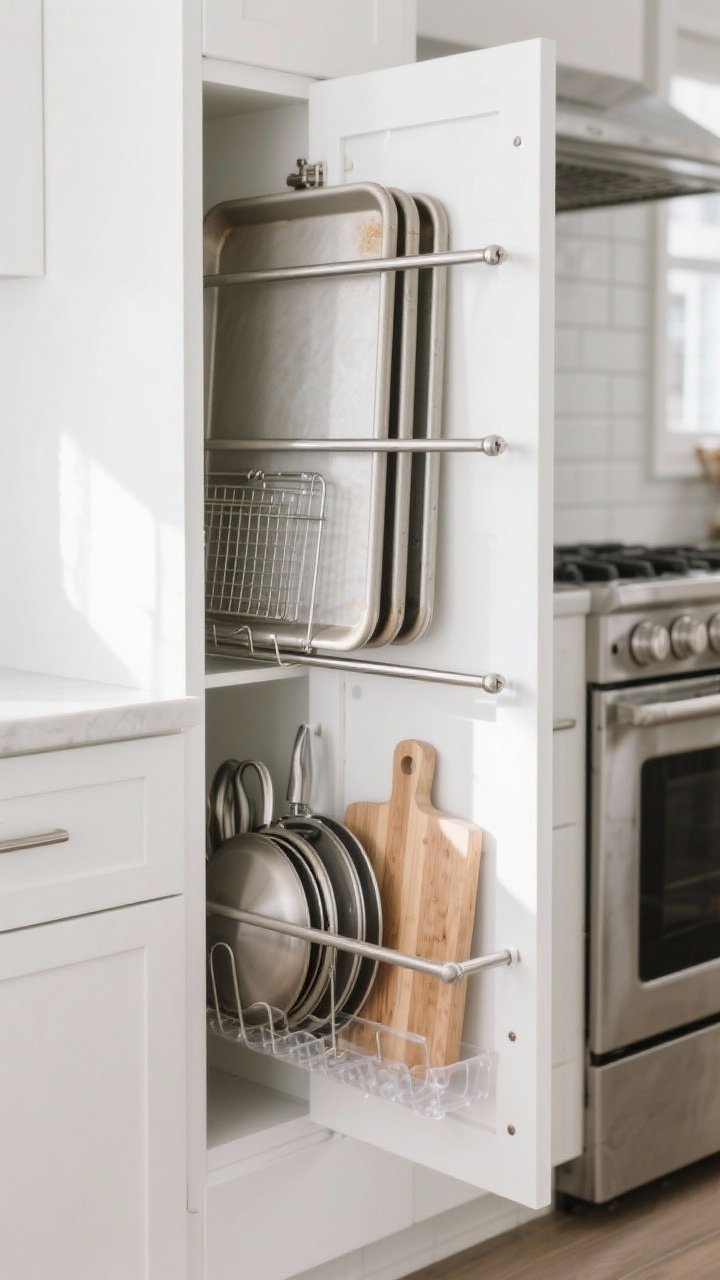
Stop stacking sheet pans and cutting boards like a game of Jenga. Vertical dividers keep everything upright and easy to grab, especially in those skinny 9- to 12-inch cabinets.
What to Store Upright
- Baking sheets, cooling racks, cutting boards
- Pan lids (line them front to back for quick grabs)
- Platters and serving trays
Smart Setup
- Use adjustable metal dividers or a DIY tension-rod hack for flexibility.
- Place dividers near the oven for baking gear, sink for cutting boards—store by zone.
- Add a thin silicone dot at the base if items slide around.
3. Double Your Space With Shelf Risers
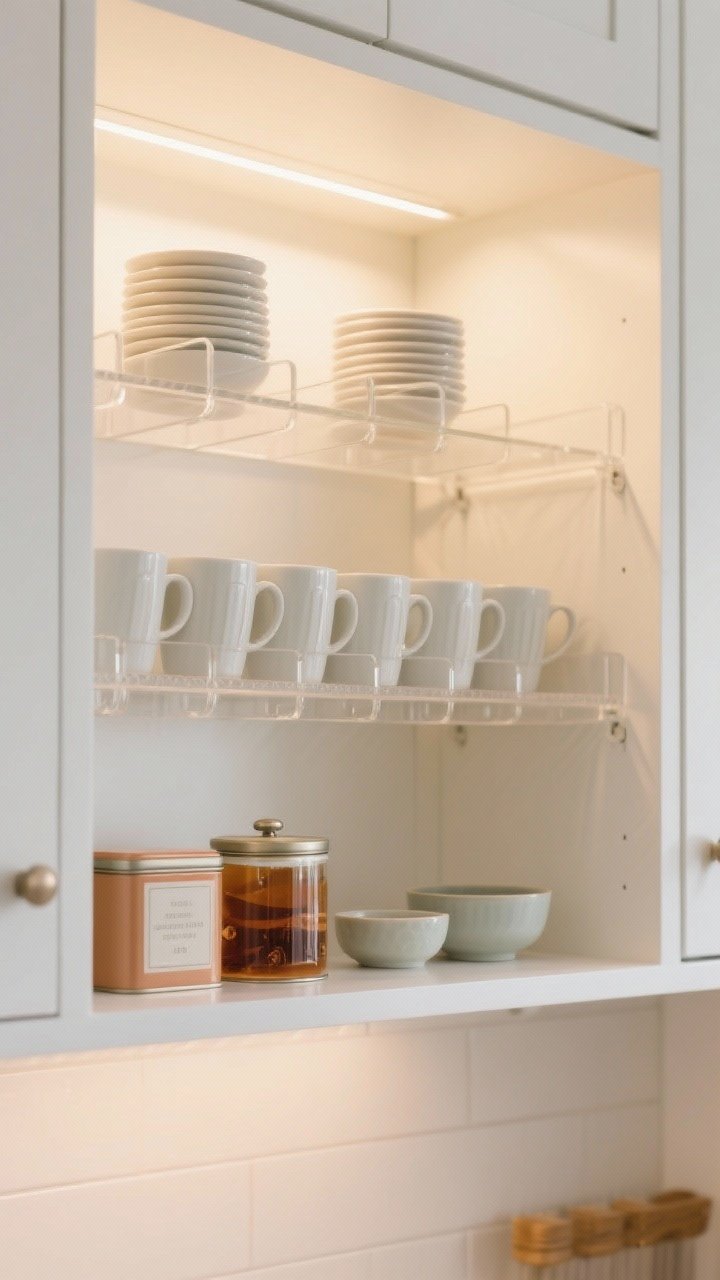
There’s always that awkward headroom in upper cabinets. Shelf risers give you a second level so mugs aren’t stacked dangerously and bowls don’t topple when you’re half-asleep.
Best Uses
- Short stuff: mugs, bowls, small plates, canned goods
- Coffee/tea station: keep mugs below, tea tins above
- Snack cabinet: kids’ snacks on the lower tier, adult snacks up high (lol)
Pro Tips
- Match riser depth to cabinet depth (10–12 inches is common).
- Choose clear acrylic for a lighter, airier look.
- Use non-slip liners to keep stacks in line—literally.
4. Embrace Pull-Outs for Spices and Oils

If your spices are basically a time capsule, it’s time for a pull-out spice rack. These narrow gliding shelves slide out like a dream and tuck perfectly next to the range.
What to Include
- Spice jars in 2-inch shallow tiers
- Oils and vinegars on a bottom shelf with a rim
- Labels facing forward so you don’t play the “is this cumin or cinnamon?” game
Installation Notes
- Measure the opening, not the exterior—cabinet hardware steals space.
- Look for soft-close slides to avoid tipping bottles.
- Consider a dedicated 3- to 6-inch pull-out if you’re renovating; otherwise, retro-fit a base cabinet.
5. Mount Racks on Doors (Hidden Storage FTW)
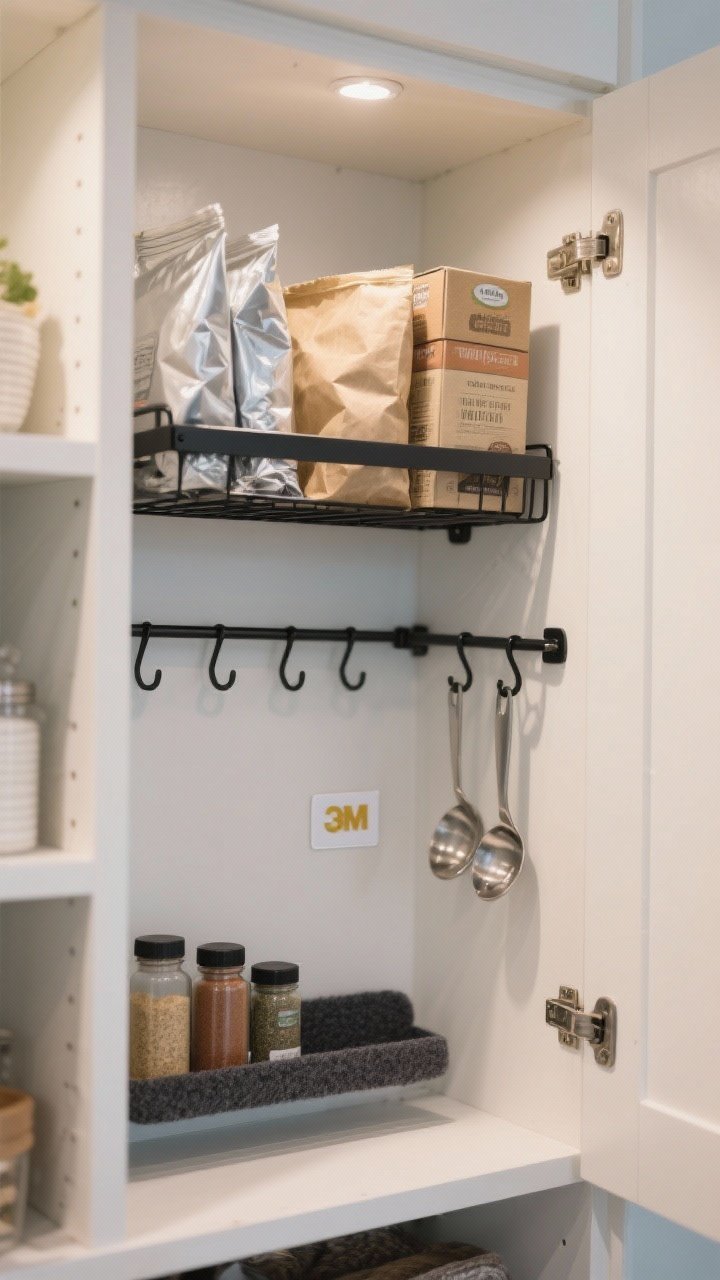
Cabinet doors are prime real estate. Use them. Door-mount racks are perfect for wraps, spices, or cleaning supplies—and they keep essentials off your shelves.
Transform Your Home With 7,250+ Stunning Landscaping Designs—No Expensive Designers Needed!
- 🌿 Access 7,250+ stunning landscaping designs.
- 💰 Save thousands—no pro designer needed.
- 🏡 Plans for gardens, patios, walkways, and more.
- ✨ Simple, beginner-friendly DIY layouts.
- 🛠️ Customize any design to fit your yard.
Where to Use Them
- Under-sink cabinet: store sponges, gloves, cleaning sprays
- Pantry cabinet: wraps, foil, zip-top bags
- Upper doors: slim spice racks or measuring spoon hooks
Pro Tips
- Measure for shelf clearance so the door still closes—FYI, 3 inches is often the max depth.
- Use 3M hooks or small bars for lightweight tools if you’re avoiding screws.
- Stick felt bumpers behind metal racks to prevent door dings.

6. File Your Pots and Pans With Lid Organizers

Here’s the chaos culprit: pan lids. They slide, they clatter, they vanish. Tame them with lid organizers that file everything upright so you can actually reach the pan you want.
Set It Up
- Use a deep drawer with a file-style rack for lids on one side, pans on the other.
- In cabinets, pair a lid rack with a roll-out tray for full access.
- Or go vertical: a door-mounted lid holder works shockingly well for pot sets.
Quick Wins
- Match materials—glass with glass, metal with metal—to avoid scratches.
- Store most-used lids front and center; seasonal or specialty lids go in the back.
- Don’t hoard: donate the 14-inch wok lid if the wok left in 2019.
7. Use Clear Bins to Create “Drawers” in Shelves
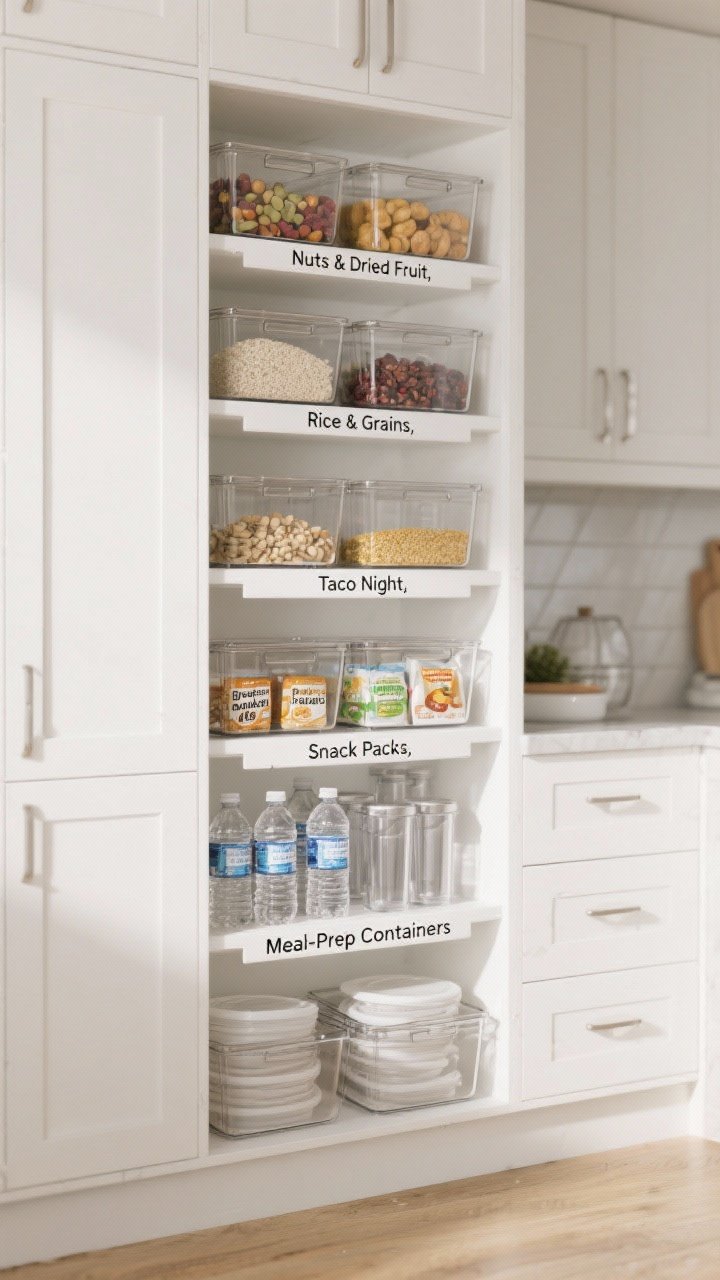
No drawers? No problem. Clear bins act like slide-out baskets without any screws or swearing. They’re amazing for deep pantry-style cabinets where things disappear.
What to Corral
- Snack packs, baking supplies, breakfast packets
- Water bottles and tumblers (divide by size)
- Meal-prep containers and lids (separate bins—trust me)
How to Label
- Use bold, high-contrast labels on the front—white on clear looks polished.
- Label by category, not brand: “Nuts & Dried Fruit,” “Rice & Grains,” “Taco Night.”
- Go stackable only if you can reach both levels—no “bin Tetris” during dinner rush.
8. Install a Hidden Toe-Kick Drawer (Sneaky Storage Alert)

That little strip under your base cabinets? It can be a drawer. Toe-kick drawers are shallow but long, and they’re perfect for the awkward stuff you rarely know where to put.
What Fits Best
- Sheet pans, cooling racks, pizza stones
- Placemats, serving trays, extra cutting boards
- Kid art supplies or pet placemats—low and out of the way
Good to Know
- These need a bit of handy work or a pro install; they ride on long slides.
- Add a toe-kick push latch so the front stays clean—no handles needed.
- Use liners to protect delicate items like baking stones.
9. Turn a Cabinet Into a Mini Appliance Garage

Small appliances eat counter space like it’s their job. Create an appliance garage in a base or upper cabinet and keep them dust-free but accessible.
Design Options
- Upper cabinet with a lift-up door and outlet inside for the coffee station
- Base cabinet with a roll-out shelf for mixers, blenders, or air fryers
- Corner cabinet with a lazy Susan for small appliances you use weekly
Safety + Convenience
- Add a surge-protected outlet inside—no cords hanging out.
- Corral attachments in a labeled bin so you’re not hunting for the dough hook.
- Place near the right zone: coffee gear by the sink, blender near the fridge, etc.
10. Upgrade Interiors With Lighting and Slim Liners
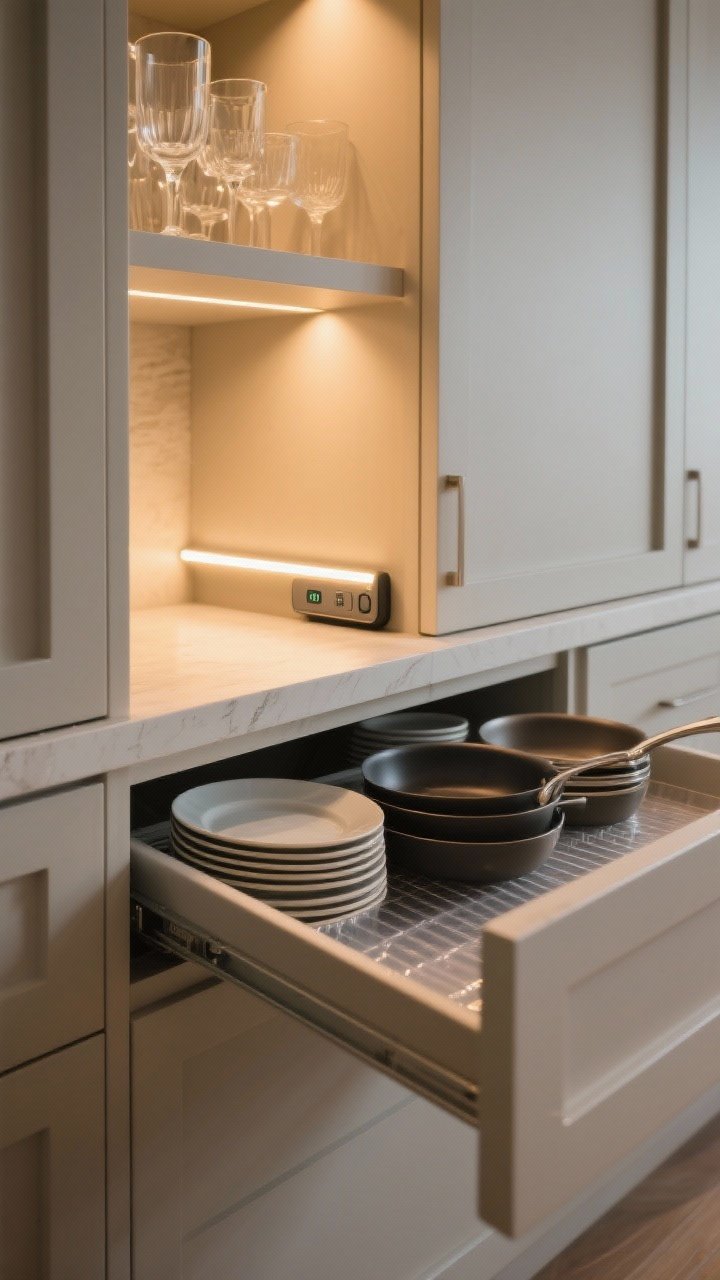
Want your cabinets to feel high-end instantly? Add cabinet lighting and drawer liners. It’s like giving your storage a glow-up—literally.
Lighting Ideas
- Motion-activated puck or strip lights inside deep base cabinets
- Rechargeable LED bars under shelves for glassware or spice cabinets
- Warm color temperature (2700–3000K) for a cozy, cohesive look
Liner Tips
- Use thin, non-slip liners to keep dishes and pans steady.
- Choose clear or neutral tones so cabinets feel airy, not busy.
- Cut liners to fit cleanly—no curling corners catching dishware.
Bonus Organizing Rhythm (Because Systems > Stuff)
- Zone by task: prep, cooking, baking, beverage, snacks, cleaning.
- Contain like with like using bins and dividers.
- Label just enough that anyone can put things back correctly—IMO, this is the secret sauce.
Final Take: You don’t need a full reno to have a designer-level kitchen. Pick two or three upgrades—roll-outs, door racks, and clear bins are an easy starter pack—and watch your cabinets transform. Your future self, cooking on a weeknight, will want to hug you. FYI: the cumin goes in the pull-out. Always.