
10 Kitchen Storage Ideas That Make Meal Prep Faster (and Way Less Chaotic)
You know that moment when you’re halfway through cooking and the cumin is hiding behind the birthday candles? Yeah, we’re done with that. These clever storage ideas don’t just look cute—they shave serious minutes off your meal prep, so dinner happens faster and without the scavenger hunt.
1. Zone Your Kitchen Like a Grocery Store
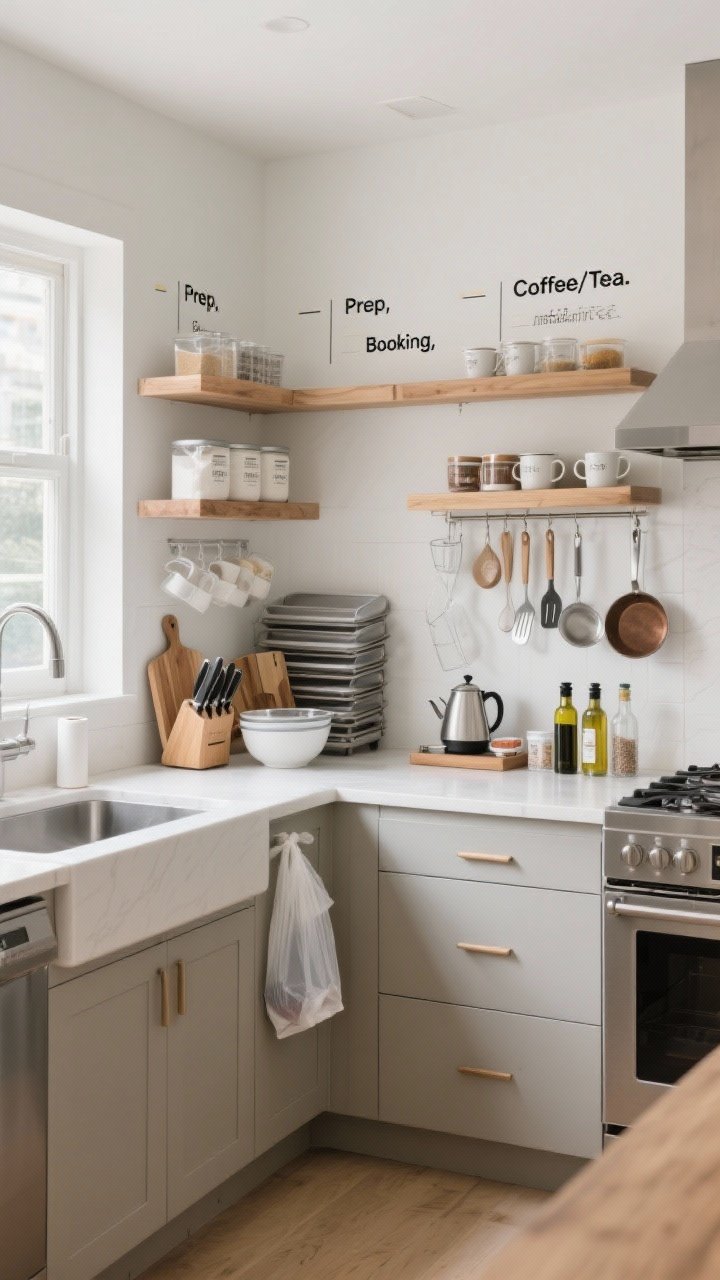
Your future self will thank you for this. Think in zones: prep, cook, bake, coffee, snacks. When everything lives where you use it, you stop doing laps around the kitchen like it’s cardio hour.
Tired of snacking when you’re not even hungry? This reset helps you stop the loop and feel back in control.
A simple reset for moments when cravings take over. Easy to use, easy to repeat, and designed to help you feel satisfied instead of stuck.
Set Up Smart Zones
- Prep Zone: Cutting boards, knives, mixing bowls, and trash bags near the sink and counter.
- Cooking Zone: Oils, salt, spices, spatulas, and pans near the stove.
- Baking Zone: Measuring cups, flour, sugar, and sheet pans grouped together.
- Coffee/Tea Station: Mugs, pods, kettle, sweeteners all in one spot.
Label shelves and drawers so everyone puts things back where they belong. It’s not bossy—it’s efficient.
2. Use Pull-Outs So Nothing Gets Lost in the Abyss
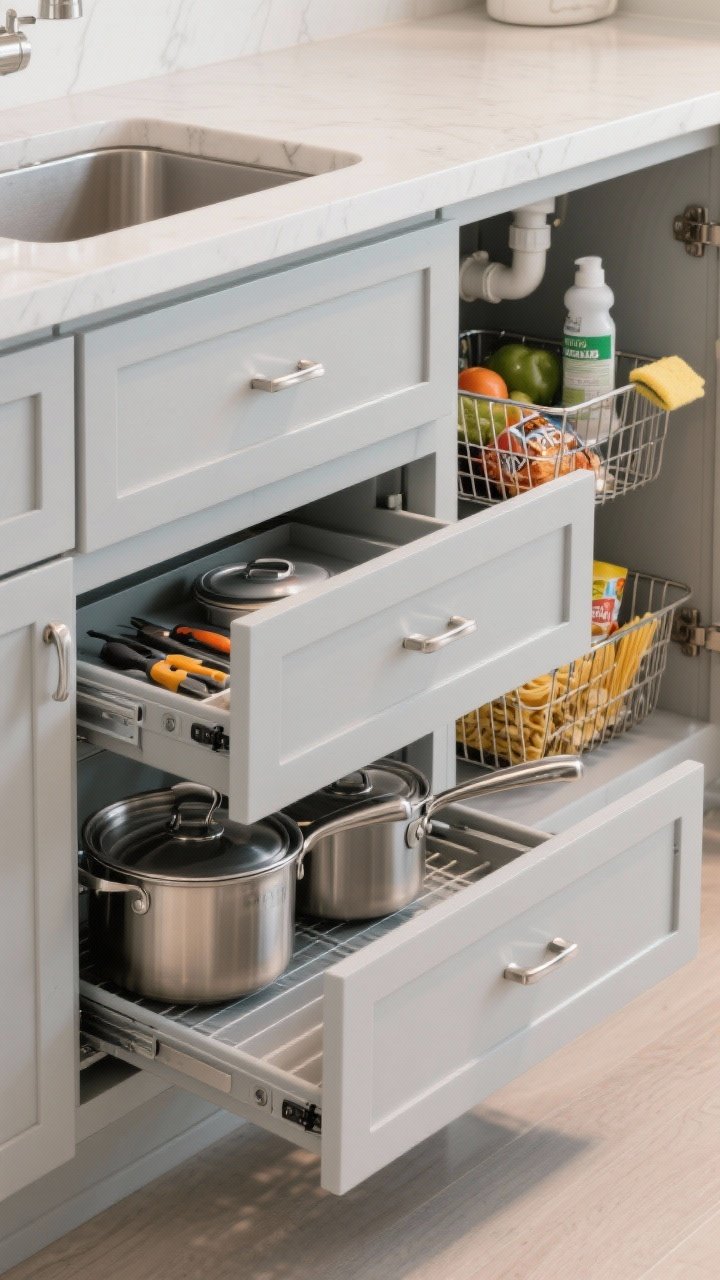
Back-of-the-cabinet items are basically in Narnia. Install pull-out shelves and roll-out trays so everything slides out to meet you. No crouching, no rummaging, no “where did the balsamic go?”
Where Pull-Outs Shine
- Base Cabinets: Use two-tier pull-outs for pots and lids. Add a shallow top tier for small tools.
- Under the Sink: A U-shaped pull-out wraps around plumbing—perfect for cleaners and sponges.
- Pantry: Pull-out baskets for produce, snacks, and pasta keep categories tidy.
FYI: If full custom isn’t in the budget, look for retrofit pull-out baskets that screw into existing shelves. Easy win.
3. Decant Dry Goods Like a Pro (Yes, Labels Matter)

Want to chop minutes off cooking? See what you have at a glance. Decant staples—rice, oats, flour, nuts—into clear, airtight containers with clear labels. No more opening five bags to find the quinoa.
Transform Your Home With 7,250+ Stunning Landscaping Designs—No Expensive Designers Needed!
- 🌿 Access 7,250+ stunning landscaping designs.
- 💰 Save thousands—no pro designer needed.
- 🏡 Plans for gardens, patios, walkways, and more.
- ✨ Simple, beginner-friendly DIY layouts.
- 🛠️ Customize any design to fit your yard.
Make It Functional
- Use uniform containers: They stack cleanly and maximize vertical space.
- Label fronts and lids: So you can identify from any angle.
- Date it: Add a tiny sticker with “opened” or “best by” dates.
Pro tip: Keep a decanting bin for refills—funnels, extra labels, marker—and stash it in the pantry.
4. Put Frequently Used Spices in a Drawer—Alphabetized
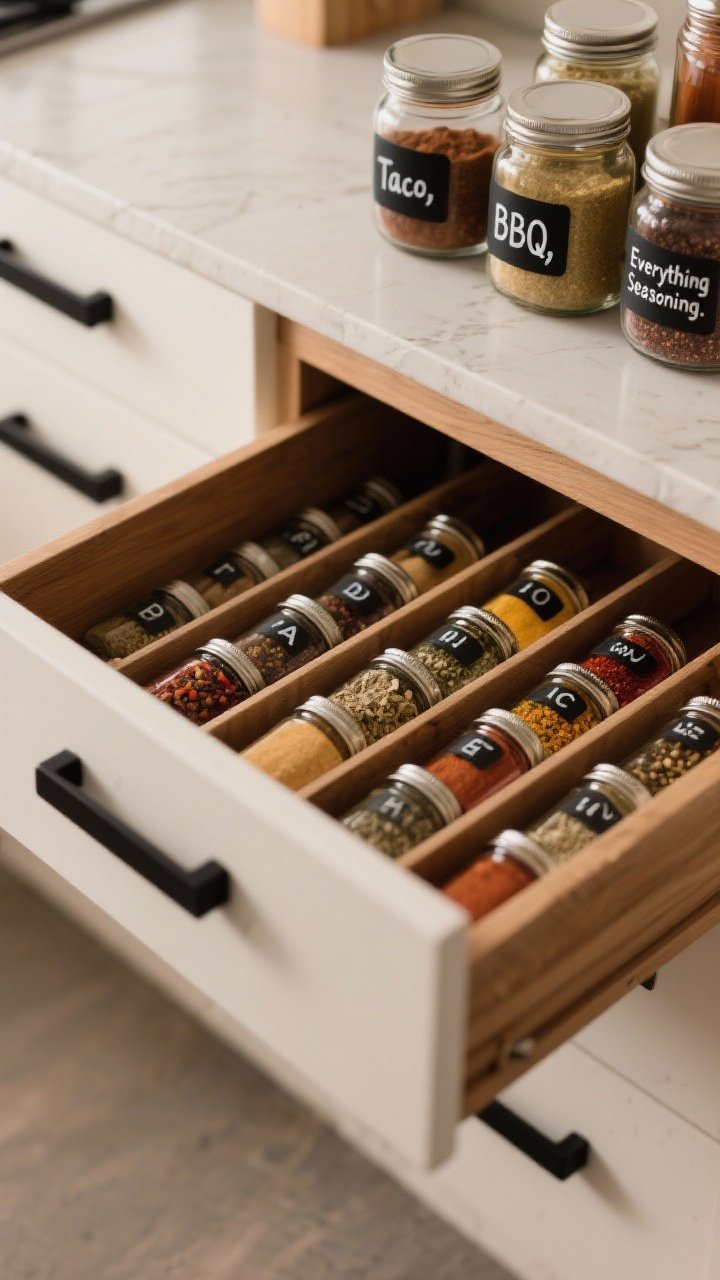
Countertop spice racks are cute until you have 30 jars. A shallow spice drawer with angled inserts keeps labels facing up and your most-used spices immediately accessible. Alphabetize them and watch your prep time drop.
Quick Spice Wins
- Edit duplicates: Combine partial jars and ditch stale blends.
- Keep heat-sensitive spices away from the stove: Put backups in the pantry.
- Pre-mix your top blends: Taco, BBQ, everything seasoning—store in larger jars.
If drawers are tight, try a pull-out spice rack in a narrow cabinet or a magnetic rack inside a pantry door.
5. Tame Pots, Pans, and Lids with Vertical Dividers
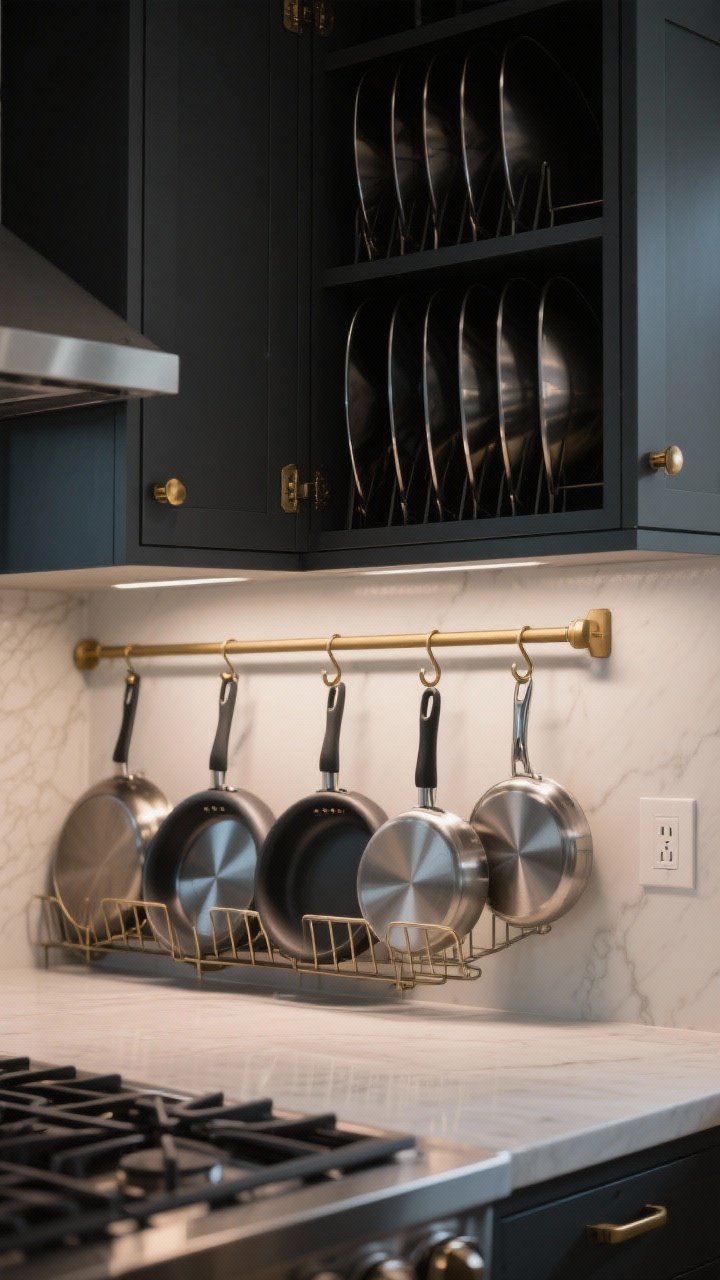
Stacked pans are a mess. Go vertical with adjustable dividers so each piece has parking. Slide out the one you need without a clang-y tower collapse situation.
How to Set It Up
- Divide by category: Frying pans together, saucepans together.
- Lid file: Use a bakeware rack to stand lids upright, or a lid organizer on the door.
- Heavy hitters close by: Keep your top three pans in the front row.
Bonus: A rail with S-hooks for daily-use pans makes grabbability elite. Just keep it near the stove, not across the room.

6. Max Your Doors: Inside, Outside, Everywhere

Cabinet doors are prime real estate. Use over-the-door racks, command hooks, and slim shelves for tools, wraps, lids, and cleaning gear. It’s like adding extra cabinets without remodeling.
Door Storage Ideas
- Inside Pantry Door: Rack for foil, parchment, zip bags, and snacks.
- Under-Sink Door: Hook for gloves and towels; slim bin for dishwasher pods.
- Upper Cabinet Door: Narrow spice shelves or measuring spoons on hooks.
Just measure depth so the door still closes. Ask me how I know.
7. Create a “Prep Tray” and “Cooking Caddy”

Portable storage is sneaky powerful. A prep tray and a cooking caddy keep your MVPs traveling with you, so you don’t stop mid-chop to play hide-and-seek with the olive oil.
What to Stock
- Prep Tray: Salt cellar, pepper grinder, garlic keeper, olive oil, vinegar, microplane, tasting spoons.
- Cooking Caddy: Tongs, spatulas, wooden spoons, fish spatula, thermometer, silicone whisk.
- Baking Bin (optional): Measuring cups/spoons, bench scraper, pastry brush, parchment sheets.
Choose trays with raised edges to catch drips and crumbs. Clean-up becomes one trip, not twelve.
8. File Your Cutting Boards, Sheets, and Trays Upright
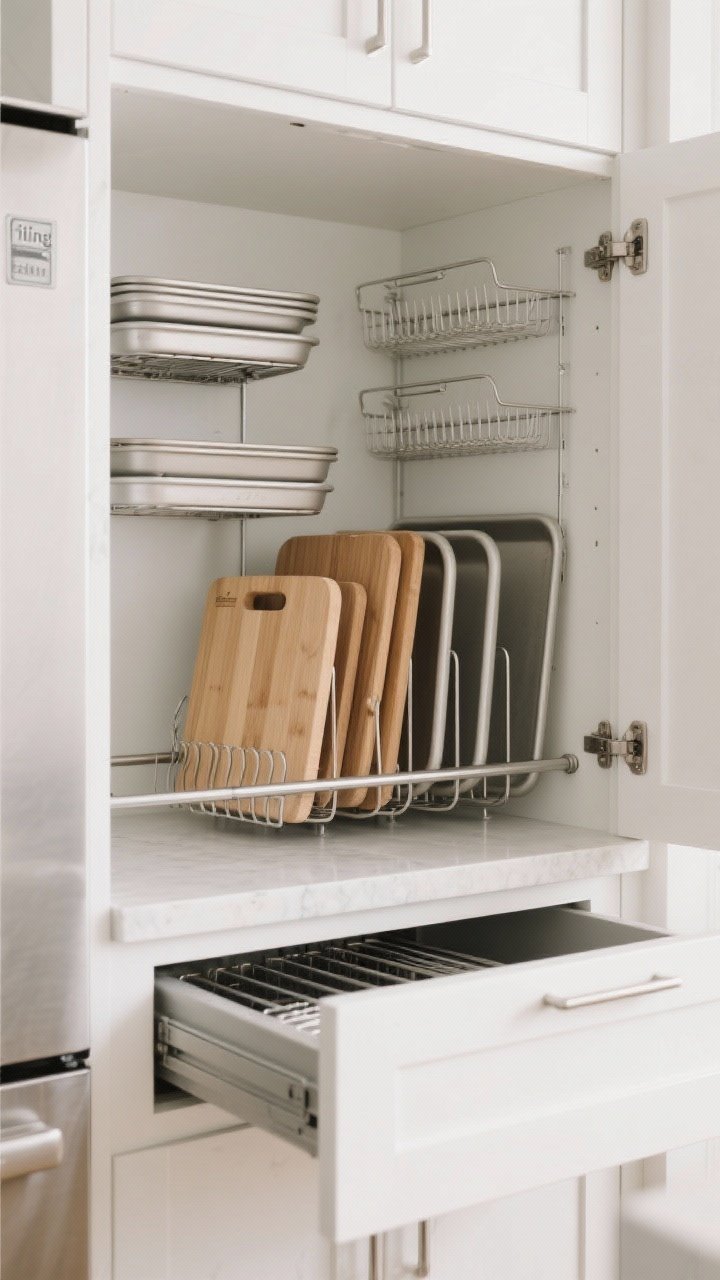
Stop stacking and start filing. Use vertical bakeware organizers in a cabinet or drawer so you can slide out just one board or sheet pan. No more bottom-of-the-stack acrobatics.
Where This Works Best
- Lower Cabinets: Add a tension rod or two to create quick dividers.
- Drawer Option: Deep drawers with metal dividers are a dream for sheets and cooling racks.
- Slot by size: Group half sheets, quarter sheets, and boards separately.
And keep one grab-and-go cutting board in your prep zone so you’re not searching when hanger strikes.
9. Use Lazy Susans Everywhere (Not Just for Condiments)

Turntables are the unsung heroes of corners and top shelves. Put a lazy Susan anywhere you’re tired of reaching behind stuff and guessing. Spin, grab, done.
Where to Spin
- Corner Cabinets: Oils, vinegars, sauces—grouped by cuisine or use.
- Fridge: Jars and condiments so “mystery jars” stop multiplying in the back.
- Pantry Top Shelves: Baking extracts, nut butters, honey, and syrup.
Go for rimmed, non-slip versions so nothing flies off during a vigorous spin. IMO, clear ones make scanning faster.
10. Give Every Drawer a Job (With Dividers That Stick)
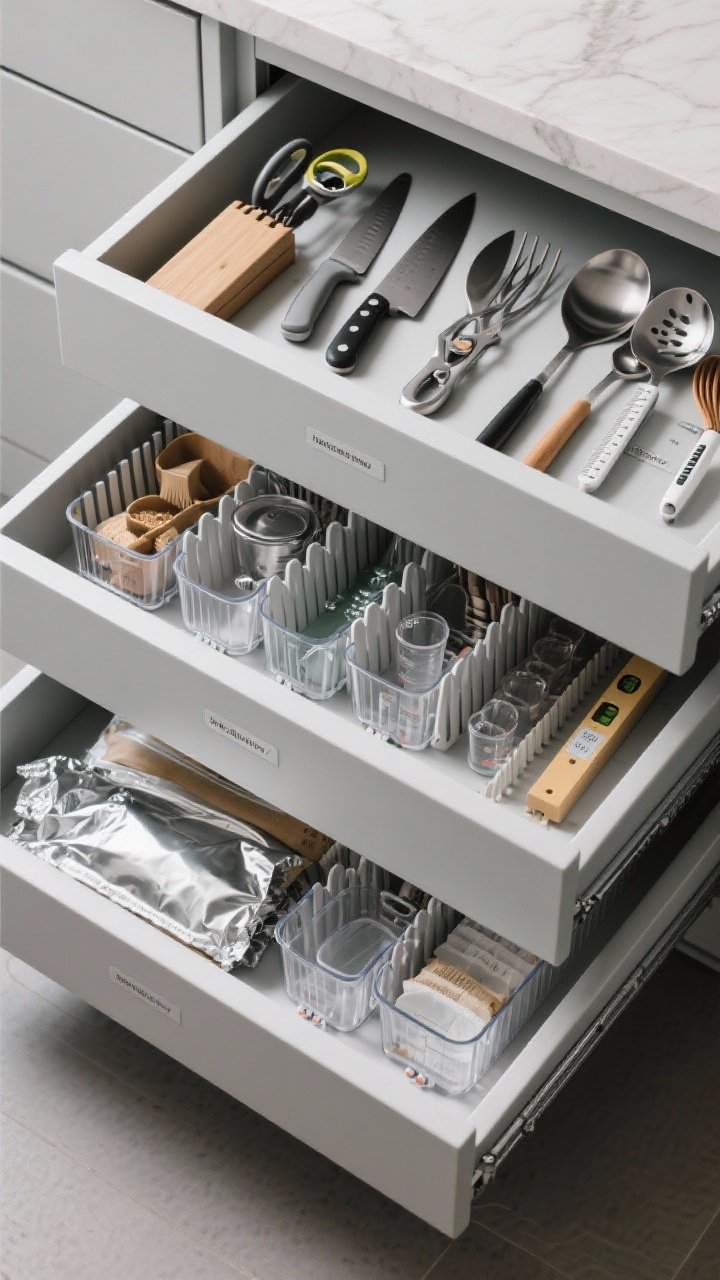
Random stuff drawers are chaos traps. Assign each drawer a role and add modular dividers or adjustable inserts so everything has a lane. The goal: grab the tool in two seconds flat.
Drawer Map Ideas
- Top Prep Drawer: Knives (in-drawer block), peeler, can opener, shears, bench scraper.
- Cooking Tools Drawer: Tongs, spatulas, ladles, probe thermometer, instant-read thermometer.
- Measure Drawer: Dry and liquid measuring tools, leveler, small funnels.
- Wraps and Bags Drawer: Foil, parchment, zip bags—use file-style holders to stand boxes up.
Use drawer organizers with grippy feet so nothing slides around. Clear bins = instant visual inventory, FYI.
Bonus Speed Hacks to Layer In
- Label everything: Shelves, bins, and drawers. Especially helpful for roommates, kids, and forgetful future you.
- Duplicate the essentials: Keep a second cutting board and knife if you meal prep often.
- Prep bin in the fridge: One clear bin for “cook first” produce and proteins.
- Night-before setup: Pull spices and tools into your prep tray so you start fast tomorrow.
Small storage upgrades add up. A few pull-outs here, a lazy Susan there, and suddenly you’re shaving 10–15 minutes off dinner without even trying. Your kitchen can look good and work hard—no more choose-your-own-chaos.
You’ve got this. Organize once, cook faster forever. And if your cumin still goes missing? It’s behind the nutmeg. Always is.


