Early Spring Seed Starting Guide That Actually Works
Spring is peeking over the horizon, and your seed packets are side-eyeing you from the drawer. Ready to turn those tiny specks into a jungle of tomatoes, herbs, and blooms? Let’s skip the guesswork and get your seedlings off to a strong start with simple steps that actually work. Fewer mistakes, more sprouts—deal?
Know Your Timing (And Don’t Get Cocky)
Starting early helps, but starting too early? That’s how you end up babysitting leggy, miserable plants for weeks. Check your average last frost date and count backward using each seed’s recommended indoor start time. Most veggies want 4–8 weeks indoors before transplant.
Tired of snacking when you’re not even hungry? This reset helps you stop the loop and feel back in control.
A simple reset for moments when cravings take over. Easy to use, easy to repeat, and designed to help you feel satisfied instead of stuck.
What To Start Early vs. Direct Sow
- Start Indoors: Tomatoes, peppers, eggplants, broccoli, cabbage, kale, onions, leeks, many herbs (basil, parsley), flowers like snapdragons.
- Direct Sow (Later): Carrots, beets, radishes, peas, beans, squash, cucumbers, sunflowers.
- Edge Cases: Lettuce and spinach can start indoors or direct sow—do what fits your schedule.
Gear You Actually Need (And What’s Overhyped)
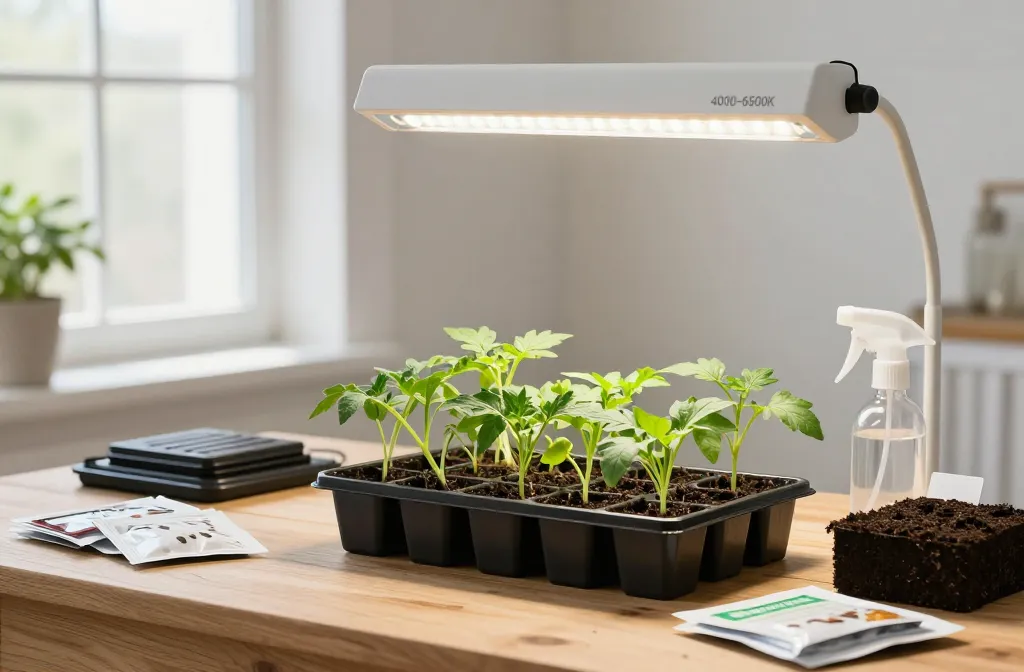
You don’t need a mini NASA lab. You need consistent light, gentle warmth, and a clean start.
The Essentials
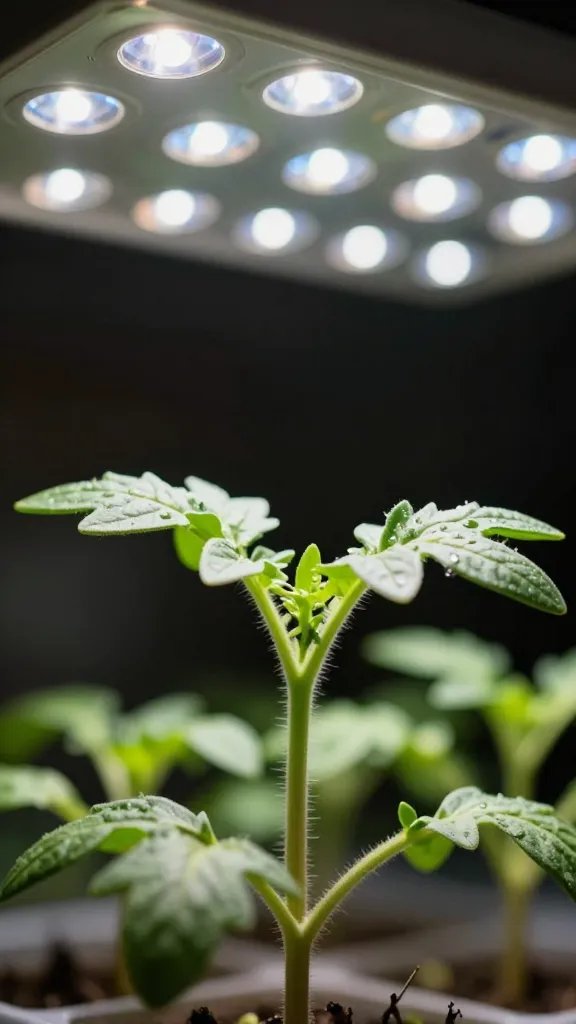
- Lights: A basic LED shop light (full-spectrum 4000–6500K) hung 2–4 inches above seedlings beats a sunny window, FYI.
- Containers: Cell trays, soil blocks, or repurposed yogurt cups with drainage holes. Trays with humidity domes help early on.
- Seed-Starting Mix: Fine-textured, sterile, and soilless. Don’t use heavy garden soil unless you enjoy fungus drama.
- Heat Mat: Optional but clutch for peppers, tomatoes, and eggplants. Speeds germination and boosts success.
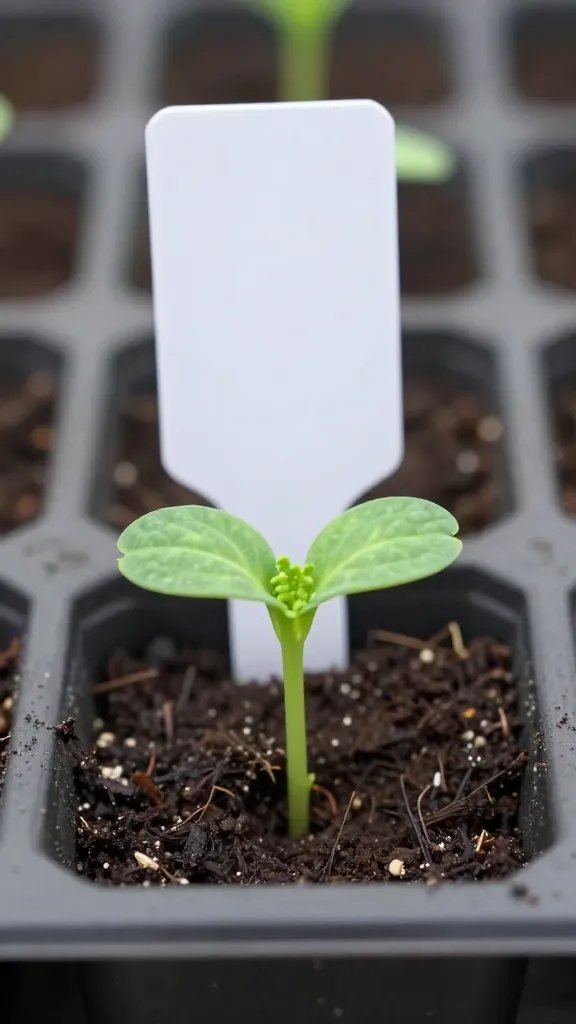
- Labels: Because “mystery plant #3” never ends well.
Nice-To-Haves (But Not Vital)
- Fan: A tiny fan for airflow toughens seedlings and helps prevent mold.
- Moisture Meter: Your finger works, IMO. But meters are handy if you love gadgets.
- Grow Tent: Useful for heat and humidity control, but overkill for most beginners.
Set Up Your Seed-Starting Station
Keep it simple. Put your trays where you can check them daily—near an outlet, away from cold drafts. Hang lights on chains or zip ties so you can adjust the height as plants grow.
Mix, Fill, and Sow
- Pre-moisten your seed-starting mix. Aim for “wrung-out sponge,” not wet cement.
- Fill cells and level gently. Don’t pack it tight.
- Sow shallow: General rule = plant seeds 2–3 times their width. Tiny seeds like basil barely need covering.
- Mist to settle. Cover with a humidity dome or plastic wrap until germination.
Heat and Light
- Use a heat mat for warm lovers (peppers, tomatoes). Remove it after germination.
- Run lights 14–16 hours daily. Keep them close so seedlings stay compact, not leggy.
Watering Without Drowning (Or Deserting)
Overwatering kills more seedlings than your cat ever will. Bottom watering works best: pour water into the tray, let cells soak for 15–20 minutes, then drain excess. Top mist only for just-sown seeds or very tiny seedlings.
Humidity, Airflow, and Damping-Off
- Remove humidity domes the second you see sprouts.
- Run a small fan on low to encourage sturdy stems.
- If you spot fuzzy white mold or collapsed stems, back off on water and boost airflow fast.
Feeding Seedlings (Gently, Please)
Seedlings don’t need food right away; seeds come with snacks. After they grow their first true leaves (the second set), feed every 1–2 weeks.
Transform Your Home With 7,250+ Stunning Landscaping Designs—No Expensive Designers Needed!
- 🌿 Access 7,250+ stunning landscaping designs.
- 💰 Save thousands—no pro designer needed.
- 🏡 Plans for gardens, patios, walkways, and more.
- ✨ Simple, beginner-friendly DIY layouts.
- 🛠️ Customize any design to fit your yard.
Fertilizer Basics
- Use a diluted, balanced liquid fertilizer (like 1/4–1/2 strength).
- Fish/seaweed blends or gentle organic feeds work great.
- If leaves yellow or growth stalls, slightly bump the strength—don’t leap to full power.

Potting Up: Give Them Room To Flex
If roots fill the cells or growth slows, move seedlings into 3–4 inch pots. Handle by the leaves, not the stems. Bury leggy tomato stems deeper (they’ll grow roots along the buried section), but don’t do this with peppers or brassicas.
Soil and Spacing
- Use a high-quality potting mix (not garden soil).
- Leave a little headspace for watering.
- Keep lights close after potting up. Plants stretch when you slack off.
Hardening Off: The Make-Or-Break Week
Hardening off teaches your tender indoor plants to handle sun, wind, and cooler temps. Yes, it’s annoying. Yes, it matters.
7-Day Hardening Plan
- Day 1–2: 1–2 hours outdoors in bright shade. Bring them in.
- Day 3–4: 3–4 hours, add gentle morning sun.
- Day 5–6: 5–6 hours, some midday light if it’s mild.
- Day 7: Full day outside. If nights stay above your crop’s comfort zone, you can leave them out.
Skip windy days and heat waves. If leaves scorch, dial back and try again.
Transplant Like A Pro
Pick a cloudy day or late afternoon to reduce shock. Water seedlings well before transplanting. In the garden, plant at the same depth (except tomatoes, which can go deeper), firm soil gently, and water again to settle.
Bonus Moves
- Mulch with straw or shredded leaves to hold moisture and block weeds.
- Row cover protects early transplants from chill and pests.
- Label your rows so you remember where the basil ends and the weeds begin.
Common Mistakes (And Easy Fixes)
- Leggy seedlings: Move lights closer and reduce heat after germination.
- Slow germination: Use a heat mat for warmth-loving crops; be patient with peppers.
- Overwatering: Bottom water, then let the mix dry slightly before the next drink.
- Underfeeding: Start gentle fertilizer after true leaves appear.
- Skipping hardening off: Don’t. Sunburned seedlings look tragic and stall for weeks.
FAQ
Do I really need grow lights, or can I use a window?
A bright south-facing window can work for greens and herbs, but most seedlings stretch and weaken without strong, close light. Budget LED shop lights crush it for cheap. Keep them a few inches above the canopy, and you’ll see sturdier, darker leaves.
How warm should I keep my seeds and seedlings?
For germination, most veggies like 70–80°F. After sprouting, 60–70°F keeps growth compact and healthy. Peppers and eggplants appreciate warmth longer, so don’t be shy about that heat mat early on.
Why do my seedlings fall over and die overnight?
That’s usually damping-off, a fungal issue triggered by excess moisture and poor airflow. Ditch the dome after sprouting, water from the bottom, add a fan, and sterilize trays before starting. Also, don’t sow too thickly—crowding invites problems.
When should I start tomatoes and peppers indoors?
Start tomatoes 6–8 weeks before your last frost date, and peppers 8–10 weeks before. Peppers take longer to germinate and size up, so earlier is better for them. Double-check your seed packet because varieties vary.
Do I need to fertilize if my mix says it’s “charged”?
Lightly charged mixes help early on, but that boost fades fast. Begin a diluted liquid feed once true leaves appear and continue every week or two. Watch the plants—rich green and steady growth mean you’re on track.
Can I reuse seed-starting mix?
I wouldn’t, IMO. Reusing mix risks carrying over pathogens and salt buildup. Compost the old stuff and start fresh for best results. Your seedlings will thank you by not keeling over.
Conclusion
Start with the right timing, give seedlings strong light and steady moisture, and harden them off like a boss. Keep your setup simple, your watering smart, and your expectations realistic. Do that, and early spring seed starting turns from “mystery and mayhem” into “wow, look at those tomatoes.” Ready to sow and glow?